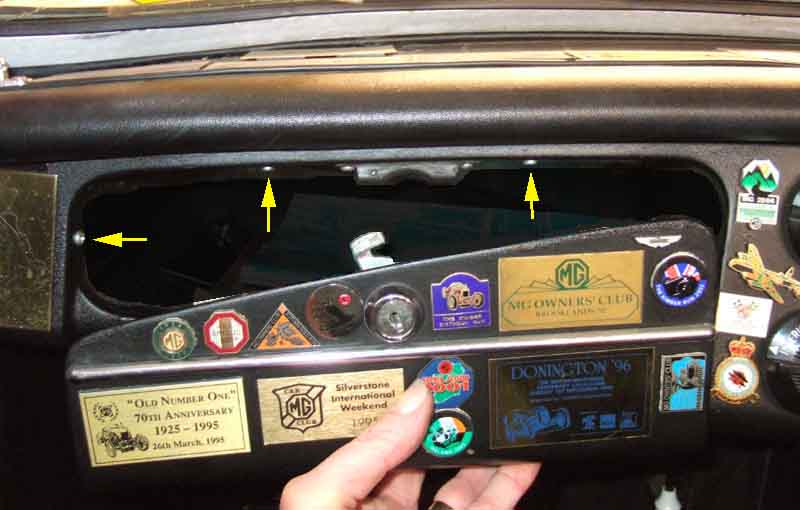
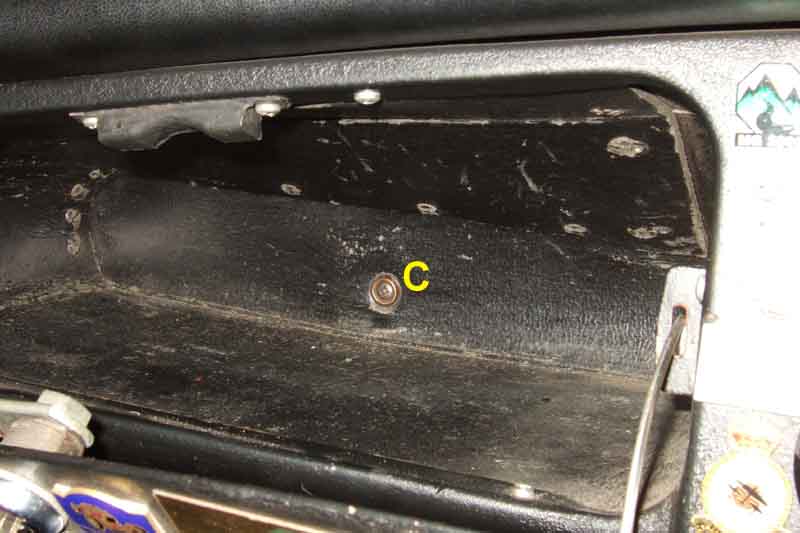
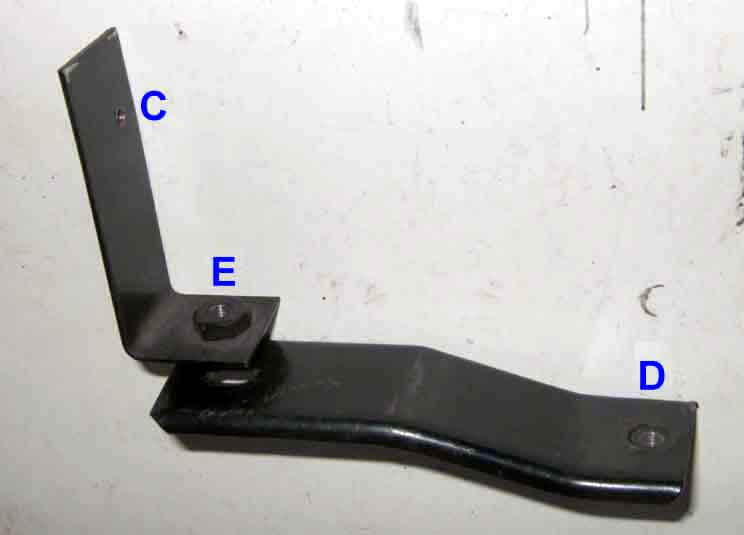
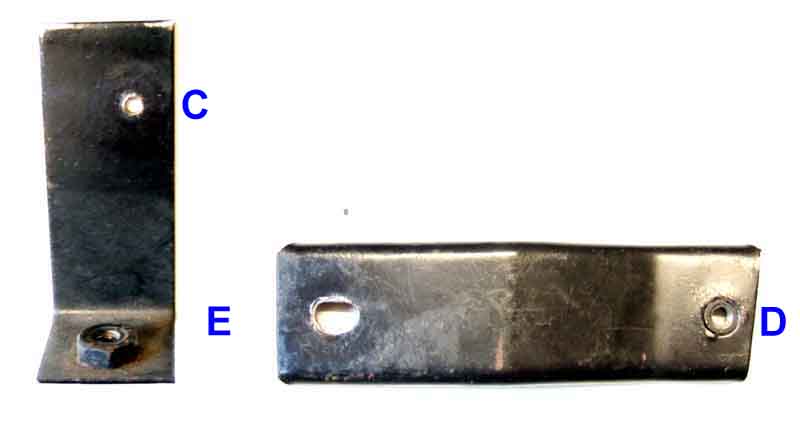
'C' is a sheet-metal screw and cup-washer go through the fibre-board 'box' into the rear (rear as in 'behind the glovebox') bracket:
'D' is where the lid hinge screw with lock-washer goes up through the dashboard flange into the welded nut of the lower bracket; 'E' is where a screw with lock-washer go up through the hole in the lower bracket, the hole in the bracket on the cross-brace, into the welded nut on the rear bracket:
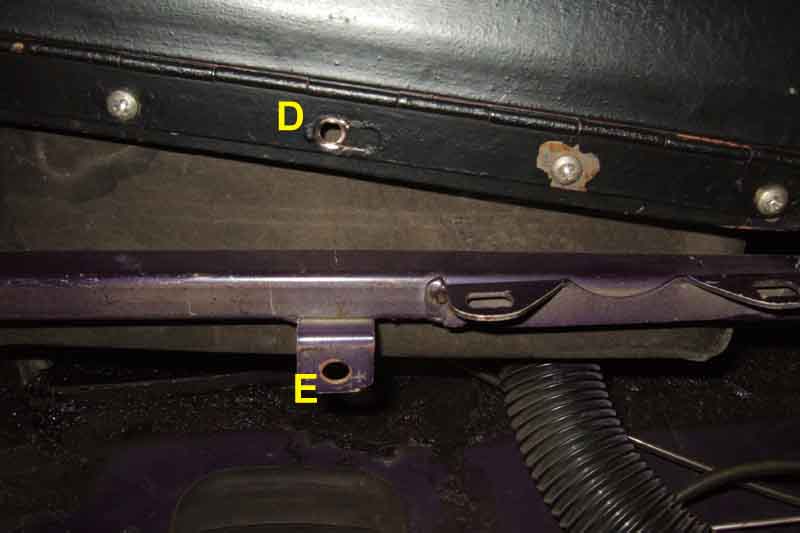
'C' is the hole for the sheet-metal screw through the back of the glovebox; 'D' is the welded nut in the lower bracket for the lid hinge screw. This nut is underneath the bracket to act as a spacer for the downward-facing flanges on the bracket because the bracket goes on top of the dashboard flange; 'E' is where the screw goes through the lower bracket and the cross-brace bracket into the welded nut on the rear bracket:
As above:
Lock problems:
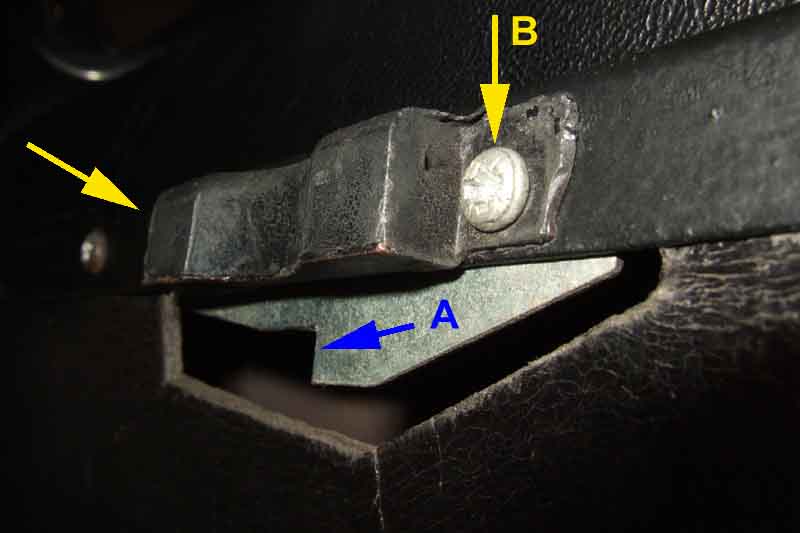
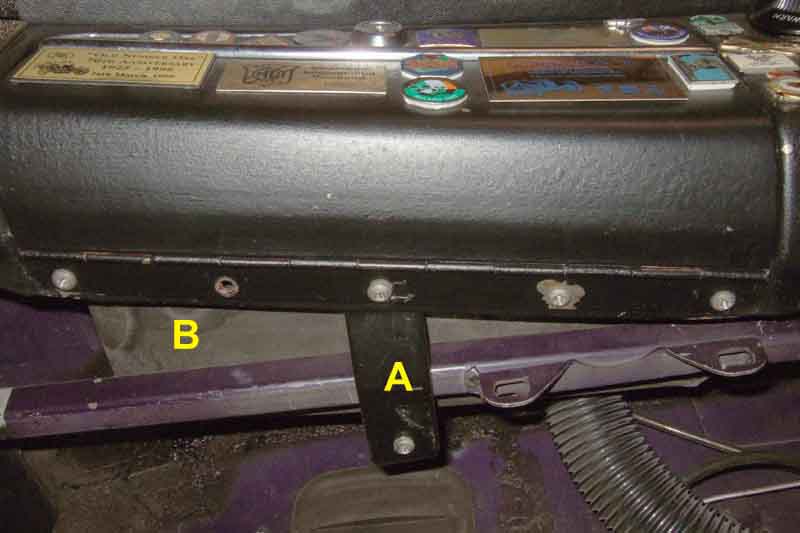
When refitting you may need to bias the lid to the left before fully tightening the screws, if it is too far to the right the tongue can't rotate clockwise far enough and the key may be difficult to remove and insert. But there isn't much scope for lateral movement, and although the original key worked OK a new one bought as a spare worked the lock OK with the lid open but it was a struggle to get the key out with it closed. This is because for some reason the striker plate 'A' has an edge that stops the lock tongue going past a certain point, even though the lock itself prevents it moving past a certain point anyway. I removed the rubber buffer and striker plate by undoing the two screws 'B' (the other one on the far side of the rubber buffer) and cut that stop edge back about 1/8" towards the point of the arrow, and now the key comes out easily:
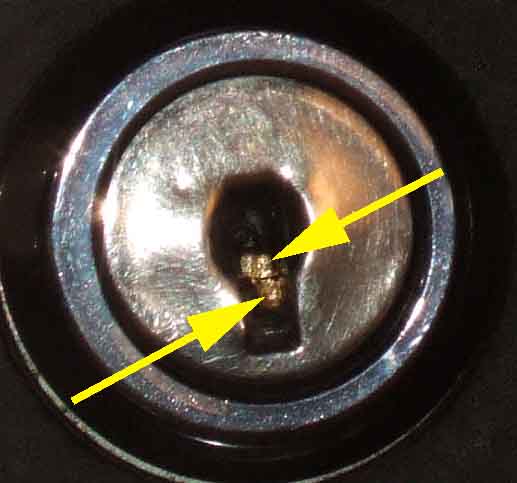
Plan B would be to pick the lock, before resorting to destroying either the lock or the fibre-board box. Whilst door and boot/hatch locks have five elements that much match between key and lock Bee's glovebox only has three, you can see two of the three arrowed here. The nearest element is set low with the key out, the second one is the same height so hidden behind the first, but the third one is higher so visible behind the first two:
Note that the five element door key can be used with the three element glovebox lock!
Manufacturing tolerances in cheap locks are such that if you apply some 'unlocking' force to the barrel, then depress each tumbler in turn with a pick, one of the tumblers will almost certain move to the correct position and the barrel rotate a fraction, which keeps that tumbler in the correct position. By keeping up the tension and depressing each tumbler again, another should move to the correct position and the barrel move a little more, and so on. If you apply too much force to the barrel the tumblers probably won't move, and if you don't apply enough they will probably spring back to the locked position. When all the tumblers have been aligned the barrel should turn fully.
I got a long panel-pin as a pick, and a small screwdriver, and by poking the panel pin in to depress the tumblers while applying a turning force to the barrel with the screwdriver, the lock came open in a couple of minutes. I have to say this was with the lock removed and held lightly in a vice as I didn't want to booger the lock while the lid was closed! Like that the barrel moved very easily, but when I subsequently tried it in-situ it was more difficult as with the lock engaged the back of the striker is pressing against the tongue which is angling the barrel in the lock body slightly, the lid has to be pressed closed to free it up. I did manage to get one of the barrels in the right place on one occasion (if you release the barrel you will see it click back up), and another on another occasion, but couldn't get all three in the time I was prepared to give it. Nevertheless, if I had to do it in anger I would persevere, having been able to do it on the bench.
How the keys are coded to the locks
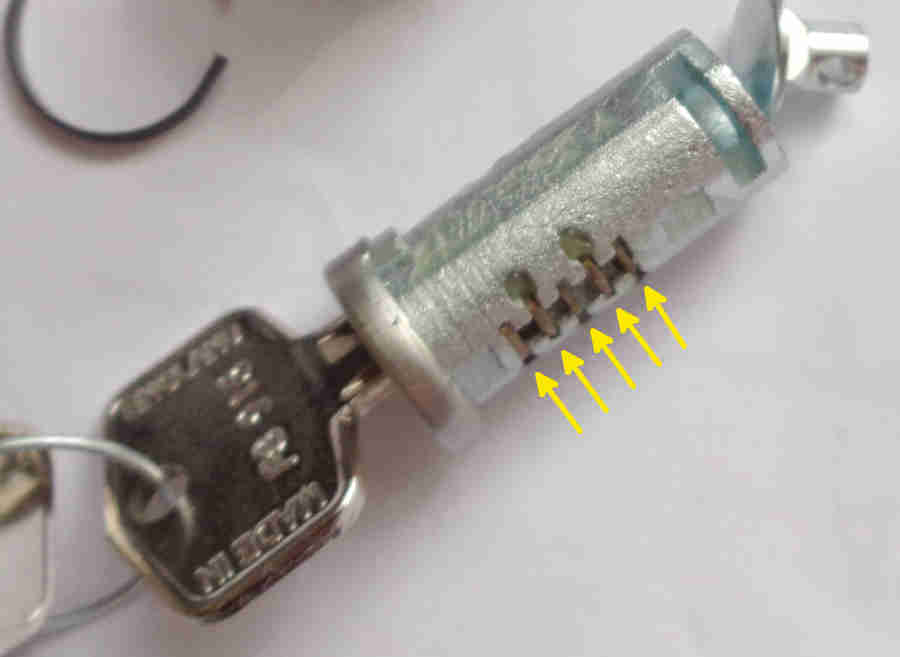
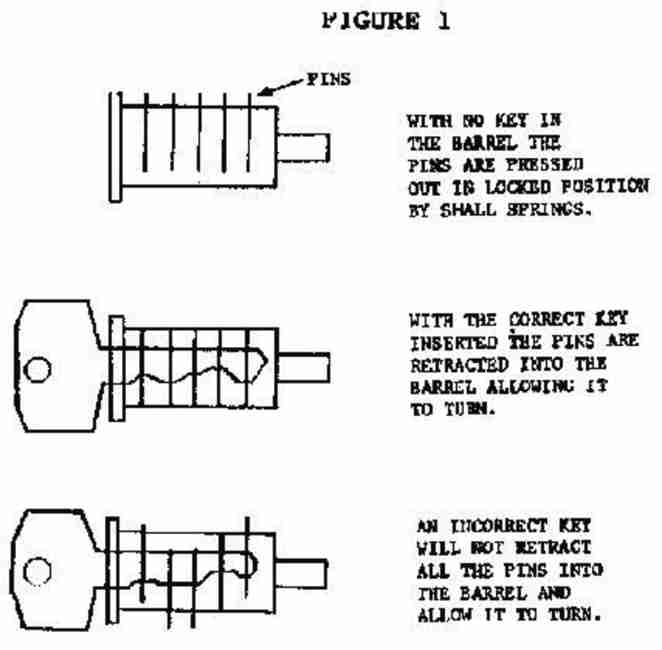
FS locks as used on many cars have five 'wafers' in the barrel positioned by five peaks on the key passing through cut-outs in the wafers. As the key is inserted the wafers move up and down according the the height of the peak on the key and the position of the cut-out in the wafer. Only when the peaks and the cut-outs line up are the wafers flush with both sides of the barrel, and the barrel can turn, or be removed as here:
The cut-outs can be in one of three (or five?) positions in the wafer - high, medium and low so there are three possible peaks on each key. When there is a mis-match in the peak and the cut-out the wafer is moved out from the barrel either one side or the other to engage in a slot in the lock body, preventing the barrel from turning: ('Sideways')
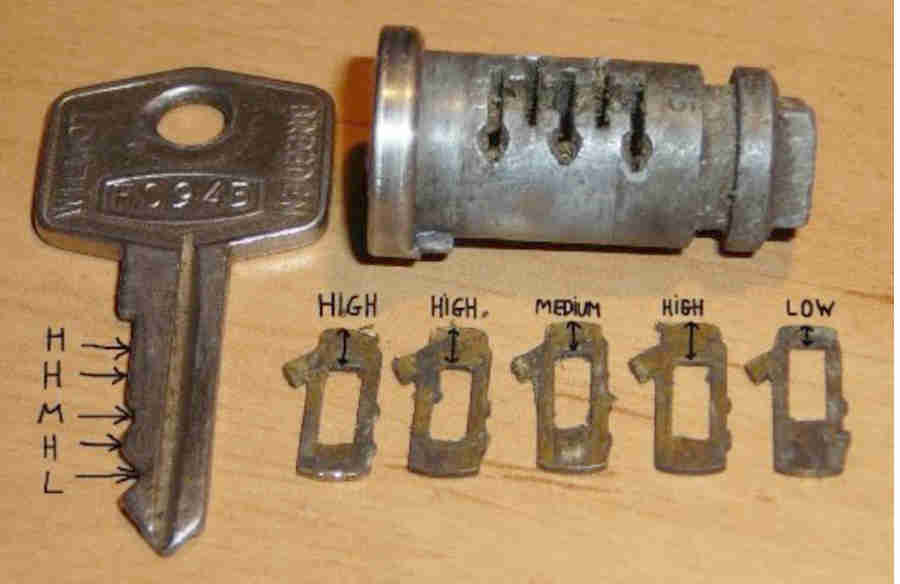
Showing three different peaks on the key and five wafers with cut-outs in one of three positions: ('Sideways')
See also this from Pete Groh the 'key guy'.
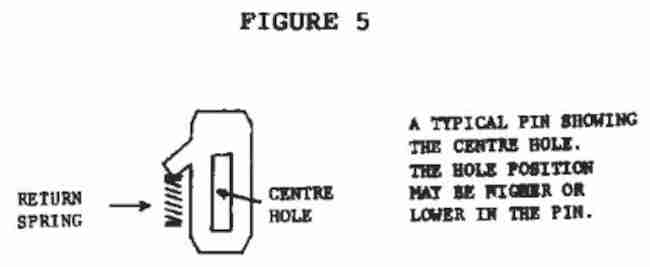
However going by an old lock of mine the peaks on the key interface with the bottoms of the holes not the top as implied above. The effect is the same though, on a new lock the holes would all be the same height and be in different positions in the wafers, so a high peak on the key would correspond to the hole being lower and hence a narrower gap to the bottom of the wafer:
On this old lock the outer three wafers had jammed and the key had enlarged the holes so they weren't doing anything anyway, only the inner pair, and the inner-most on was only partially moving.