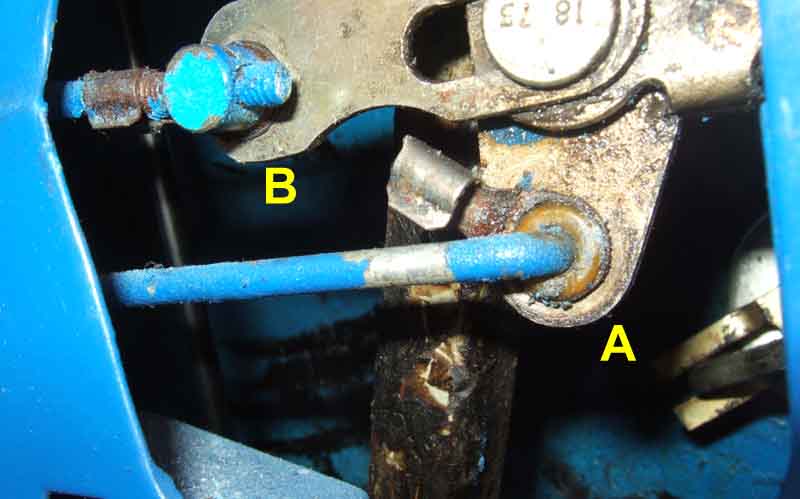
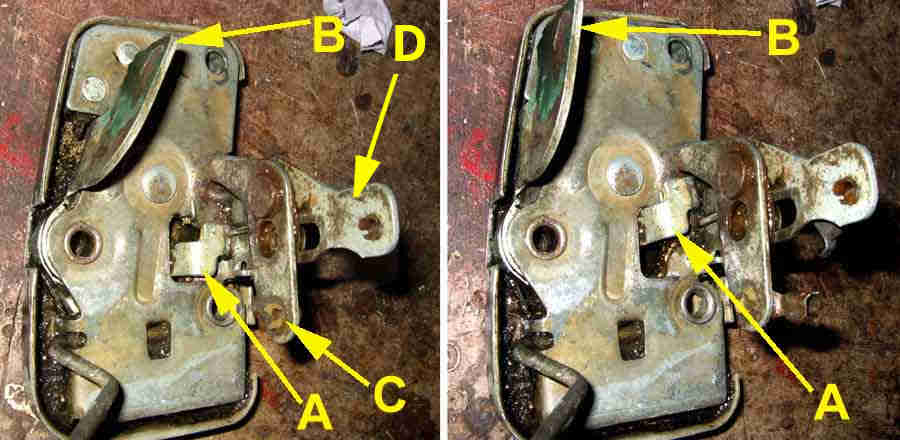
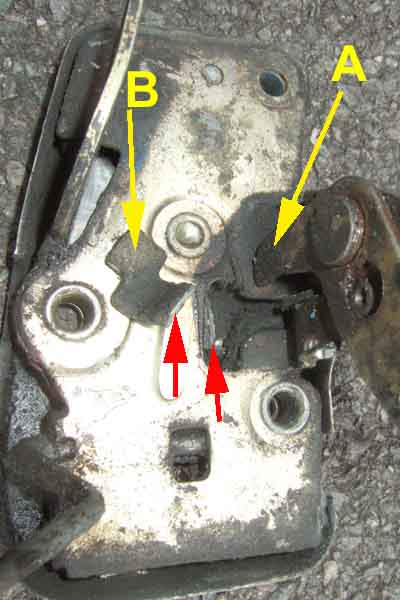
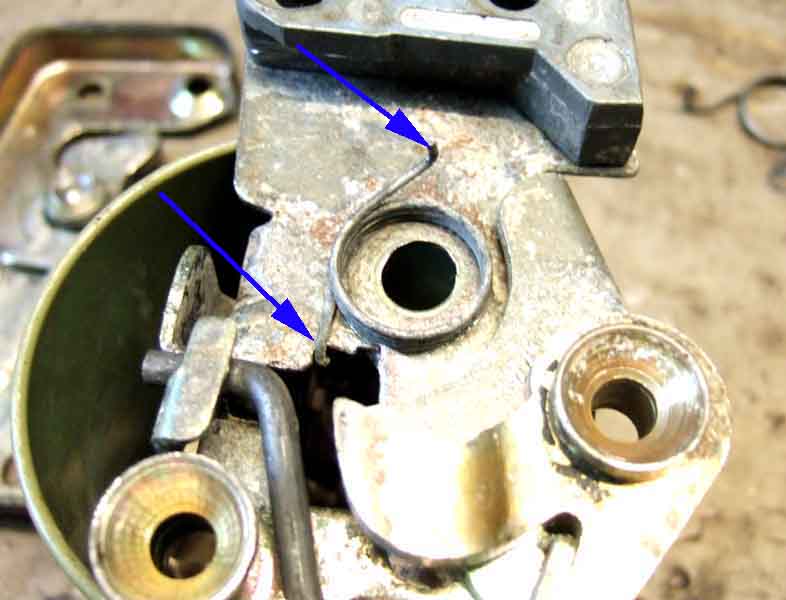
'A' is the 'door opener' pivot operated by the large flap inside cabin, and 'B' is the locking component that slides back and fore under the control of the smaller internal lever. The 'opener' rod has a right-angle bend at the end that fits in a nylon socket on the pivoting lever, it is retained by a spring clip shown in the 'unclipped' position. The locking rod has a component threaded onto the end which has a right-angle pin to slot into a similar nylon socket on the nylon latch, also retained by a spring-clip this time shown in the fastened position. The threading allows the length of the locking rod to be set to ensure that the latch is cleanly locked and unlocked at each end of the travel of the internal lever. There is no adjustment for the 'opener' rod:
The locking rod 'A' from the latch sitting in the slot in the key-lock lever, near the end to get adequate travel. 'B' is the external button, 'C' is the latch lever the button bears against to open the door (door is open):

See here for details of the lock assembly.
Door closed, latch lever 'C' has moved towards 'B' the external button. 'B' has an adjuster screw at the end to get the correct travel of 'C' to open the door. Key removed so locking rod 'A' is central:
Key in and turned to lock the door, locking rod 'A' is raised:
Key in and turned to unlock the door, locking rod 'A' is lowered:
To be able to see the operation of the locking rods with the door open (a lot easier than with it closed), the 'door shut' position of the latch must be set manually with the door open because an interlock inside the latch prevents the two locking rods from moving with it in the 'door open' position. As well as the usual 'door open' and 'door closed' positions of the latch there is an intermediate position which prevents the door flying open if it has not been closed properly and the 'door shut' position not fully engaged. The latch has a pivoting forked plate that engages with the bar on the striker-plate as the door is closed - shown in the fully open position on the left, part-closed in the middle, and fully closed on the right:

Note! Make sure you have released the latch with the internal or external controls and the latch has returned to its fully open position before attempting to close the door.
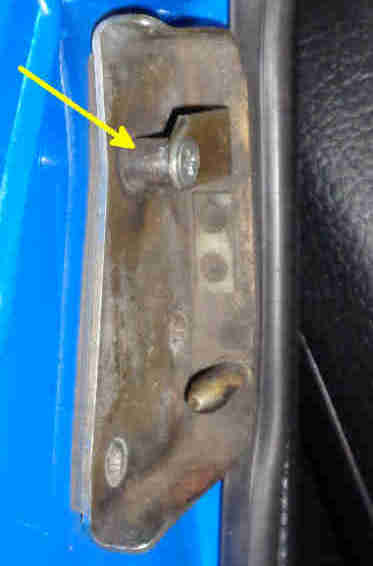
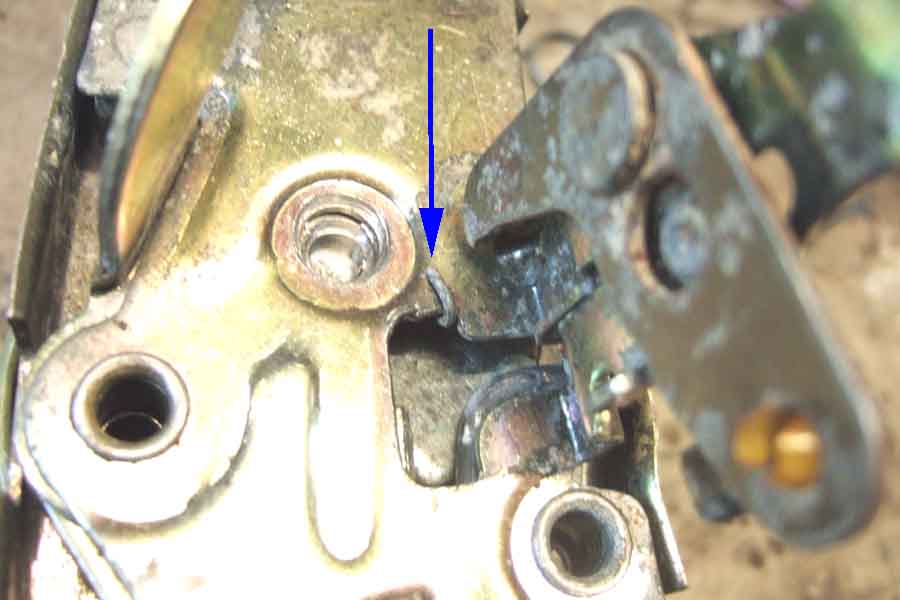
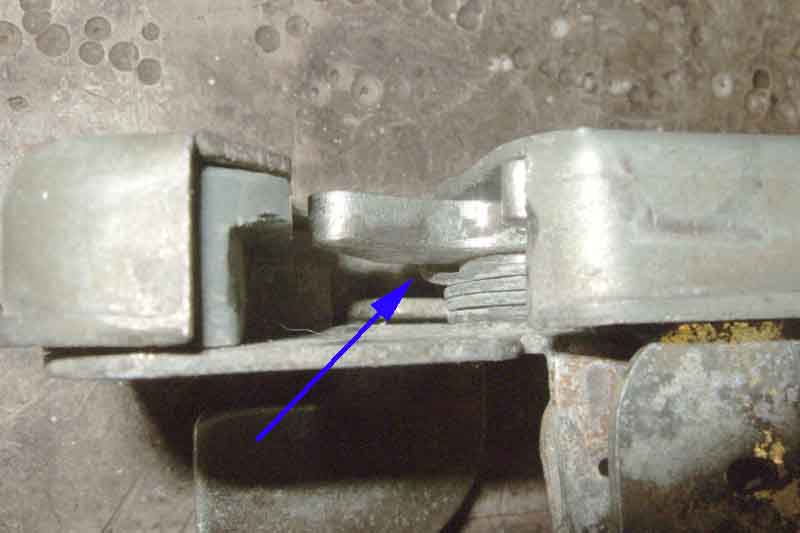
The 'hook' on the latch closes round the bar on the striker plate (arrowed) with the door fully shut. This makes a jammed latch on a closed door difficult to deal with, which someone on a forum has just (October 2023) asked for help with. The only thing I can see short of taking an angle grinder to the door is to somehow cut through the bar and its support bracket. May be possible from the inside using an electric saw if the door seal is removed and the flange knocked back, or if the door skin and case flange is bent back:
Someone has suggested removing the hinge screws and 'wiggling' the door off. For a start the anti-burst nature of this type of lock with the hook and bar would prevent that. In any case the arms on the door hinge have to be slid out of the pockets in the door, which means the hinges would have to be removed from the A-pillar and slid sideways away from the side of the car. But they are recessed into the A-pillar behind behind the wing by several inches, and even if the wing is removed the A-pillar would have to be cut round the hinges.
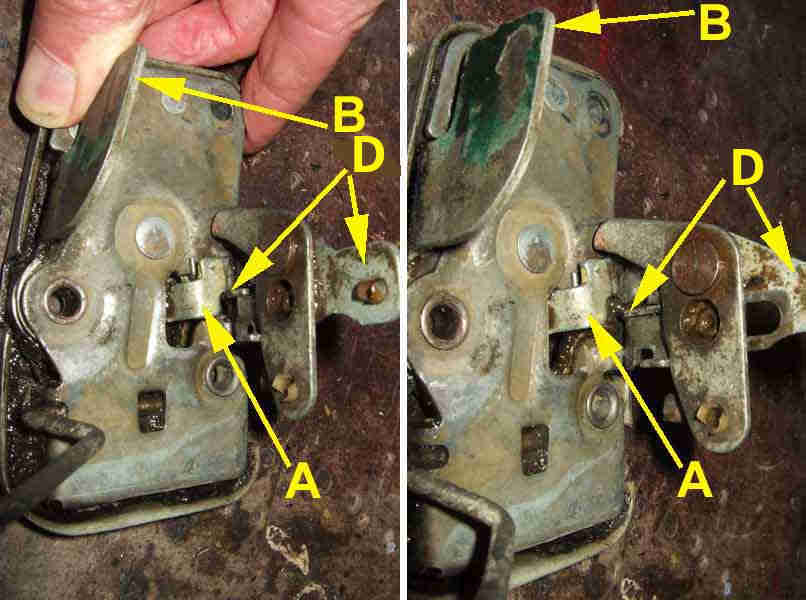
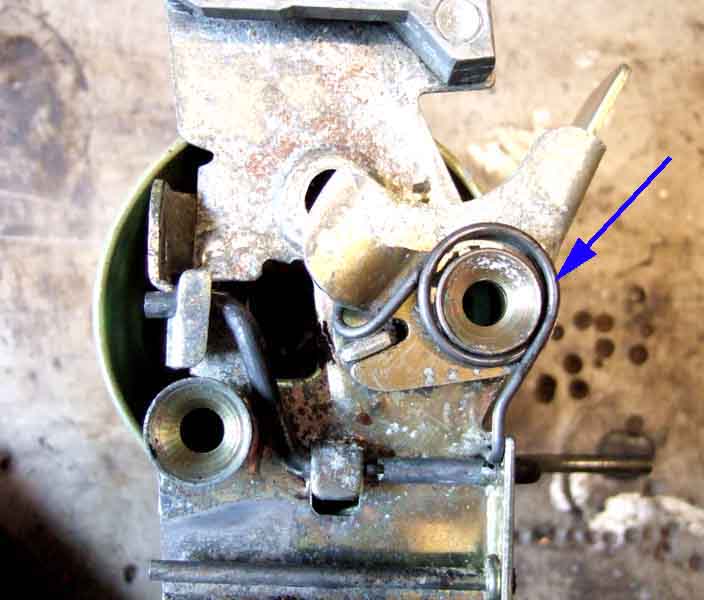
The internal door opener rod pulls on 'C' which pivots and the other end presses down on 'A' to release the latch and open the door. 'B' opens the door from the outside by the external button pushing against it. Both 'A' and 'B' move irrespective of which opening method is used. Door open on the left, 'A' in the lower of the two positions and 'B' moved away from the external button. Door closed on the right, 'A' is raised towards 'C', and 'B' is against the external button. 'D' is the slider that locks and unlocks the door, with the door open 'A' is in the lower position that prevents 'D' moving towards the latch to lock the door:
Door closed. On the left the latch is in the locked position, from either the key-lock or the internal locking control and rod, with 'D' pushed towards the latch and under 'A'. The external button cannot move 'B' to open the door because 'A' has the lock slider underneath it at 'D' preventing it from moving down when the external button is pressed. On the right the latch is unlocked with slider 'D' pulled back from underneath 'A' so it is free to move down and open the door from either the external button or the internal control:
Note that the latch can be removed and replaced without upsetting door alignment to the rear wing as there is a fixed position for the latch on the door casing, unlike the striker plate on the B-post which can be slid vertically and horizontally to get the correct closing and shut line.
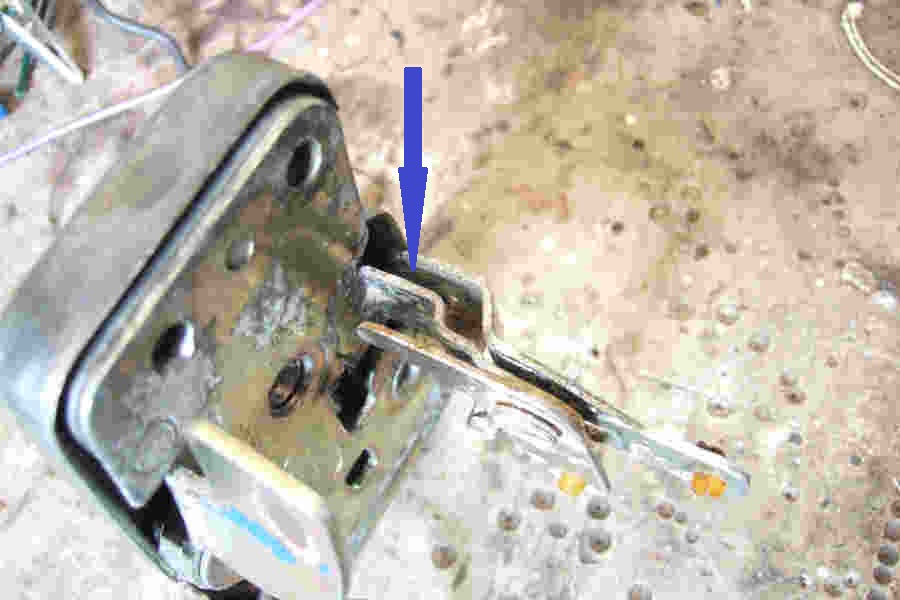
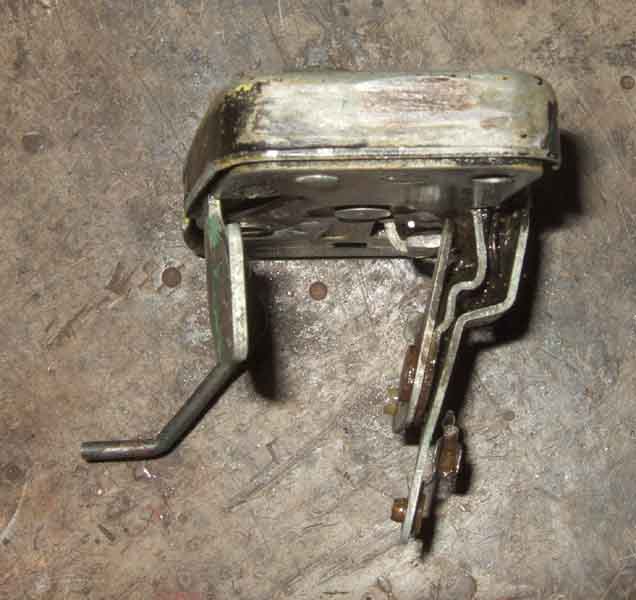
Vee's broken driver's door latch. 'A' is the pivoting lever operated by the large flap on the inside of the door, 'B' is a piece broken off. The arrowed end of 'A' moves down as the flap is operated, to bear on the broken piece at the end near the arrow. The red arrows indicate the point of the fracture:
Latches AHH9254 (RH) and 9255 (LH) are currently about �200 new each, but there are loads of used ones around at about �25. Risk of the same thing happening sooner rather than later, but I propose to dismantle my latch with a view to welding the broken piece back on, as a spare.
Got one from Andy Jennings, usually a very good supply of 2nd-hand parts, and testing it prior to cleaning up and fitting it didn't work! Basically the same problem in that it wouldn't have opened the door from the inside, but for completely the opposite reason in that the pivoting lever didn't move far enough to trip the latch. The collection of levers on the side of the bracket was bent inwards so the pivoting lever 'A' in the above pictures was hitting the body of the latch before it could move far enough to trip the latch. Whether this happened before sending or in transit is impossible to say:
A bit of judicious bending solved that problem, although locking and unlocking on the bench showed that there was a stiff bit in the middle of its travel. In the car everything worked except the key-lock, which would lock it but not unlock. As I have central-locking I never use the key, but I hate things that don't work, and resolving that was the longest part of the job by far with the latch being fitted and removed several times. This latch is more worn than Vee's in several places, one being the key-lock rod which has more sideways movement inside the latch, and where it is connected to the sliding locking lever it had to move upwards a bit before it would move the slider fully back. Close comparison with Vee's latch showed the collection of levers was still bent in a bit so that was 'adjusted', and the rod where it goes into the slot in the key-lock was bent up so that the key-lock would press it down further when unlocking. Finally it all worked, but that wasn't the end of the job.
Fitting the plastic finishers round the internal control assembly was tending to tear the vinyl on the door card as the clearance was so tight. I had the idea of putting washers behind the control assembly to bring it forwards a bit ... but that brought the lock rod closer to the inner skin of the door and was binding mid-travel, which would have made life difficult for the key lock. So they had to come out, everything tested again to make sure I hadn't disturbed anything ... and using the internal handle the door needed a good shove before it opened!
There is no threaded adjuster on that rod like there is for the lock rod, but the control assembly has slots for the screws, so it was a case of slackening them and sliding the assembly towards the front of the car a smidgen, and at last everything worked. However with the latch working correctly it may mean that when fastened the trim panel does not sit square over the control lever panel and leaves a gap even when the plastic 'U' pieces are fitted round the panel. That was the case with Vee's driver's door, it needed to go to the right, but that meant the opener did not move the latch lever far enough to open the door. The rod needed to be shortened which was simply achieved by putting an upward bend in the rod.
Finally I could refit the door card and handles ... only to find the screw had fallen out of the window winder and was nowhere to be found! I knew I had an old one somewhere that had previously rusted into Bee's driver's regulator and needed a bit of 'machining' to get out, but could be reused. But it wouldn't screw into the regulator. When stripping for painting that screw had to be drilled out (also rusted in), and I drilled and tapped (3BA suits the screw) the regulator spindle. This old screw wasn't picking up the threads and in fact had pulled a bit of the original thread out, so I had to tap it a bit deeper, and finally I can say that job is finished.
December 2024: Famous last words. OK it took three years but after several weeks of not being able to use the car for shopping and so use the central locking a trip to Tesco locked it OK but didn't unlock, so I had to use the key. Definitely stiff from the inside, and hesitates when using central unlocking before it unlocks, so I had to get it out again. A little lithium spray loosened up the mechanism so ready to go back in, but one thing with the replacement latch had always been that it didn't release with the external button unless the door was pulled a little as the button was pressed. Thought it might have been more stiffness, but it worked perfectly out of the door. Also when it was in position with no screws, but not when the screws were fitted - even left loose - most odd. Then I realised the adjuster screw in the button that bears on the latch lever needed to be unscrewed a bit, and that was that sorted.
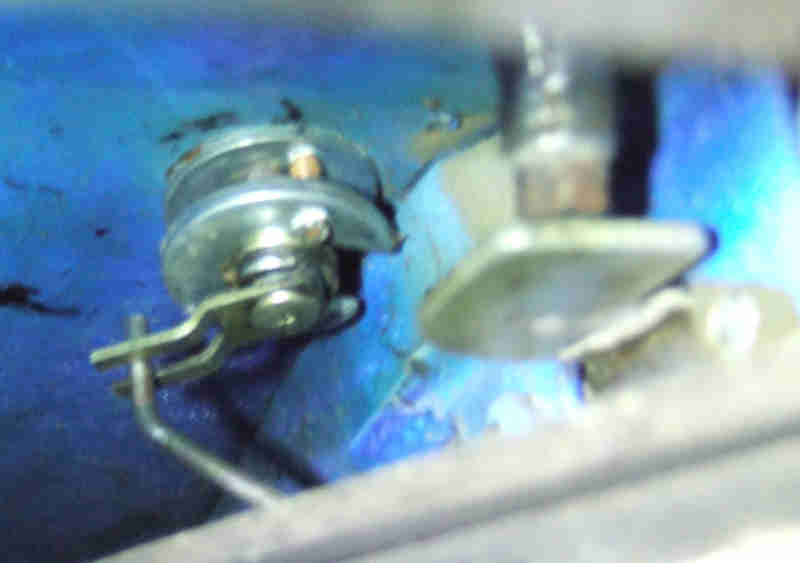
Always interested to take things apart and see how they work, Herb Adler in Oz had dismantled one of his when it became very stiff, but mine seems to be different. As well as the rivet in the middle there was another in a top corner, both being drilled out from the back. The upper rivet had to be punched back a bit then the top can be parted, the bottom edge having two tabs on the back piece (on the right) which engage in slots in the cover, all arrowed:
That left the forked part of the latch that engages with the striker plate securely held by a large pivot on the cover (left), and the button lever and detent that holds the forked part in the locked position on another large pivot on the base - blue arrows:

I realise now that Herb had drilled out the centre rivet in the cover whereas I had drilled it from the back. It's that which probably allowed both pivoting components to remain on his base plate which probably makes things easier to visualise and to reassemble. It also allowed his forked part to come free, whereas mine remained firmly attached to the cover.
Several parts had fallen out as I parted the to halves - two long springs and 'wedge'-like bits of metal, and a thick circular spring. A thinner circular remained attached to the base by one end. The long springs look like they go over a long pin at the bottom of the base, but there is only room for one. In fact one spring tucks behind the pin, and a pip on the larger end of one of the wedges goes in the end of the spring, and a groove the length of the wedge sits under the pin and guides the wedge back as the latch closes onto the pin in the striker plate (upper image). The second spring sits beside the first spring, with its wedge sitting on top of the pin (lower image). The pin on the striker plate presses the wedges back as the door is shut, and presumably the springs help push the door open when the latch is released:
It took a bit of puzzling-out where the springs went, which became easier when I reasoned that the thicker of the two would control the detent (arrowed), and the thinner one the forked pivoting part. The thick one was easier to fit than the thinner:
The thinner one sits against the base over the middle rivet hole, with the hooked end going through the base and the right-angle end facing upwards:
Hooked end passing through the base (remember this is the broken latch with the part that should protrude through the hole under the spring broken off):
Fit the two halves together, which needs the key-lock rod to be held down, the button lever to be pushed fully in to hold the detent back, and the forked part to be facing out of what will become the slot. Position the tabs at the bottom in the slots, and when the detent is clear of the forked part the top half should then close. This leaves the right-angled end of the thinner spring against the side of the forked part:
Pushing that down will position the end behind the forked part, and it should now all function:
However I have omitted fitting the springs and wedges as that required more fingers than I had available at the time!
Another difference in Vee's old latch to both Herb's and Vee's replacements is that the latter two have an even thinner circular spring that fits between the 'external' parts that the rods act on (arrowed), and gives something of a snap-action to the locking slider as well as perhaps keeping it in one position or the other and not allowing it to drift from unlocked to locked (or vice-versa) while driving. But the lack of that spring has never been an issue with Vee's locks: