
The Parts Catalogue shows the oil seal proper (88G490 4-cylinder, BTB1326 V8) being behind a dust cover (BTC350 NLA), but only the dust cover seems to be here on the Gaydon cut-away. The seal fits inside the casting and the dust cover looks like it fits over a thin flange around the seal. To replace the seal the drive flange must be removed, and as said in the main text it is critical how the flange nut is retightened afterwards or the collapsible spacer can be destroyed.
When tightening the nut you are effectively pulling the pinion against the back of the inner bearing inner race, which via the rollers is pressing the outer race into the axle casing.
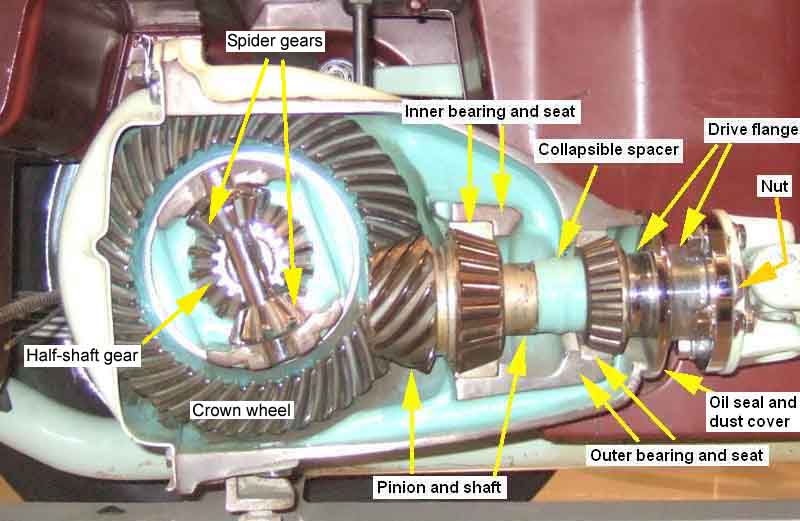
Likewise the drive flange is pushing against the inner race of the outer bearing, which via its rollers is pressing its outer race into the axle casing.
So the torque applied to the nut has a direct influence on the force applied to the bearing rollers and the races. Too slack and the pinion shaft will be loose and noisy, too tight and it will result in excessive bearing wear. Unlike the front wheel bearings this assembly does not have an end-float, it has a pre-load, and that pre-load is critical in that the torque required to rotate the pinion shaft must be between 4 and 6 pound INCHES, which needs a special tool to measure. With a solid spacer tube as in the front hub the positioning of the nut would be very difficult indeed to land between 4 and 6 lb in, just a fraction either way will be either too loose or too tight, and the nut has to be secured with a split-pin which doesn't allow for very fine differences in position.
The solution chosen by the designer is to make the spacer tube between the two inner races collapsible, and in that way because the tube collapses progressively as you tighten the nut, absorbing a portion of the force as the force goes up, the increase in rotational torque can be made more gradual. Even so great care is needed, and the Workshop Manual does say that the torque rises rapidly.
When fitting a new spacer tube I don't see you have any option but to go by the rotational torque, and come up with some way of measuring it. When replacing just the oil seal the Manual says to measure the force needed before slackening the nut, and to refit the nut to the same torque - or if the original torque was zero then to set it to 4 to 6 ft in., which puts us back to needing the special tool again. But it has been found that going by torque can be dangerous when just replacing the seal, destroying the spacer, as well as needing the special tool.
Hence the advice to put the nut back to its original POSITION, regardless of either rotational or tightening torque, and that is much easier to achieve. As said in the main text, carefully mark the position of the nut with respect to the shaft, and I'd also mark the flange with respect to the shaft as well. Once marked, undo the nut, carefully counting full turns, and there will almost certainly be a partial turn just before the nut comes off the threads of the shaft. You must be ready for this so you can note the approximate angle of the partial turn, as well as the exact number of full turns.
With the oil seal (and any dust seal - which is probably there to keep dirt away from the seal and the part of the shaft it runs on which can cause wear and leaks.) replaced fit the flange back in its original position on the shaft. I would definitely NOT do what one YouTube video advises and that is to seat the flange back on the shaft by tapping it with a hammer or mallet as this will be applying shock loads through the outer bearing inner race onto the collapsible spacer. Because we are going to be tightening the nut to its original position, that is going to seat the flange to the same position as it was before, if there is any stiffness or stickiness on the splines.
Carefully start the nut (having fitted the washer) on the shaft - in fact I would turn the nut backwards until I hear and feel the click as the two starts drop past each other, then turn it forwards the previously noted partial turn, and the nut and shaft marks should be aligned - albeit with the nut very loose of course. Then tighten the nut, carefully counting the turns. Probably by hand to start with, but eventually you will need to use a socket, and then a breaker-bar. Be absolutely sure you don't go part the marks as you complete the final turn, and you should be OK to refit the split-pin. If you lose count, remove the nut and start again.