Observations on a commercially available product
I've never been a fan of WindStops or 'hair nets' as 'wind in the hair' has always been part of the enjoyment for me - as long as I'm wearing a hat to stop my hair from flaying the skin off my face (when I had more hair, and longer) - but the Navigator finally nagged me into doing something about it as she finds the buffeting at 60 or so for long distances wearing, and the alternative is hood up which is no good at all. Having seen them advertised for Ł170 or so for the solid plastic ones - and where do you put them when you aren't 'wearing' them? - or up to Ł250 for fabric ones (which still have a solid frame) I thought I could do better myself.
But first I wanted to see how effective they were. I bent a couple of brackets from aluminium curtain track to slot in the tonneau bar sockets and wired a piece of old plywood to them. Couldn't see behind me using the interior mirror of course, but it was good enough for testing on a quiet road. I was surprised how effective it was. At 40mph there was no buffeting at all, whereas you can feel it start from as low as 10 or 15mph without, and at 70 mph there was still hardly any, so the solid ones certainly are effective. But I had in mind a fabric one that I could fold up and tuck away when it was not in use.
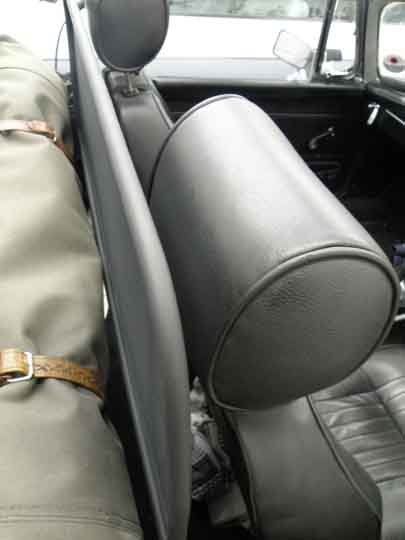
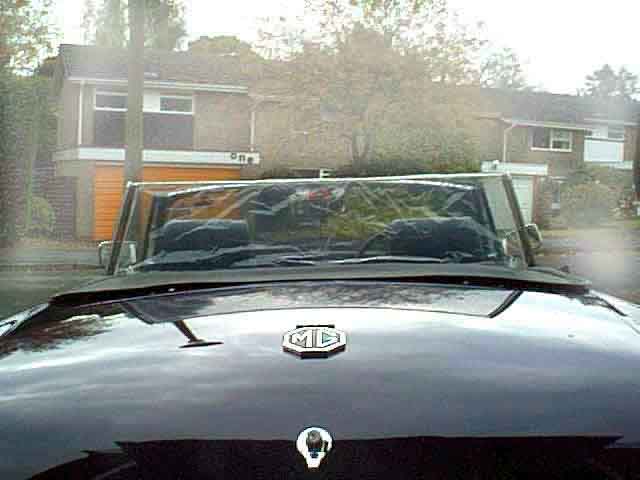
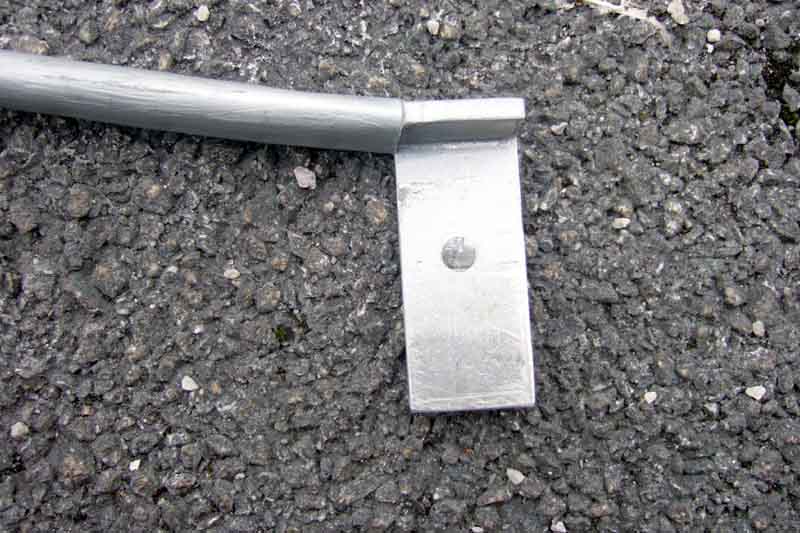
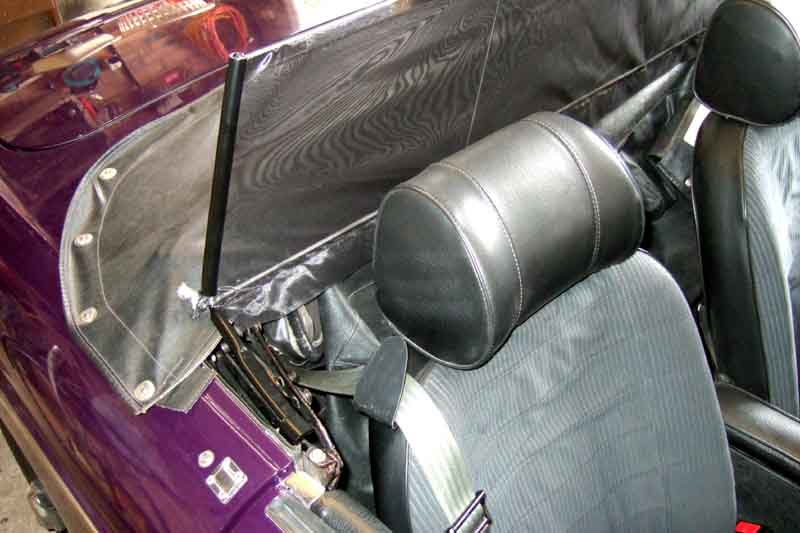
 A neighbour had given me some aluminium sheet many years ago - her husband had been in the car industry in design even further back and this was some 3/16" thick stuff he had used for chassis and body frames, it was the ideal thickness for a snug fit in the tonneau sockets. I cut and shaped a pair of brackets that plugged in the sockets and more-or-less followed the line of the folded hood frame behind the seats nearly to the horizontal line of the tonneau cover over the folded hood. These ended in a vertical post about 10 1/2" high that was going to be the support for the fabric. I say 'vertical' but they are inclined in towards the centre of the car to follow the line of the screen side rails when viewed from the rear as the adjacent pics.
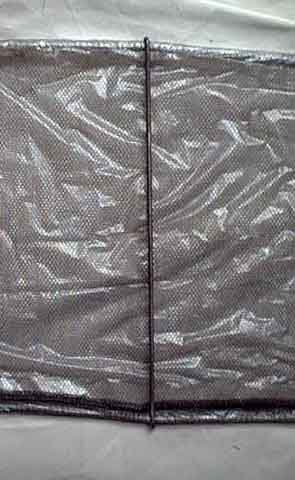
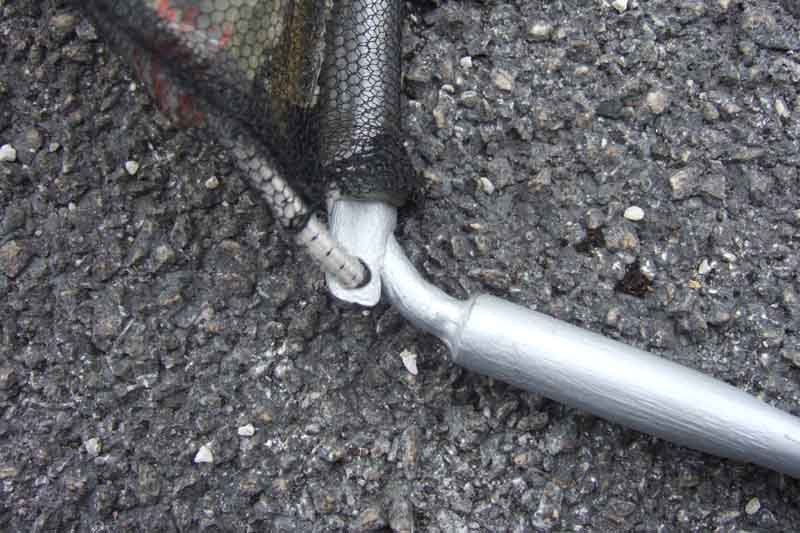
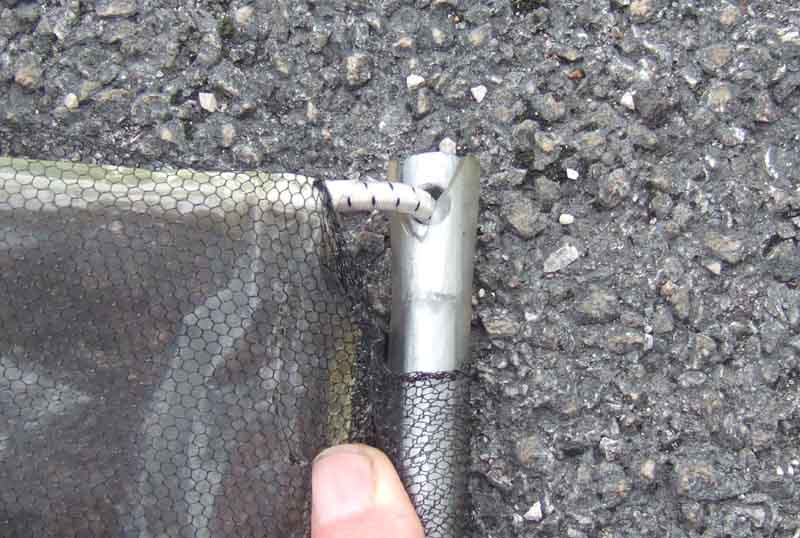
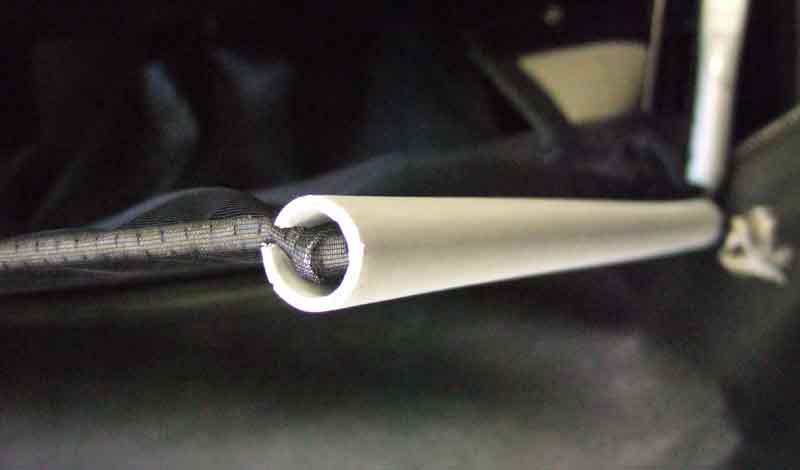
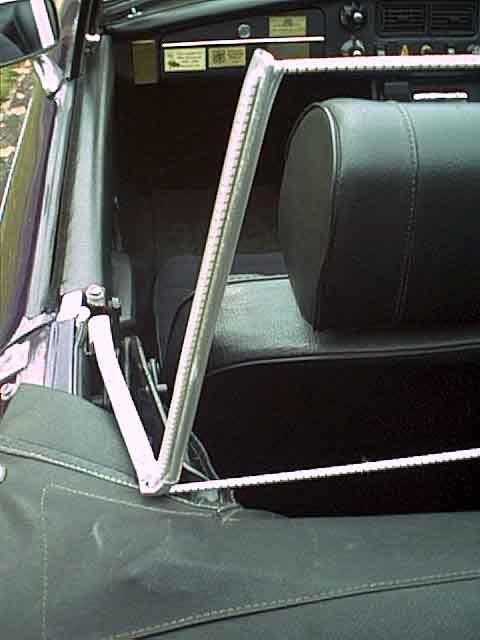 I drilled holes at the top and the bottom of these posts to thread 'shock cord' like bungee or those spider things used to secure suitcases to roof-racks, but much thinner at about 3/16" diameter - about Ł3 for 3 metres. These were going to run across the car to support the top and bottom of the fabric. A length of poly tubing to go over the vertical posts to act as a smooth support for the sides of the fabric to stop fretting and wearing through of the fabric - about Ł1 The bungee runs vertically through these tubes to avoid having any knots at the top and hence clearly visible.
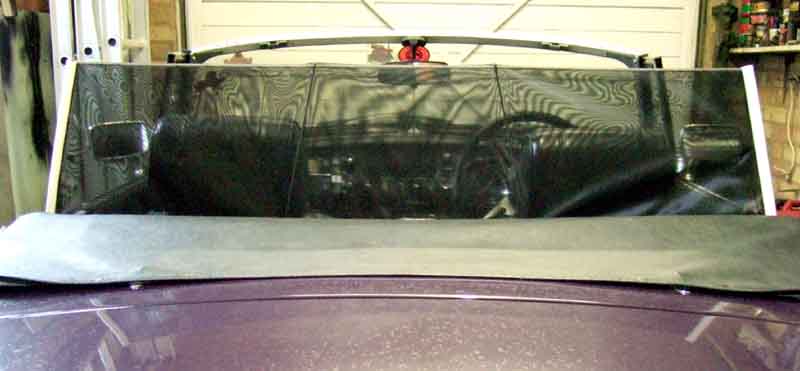
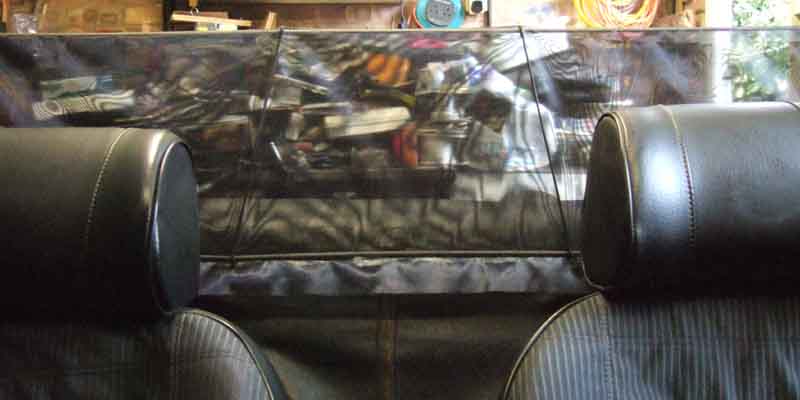
Black veiling material seemed close to what I had in mind, although the holes were a little bigger than I would have wanted and the threads 'holding them together' a little thinner, but for Ł1 for enough for four single thicknesses, two double, or one quadruple it was cheap enough. Before cutting the material I did test runs with one, two and four thicknesses held on to the frame and bungee with clothes pegs to check effectiveness. As I suspected even four thicknesses was not as effective as the solid board, but was beginning to affect visibility. So I decided to opt for a double thickness with clear polythene in the middle.
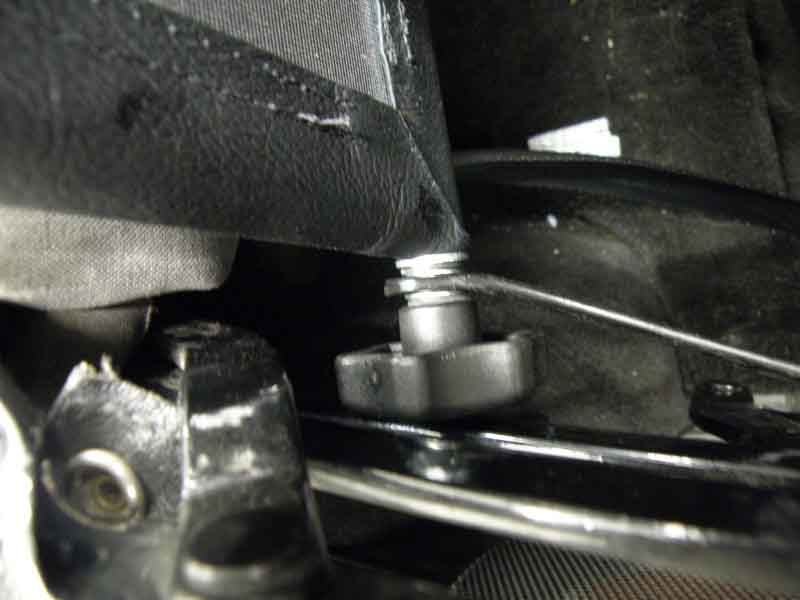
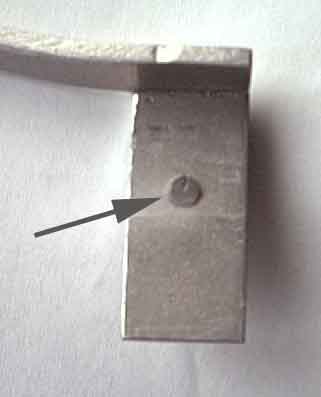 After the test I noticed that the brackets had tended to work their way out of the sockets a little. I didn't think it would come out altogether but neither did I want to risk it, so I drilled and tapped the tongues of my brackets for a cheese-headed screw, which I then ground off at an angle. This would enable the tongue to slide in without difficulty, then the high edge of the screw head would engage in a convenient hole that was already in the socket. To remove the bracket from the socket one has to pull against bungee tension to disengage the screw head from the hole before the tongue can come out of the socket, which isn't going to happen while on the road.
 I had trouble finding some polythene that was clear for distant objects (most 'clear' stuff is fine when wrapped around something but opaque when looking down the road through it) but eventually found a large bag that had originally contained a folding garden chair - Ł0. Rolled the top and bottom edges of this around a length of dowel to form a tube to thread the bungee through, stuck down with double-sided tape. The same neighbour who had given me the aluminium was very interested in how I was planning to use some of it, and used her machine to sew up a double-thickness of the material so that it slotted over the verticals and I could thread the bungee through from side to side to make the finished article.
So for a fiver and some time I had something the Navigator declared herself well pleased with during our recent visit to the New Forest, but there are a couple of areas for improvement. Both concern the polythene which is very thin and was chosen for its visibility: Because it is so thin the buffeting that it is now stopping reaching us is causing it to flap which is quite noisy, it also bows out under the air pressure and this can result in reflections from the sun which reduce the area I can see through, so the hunt is on for a stiffer but equally transparent substitute (hood rear window material perhaps?) for MkII. I might also extend the screen to the tonneau cover to reduce the draft behind the seats ... or is that going to far?
 Update: Put a couple of thin metal rods vertically between the top and bottom bungies about 1/3rd the way in from the ends. This keeps the bungee at the correct distance apart and supports the front of the screen, both of which reduce the bowing, flapping and reflections.
In very blustery conditions on the A14 passing Cambridge the bracket my side broke where the horizontal strut is turned upwards, but at least the remaining half still sheltered the Navigator. I tried welding it but it wasn't going to work so I fabricated a new one out of the large amount of aluminium sheet I still have from when I originally made it. If I get another breakage I'll get another pair of tonneau sticks and modify those.
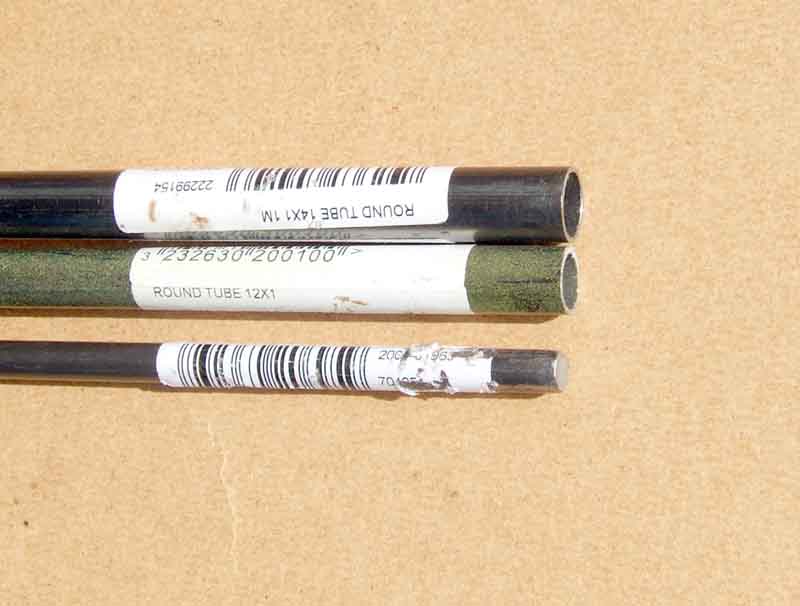 Must be something about May. On the way down to the Tamar Valley Run the Navigators side broke this time. I was able to jury-rig another support out of a jack handle and some wire, but wasn't going to fiddle about with aluminium any more as it obviously can't take the stresses. I'd thought about modifying tonneau sticks, but it was going to be some time before I could pick up another pair at a spares show and needed it before then, and didn't want to chop up the pair that came with Bee. So I toddled off to B&Q to see what they had and was surprised to see quite an array of alloy and steel bar and tubing both round and square, and got a length of bar and two of tubing of different sizes, all in steel.
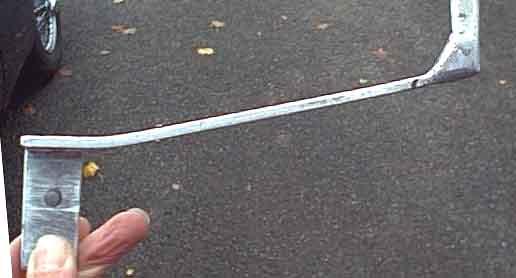
 The part of the old strut that goes into the tonneau sticks socket and horizontally rearwards seems strong enough, it is the angle where the horizontal section turns upwards that has broken each time. So I shortened the horizontal section by about half and with a bit of swaging fitted it into a length of the larger diameter tubing, cut to just before the turn upwards.
 I was going to use the bar for the turn from the horizontal and the vertical section and it had to be small enough to go through the netting and plastic tubing along with the bungee, which made it too small to fit into the tubing used so far. But with more swaging I used the smaller tubing as an intermediate, and the three were welded together.
 I bent the bar to the appropriate angle, cut it to length, welded a couple of brackets for the bungee where it turned across the car, fitted it and the plastic tubing and netting, and job done. A couple of quid and a few hours fun in the garage, with plenty more bar and tubing left over for when the other side breaks again.
Which it did June 2008 on the Bridgend Vales and Valleys Run. Another couple of hours using the passenger side as a pattern and the drivers side should now be OK. However the internal plastic membrane needs a bit of attention as the corners have come unglued and are wrinkling up, but I'm pretty amazed both it and the material have lasted as long as they have given the battering it gets on long journeys.
No further problems yet but whilst the mesh fabric is holding-up the plastic inner sheet is getting a bit ratty and opaque. Idly Googled 'windstop fabric' one day and this link to a document explaining how to repair an MGF/TF windstop comes top of the list. Not a lot of use to me in itself, but it includes a link to Ikea for some apparently suitable fabric (FLYN LILL) at only £1.36 a roll! Not dead handy to me, and not available online, but worth a look the next time I'm passing.
 Bought a roll of the Ikea FLYN LILL fabric towards the end of last year, so now it's time to do something with it. The MGF frame is solid tubing with a slot and filler strip, so it is relatively easy to clamp a single thickness of material in the frame. I want to be able to fold mine up as before, i.e. keep the side struts and the top and bottom bungee so have to have a double-thickness folded over the top bungee and sewn together below the bottom one. I made a hardboard template to fold the fabric round, cutting to have a couple of inches of spare in each half at the bottom and several inches at the sides. Pin at intervals along the bottom, then slide the hardboard out and start stitching, just the 44" between the bottom of the uprights, and use a line of household glue along the stitching for strength. Slid it onto the assembled struts and bungee, attach to the car, and trim the ends to be a couple of inches long following the angle of the uprights.
 The big question was how to attach the sides, short of more stitching and glue, which would be a 'no going back' operation. I thought of sliding some split tubing down over the uprights trapping the material, and browsing B&Q found a length of white plastic plumbing pipe intended for 'push together' fittings (Speedfit), which looked about the right internal diameter. I slit this lengthways with a sharp knife, ran a screwdriver blade up and down the slit a couple of times to open it up slightly, and slid it down over the strut trapping the fabric. All went well until annoyingly the edge of the slit on the second tube caught in the fabric and tore it slightly. Cut a slight 'V' in the bottom of the slit to remove the corners and it slid on just fine this time. Oh well, it's double-thickness so not easily noticeable, and is worth running with to see if the overall thing is OK, plenty more on the roll to make another if needed. Trim off the excess from the bottom of the split tubing and we are ready to roll. I've kept the wire struts positioned along the fabric but had to angle them slightly as the pocket in this version ended up not quite so deep.
 On a quick test-drive it prevents the buffeting as before, but as it is fabric with holes some air does get through so there is a slight feeling of diffused breeze around the back of the head which wasn't there with Mk1. However that also means there is no noisy flapping of the material, so as such there should much less strain on the material and struts than before. This material has smaller holes closer together, so is more opaque than the previous version. I've only tried it on a dull day, i.e. things less visible anyway, so we shall have to see how it goes. I may paint the tubing (tricky being plastic?) and struts black to match the material, hood frame, tonneau cover etc. in the same area.
 Happened to find some plastic primer I had bought in error some time ago thinking it was normal metal primer, also had some satin black, so relatively easy to paint the removed tubes. With them back on very pleased with the result, but then realised the framework between the bottom of the windstop and the tonneau sockets was still silver, so painted those satin black as well - even more pleased with the result!
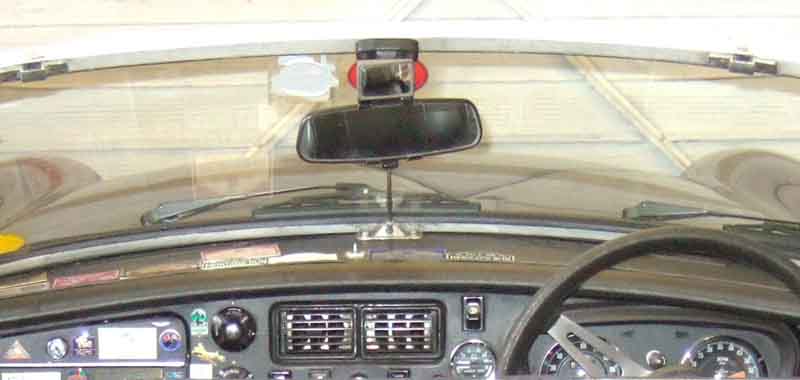 That left the rear visibility. I had an old blind-spot mirror kicking around, and what looks like a convenient space above the existing mirror to position it, where the higher position as well as the convex construction would allow me to see 'behind' the windstop. The big question was how to mount it? Eventually I settled for a strip of black plastic (cut from the side of an offcut of square-section guttering downpipe ...) as wide as the additional mirror, cut and shaped (with a heat-gun) to clip onto the back of the existing mirror, with the new mirror stuck to that.
 However the blind-spot mirror being quite a bit smaller than the standard interior mirror meant that I had to focus more intently on it to see behind - not a good thing to take ones eyes off what is going on in the arc in front of you for too long. So yet another blast from the past is the stick-on mirror I used while teaching my children to drive some 20 years ago. Made another bracket to clip the mirror-part of that onto the back of the existing, and that's much better. Even though it is only immediately above it can still see over the top of the wind-stop, and it can stay in place when the top is raised.
May 2022:
 A couple of years ago small holes started developing in the fabric above the wire supports (but not below), which early this year developed into a short tear one side and a full length tear the other. The original roll of fabric had more than enough for two and of course I had kept it. The width is exactly right for doubling over the bungies, so removed the existing fabric (the support structure just slides out once the end tubes are slid off) and cut the new piece to length. The original join at the bottom had been loosely stitched and glued and was as good as new so I will do the same thing again.
Getting the top to bottom spacing is important, it really needs a former such as a square of card, and I 'just happened to have' two pieces of card from some new bedsheets that the Navigator asked if I had a use for a few weeks ago, and of course I said 'yes'. Compared that with the height of the old cover ... and it was perfect! So sat down and stitched the length which took less than an hour using a simple running-stitch. Glueing needed a bit of thought, I didn't want to lay it on anything and have the fabric stick to whatever it was, so I pegged one end to the top of a clothes airer, let the length hand down with the seam just off the side of the airer, and ran a bead of UHU down the stitched seam on the 'open' side. Half-way down turned it over to do the other end, then pinched the seam lightly between finger and thumb to stick them and the thread together.
Fitted the support structure minus cover to the car and it was sagging a it so tighened up the bungie. By that time the cover was dry so was ready to go back on, but I wondered if I could protect against more holes wearing through. Tried insulation tape over the top of the wire supports but it had bits sticking out which I thought would probably be as bad. Heat-shrink tubing would probably protect against roughness on the loops, but they would need opening out and closing them up again may damage it. So I settled for rubbing fine wet-and-dry over the loops to smooth off any roughness. I started to fit the new cover then realised that the wire supports had the cut ends of the loops against the back of the cover, which in use will have the cover pressed against them, which may well have contributed to the holes. So took the cover off again and turned the wires round. Fitted it to the car, tucked the ends of the cover round the main vertical support and slid the tubing back down, both sides, job done for another dozen years or so. That fabric has not available for a long time, but Klippfly in blue may do the job.