Folding the hood/top
Front bow fouls the body
Header rail seal
Replacing the hood/top
Hood/top fittings
Interchangeability of tops and frames
Frame mounts
Decals
Originally as standard the MGB had a pack-away hood that was completely removed from the car and the frame dismantled into two parts, as well as an optional folding frame. The pack-away frame slotted into two sockets screwed to the inner panel aft of the doors, and the folding frame screwed to the same welded nuts on the back of this panel. In 1970 both of those were replaced by an improved folding frame, and the bulk of his section describes that.
 The pack-away frame sockets can be installed with either of the folding frames to be used for the tonneau or hood cover sticks, the sockets are also used for the hardtop.
Octagonal Origami (or, the art of folding the MGB hood)
Hood straps
Front bow fouls the body
My hood/top doesn't fold low enough
I posted the following on the MG BBS in response to an enquiry, and one person was kind enough to contact me and say it had helped him, so I decided to include it here. It relates to the 1970-on Michelotti hood, not the packaway or earlier folding types for which see here.
By the way I keep seeing exhortations not to fold the hood if it is damp. Fair enough, I wouldn't put the car away with a damp folded hood, but are you going to keep driving with the hood up after a shower now the sun is shining again? Nor am I, but it does go up again when I get to my destination. In fact I always erect the hood when in the garage, just in case the roof decides to start leaking.
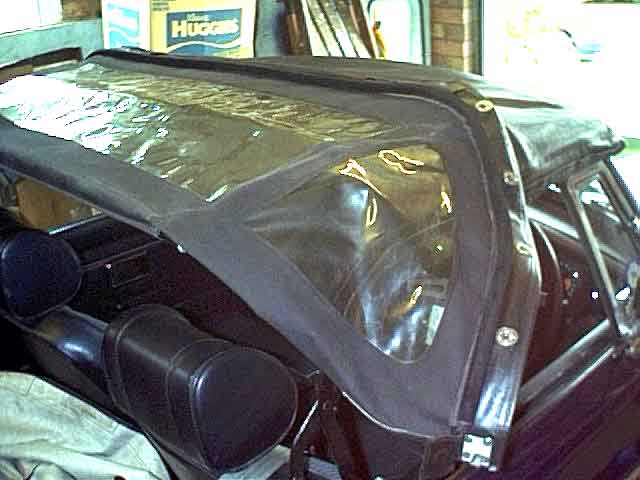 With all fasteners (front and rear) undone I pull the header rail back just enough for the hood to clear the slotted chrome teardrops (officially 'plate-retaining hood-rear') behind the cockpit, then push the header rail forward again. At this time the rear window is dangling down behind the rear seats,
I lift it up and forward and lay it over the central part of the hood.
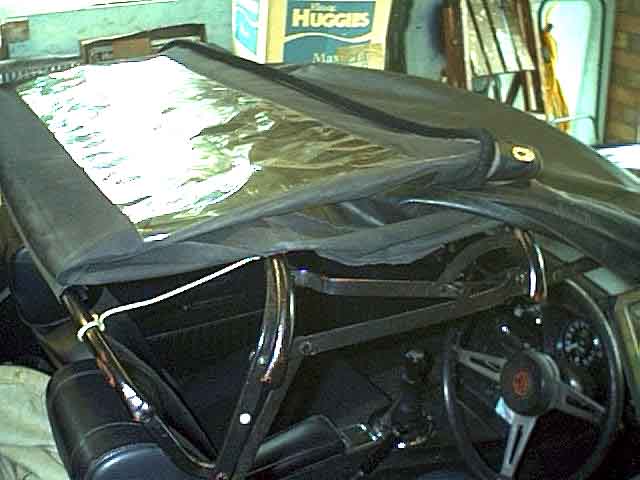 The quarter-lights are now sticking out at the sides. I lift the rear window part and tuck each rear quarter-light under the rear window so that they lie between the rear window and the main part of the hood. If you get this right the three pieces of clear plastic (rear window and two quarter-lights) will be lying flat, unfolded, uncreased and all the folds will be in the black vinyl. You can see one of the cords that pulls the rear bar into the correct position when the hood is erected.
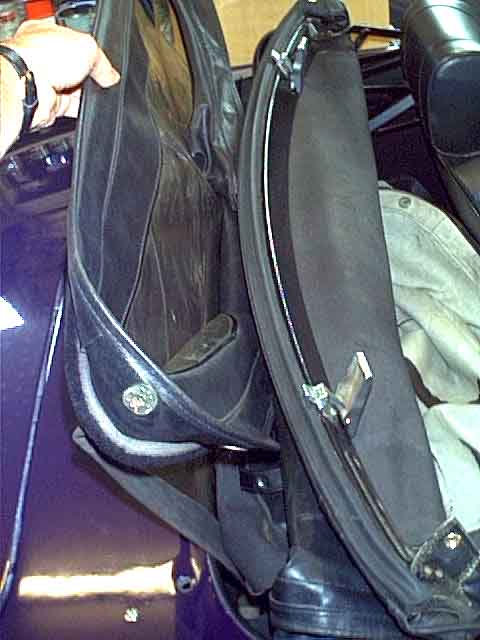 I now pull the header rail back lift the rear bow by pulling up on the trailing edge of the vinyl (the part that hooks into the chrome thingies behind the cockpit) so that the rear bow doesn't wedge on top of the inner arches, and lower the whole thing down into the space in front of the rear cockpit rail.
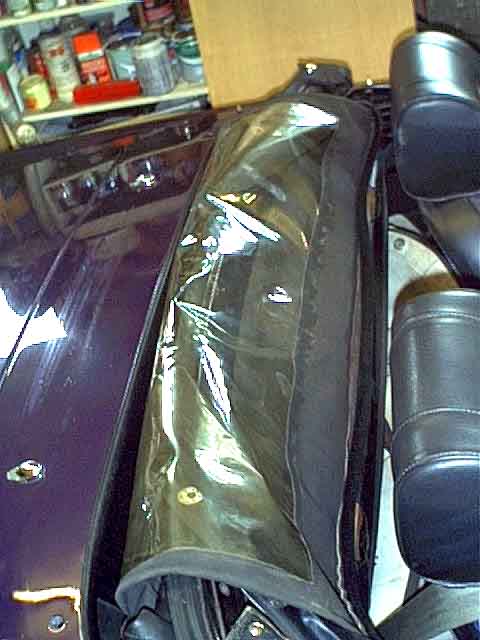 Finally I drape the rear window part, complete with tucked-in quarter-lights, forward over the header rail, making sure the header rail clamps are closed. If you fold the black vinyl edges correctly it is these that lie over the screen fasteners and not the clear plastic.
I have seen two pieces of cloth employed at this point - one between the clear plastic and the header rail and the other between the tonneau cover and the hood to protect the clear plastic but personally have not bothered to do this - after nine years and 25k wet and dry miles my windows are still in pretty good condition.
With the rear bow attached to the hood material using the two strips that are provided for this purpose I found the bow wasn't in quite the right place when the hood was erected, but too far to the rear. I now have two cords, one each side, tied between the middle and rear bows, and adjusted so that the rear bow is pulled up right under the seam as the header rail is pulled forward. See the 2nd picture above. Subsequently I discovered the early folding frame had something similar as standard. It was two lengths of webbing joining the front and rear bows and going over the middle bow. One can be seen clearly in Clausager on page 54, 2nd picture down, as cream webbing contrasting with the black hood material and grey frame. Also a glimpse of it in the bottom-left picture, which also seems to show the rear bar sewn or glued into hood material flaps the same as the later hood.
Hood straps: November 2020
 You should have two hood straps (or rather two ends of one strap each side) that allow the rear part of the hood to be rolled round the bottom part of the whole folded arrangement and held up out of the way of anything on the shelf, but although I have these straps I use the full-length tonneau cover as a hood cover fastened to the rear heel board so there is no need. Some people seem to really struggle with these saying they are difficult to find and fasten, and unless they are used the hanging hood interferes with the inertia reels. None of which is a problem for me, but I can understand that with a mohair or lined hood the additional thickness may well mean that the original strap press-studs may not meet, or pop-apart. Some say they have provided longer, loose straps, but they get lost. I really can't see what is so difficult in replacing the originals, or extending them, and using Velcro so press-stud positioning isn't critical.
Front bow fouls body: April 2015
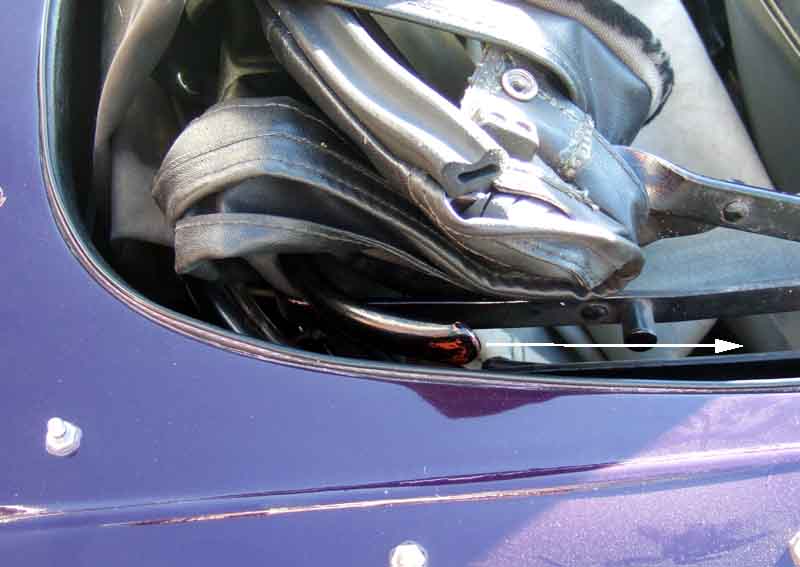 I've been folding Bee's hood for 25 years without a problem then suddenly one time last year the ends of the front bow were fouling the body both sides. It took me a few minutes to realise that for some reason this bow had pivoted, and stuck in a different position to normal. Normally when erected the ends of this bow point downwards, and when folded they should point straight forwards and tuck inside the cockpit rail with a clearance. If for any reason they are pointing too far backwards when the hood is erected, they will be pointing straight down when the hood is folded and foul on the cockpit rail. Since then it started happening more often, and now (September 2015) happens every time.
September 2015:
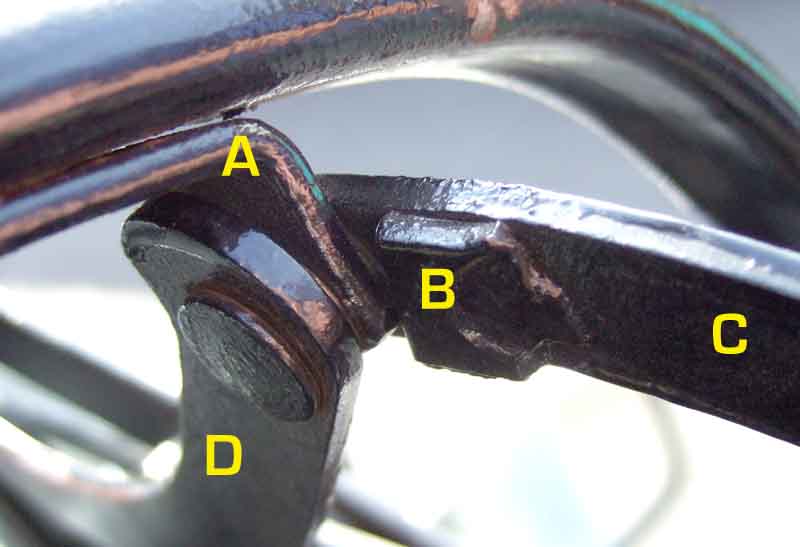 Looking at where the front bow pivots there is a block of metal welded beside it, which looks as if it was an afterthought to stop the bow pivoting at all, or only very slightly at most. But after 42 years wear has taken place in various places so that the block no longer restricts the movement of the bow. It seems that the sides of the bow support should butt up against the edge of the block, which would put the bow almost vertical. But in that position, when folded the ends of the bow stick up which isn't ideal for the hood cover or tonneau cover. With the ends of the bow pointing straight forwards when folded, they are pretty-much the same angle to the vertical as the middle bow when erected. However at that angle, because of the wear in the bow support and the block, the corners of the bow support are overlapping the block which can't be right. Looking at two pictures in Clausager the front bow does seem to be almost vertical when raised, which would put the side of the bow supports against the edge of the block. The bow support is sandwiched between two other parts of the hood frame - a short curved piece pointing backwards to the outside, and a longer curved piece facing forwards to the inside, but it only pivots in relation to this longer piece while being folded. It doesn't need to move in relation to the shorter outer one at all, so could in theory be welded to it. But I shall ponder for a bit whether to do that, or weld another block on top of the existing one, ... or ... something else.
February 2018:
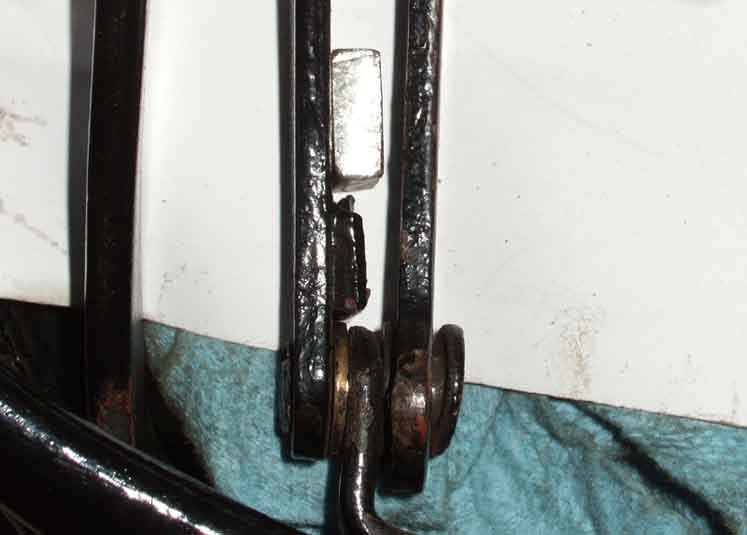 With Bee Hors de Combat while the head is converted to unleaded I decide to tackle the hood frame. After some examination off the car and pondering I'm minded to grind off the existing blocks, weld in a thicker one, and closer to the bow bracket, to overcome the wear in the pivot.
My hood/top doesn't fold low enough July 2008 This relates to something that happened when I restored the car some 19 years ago, so I don't have any photos and it is dependant upon memory to a large extent. I'm only including it now as someone has written to me with what seems to be the same problem, although it doesn't appear to be a common one as I can't recall anyone coming back when I mentioned it on the various lists and BBs some years ago.
When I first had the roadster it came with a full-length tonneau cover with snaps half-way along so it could be used as a hood cover as well, the front half of the cover being tucked up under the folded top on the shelf. However my hood sat so high when folded that the snaps were nowhere near the posts on the heelboard, whereas pictures of cars showed the top of the hood dropped right down into the space behind the seats. But what I could do was fold the hood back with all the rear fasteners still done up, which made it very quick and easy to erect. A friends car of the same age (73) was exactly the same, and he related how he could erect his top while driving along!
 When I restored the car I wanted to get the hood lower so I could use the tonneau cover as it does look much neater, and after some pondering realised that a couple of the struts in the frame were folding as far as they could, then jamming, and that was stopping the top and frame folding all the way down. After a bit of beating on these struts (time elapsed prevents me from remembering which) and changing the angles 'lo and behold' the frame and cover now drops all the way down as shown here, with the frame bows resting on top of the inner arches, and I can fasten the tonneau cover heel-board snaps and now have a neat hood cover. But I then discovered I can no longer fold the top back with all the rear fasteners in place as it traps and stretches the material. No matter, I'd rather have the neat folded appearance.
May 2020:
 Martin White asked about this on the MGOC forum even though his looked much lower than I remember Bee's being before I made the 'adjustment'. I described what to look for (a strut trying to push its pivot pin past the pivot where the frame didn't collapse any more, instead or rotating around it), and he reports back that having taken his frame off the car and put it on the ground as I did, he found the strut that was causing the problem, and adjusting both sides now allows the frame to drop down completely. He also writes that on his other roadster (which drops right down) this strut does appear to have been bent, he says by a previous owner, but given the variability between cars I'm wondering whether it is just manufacturing tolerances. Also looking at the piece in question, and his 'before' and my 'after' pictures, I'm wondering whether we made the same adjustment. But no matter, we are both happy now, and it may help others.
I've got the sticks, but it is a real stretch to fasten the snaps of the full-length cover when used as a hood cover, and it doesn't really make that much difference to the appearance anyway so I don't use them. I think they are mainly intended in that position to shape the separate hood cover which I don't have. Where the tonneau sticks are useful with the full-length cover is when both sides are fastened full-length, when if you position the sticks in front of the seats instead of behind it lifts up the centre of the cover so rain runs off the sides instead of pooling in the middle and dripping through the zip. I've never seen this advice anywhere else.
I don't understand why so few stick up in the air like mine did, unless it was a different manufacturer of the frames for a while, but even then I'd expect more cars to be affected. Having said that at the Stafford MG Enthusiasts run to Upton House in September 2009 I noticed quite a few of each type i.e. some low and some high. These were all the later Michelotti style, and there didn't seem to be any correlation with the year i.e. some early and some late with both appearances. No pics, maybe next year if I remember.
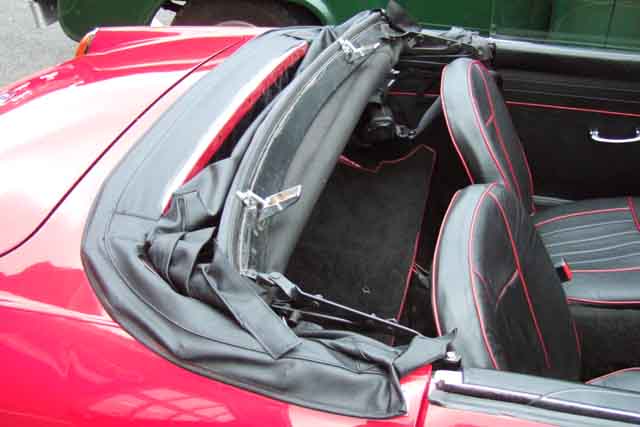 This 65 roadster has the (later Michelotti) frame dropped pretty-well all the way down, but also has the rear still fastened to the rear panel! However it is a later zip-out hood, maybe that makes the difference.
 I've seen complaints that the inertia reels prevent the hood from folding all the way down, but if they are fitted correctly that can't happen.
Header rail seal
 When closing the hood I'd always had to run a finger along the seal in the gap between the header rail and the screen top rail from inside the cabin to prevent the rubber seal getting trapped by the flange on the screen top rail, which was a pain. When I received the new seal I immediately noticed that it was slightly asymmetric front to rear in that the two 'bumps' on the seal that press down onto the screen top-rail are slightly off-set. I checked the old seal and found that this off-set was rearwards (i.e. to the left in this profile image) which could account for the seal getting trapped. Fitted the other way round the rear bump drops neatly onto the screen top rail without getting trapped. But the forward bump, instead of lying flat on top of the rail, now lies on the angle between the top and front faces. My first thought was that this can't be right, surely lying flat on the frame rail is correct, but then it occurred to me that being on an edge rather than a flat surface it probably conforms to the shape better giving a more effective seal. Since then it has never leaked even in torrential rain, whereas it had before. Someone subsequently stated that the bumps should be rearward as the original was, and they hadn't had problems of the seal getting trapped. The new seal may have been responsible by itself for the non-leaking now i.e. whichever way round it was fitted, but as it doesn't leak, and as I don't get the trapping problem either, it will stay as it is.
October 2004: Torrential rain and a howling gale on the way back from the MGOC Autumn Gold run (ditto while on the Lincolnshire Wander in 2005). Absolutely nothing came past the header rail seal.
October 2018: A certain eBay supplier is listing this seal using an image that looks like it has been filched from Motaclan/Leacy. Someone on the MGOC forum purchased one from eBay and found it significantly different in profile to the one pictured. Not only that but the eBay one was £8.35 whereas Motaclan/Leacy's is £4.26. Yes the eBay one is post-free and P&P is extra from Motaclan/Leacy, but if buying with other parts the P&P on that item will be marginal at worst.
Two things to be aware of here - buying a new hood, and fitting it.
I will deal with the fitting first as it may impact on which one you buy. IMHO you must read through a set of hood fitting instructions, such as those contained in Lyndsay Porter's excellent "Guide to Purchase and DIY Restoration of the MGB" before embarking on the task. It may incline you towards buying a hood without header rail already fitted or indeed the other way. Personally, I feel that buying without may well result in a better fit, albeit at the expense of extra effort. Buying one with header rail ready-fitted is a lot simpler but the resultant fit may not be as good if your screen/hood frame/rear fastening dimensions are not exactly the same as the template used by the manufacturer of the ready-fitted item. You don't want something that is going to look like Nora Batty's stockings (see Last of the Summer Wine).
Buying
The hood on my roadster was replaced shortly before I bought the car and is probably one of the cheapest you can get - single thickness vinyl. Although it is waterproof in itself its fit to the remainder of the car is less than perfect in one or two places so I have been considering replacing it with something of higher quality.
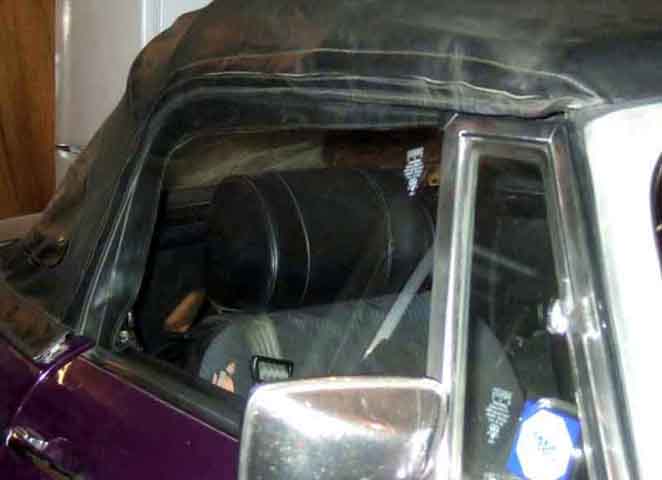 In May 1999 we stayed at a hotel in Guernsey for a few nights with a group of other MG owners from across the UK so the cars were in the hotel car park overnight with the hoods erected. I was amazed to see the variation in fit amongst the cars, and even more amazed to find that mine was one of the best. On my hood the gutter rail just reaches the top of the side windows and there is a flap of vinyl that hangs down inside the glass for an inch or so. On some of the better quality and more expensive hoods this flap barely reached the top of the glass and the gutter was way above it. Furthermore the flap was bowed in leaving a considerable gap between it and glass, which meant that with the slightest breeze any rain would blow straight into the car. Others I have seen have a much deeper flap inside the car, which although it seals just fine, is probably in the way when looking to the side. At least you could trim that back. This Prestige hood seems to combine both with the gutter a good inch above the drop-glass as well as a deep internal flap, but at least it lies flat. So, when considering buying a new hood, carefully measure from the top of one side glass, over the middle hood bow and down to the top of the other side glass, and compare with the gutter-to-gutter measurement of the new hood. Hold out for a good fit, new hoods are not cheap and you are likely to be stuck with it for some time.
 I've been asked a couple of times now for a diagram and dimensions of the hood fittings, so here it is. The hole to the left of the 8cm line for the rear-most peg is the tapped hole for the static shoulder belt attached with a quick-release fastener for some markets in various years. The front-most peg is measured from the front of the socket for the hood/top tongue, and has a press stud close behind it, which is for the tonneau cover.

 And how to get at the nuts that secure them.
 Another question popped up on the length of the retaining bar at the back of the hood. I knew it had chamfered ends to follow the curve of the hood material, and little boots on the end to stop it wearing through, but I hadn't realised the whole bar was curved, even though the pocket itself seems to be straight.
 For the three press-studs each side round the drop-glass positioning of the females in the hood material is best done on the car using the position of the males on the hood-frame as a guide, rather than giving measurements.
Interchangeability of tops and frames February 2018
There are occasional questions from people wishing to upgrade their hood and asking if it's possible. I can understand people wishing to upgrade from the packaway hood as that takes a while to sort out in a sudden shower, and apparently when the early folding ('scissors') hood is detached from the screen it flops all over the place instead of being self-supporting like the later Michelotti hood, so not quite as easy to raise and lower especially if one's Navigator is sitting in the passenger seat at the time. It's almost certainly true that any frame type will fit any body, as all use the same fixing points at the top of the B-pillars either indirectly using the tonneau sockets for the removable hood or directly for the two folding hoods. The pack-away sockets can also be fitted with the folding frames so tonneau cover bars can be used. But it's after that it gets a bit complicated.
 For the early hoods the header rail was the same for both - BHH496 - probably because the header rail has no attachments to the packaway frame, unlike the two folding frames. However the top including header rail is different between the two - AHH8516 for the packaway and AKE5372 for the scissors indicating the tops themselves are not the same. The rear fastenings should be the same as the early folding was an optional extra, so it probably means the fit is different over the two frames. Both the later folding hood complete with header rail, and the header rail itself are different part numbers again - BHH905 for the cover with header rail and AHH6437 for the header rail itself, however several of the main suppliers list the earlier header rail for all models, implying that the rails themselves are ostensibly the same and it is the tops that are again different. As far as rear fastenings go Kelvin Dodd of Moss US writes:
"In reality, the rear snaps moved around quite a lot when the V8/rubber bumper shell was built. I've done some research on this and have found that the stud location on the cars up to 1974.5 is pretty standard. From then on the snaps vary even from side to side. To allow the later tops to fit these later cars accurately the snaps and even the cut of the top from some manufacturers is slightly different.
"The changes in the rear lift a dot fasteners correspond to the re-shell, not to the introduction of the fold back frame design, but there may be slight differences in the later examples of this frame.
"Thankfully this is not enough to make it impossible to fit the earlier cars as the differences are in the order of a few millimeters, but it does require some stretching to fit all the rear snaps.
"The other thing that is interesting is that installing early stow away bows and top on a post 1975 car results in the rear seam not being in line with the rear bow as would be original for the early cars. So far my best guess for this is that the location of the tonneau bar mounts is slightly off on these later shells. Again, there is no reason for this, other than the looser tolerances in the shell fitment."
'Steve' asked this question on the MGOC forum as he was proposing to substitute a folding frame for his pack-away, and wondered which type of frame to get, and whether he would need a new top. I went through the above, he 'plumped' for the early folding frame, and his pack-away top and header rail fits just fine.
Frame mounts February 2018
 There are three nuts welded to the inside of the rear inner wing, just behind and at the top of each B-post. This panel isn't particularly strong, so can flex as the hood is raised and lowered, and the nuts can tear free. Also using standard nuts there isn't much engagement with the three screws, and the threads can strip. Oddly, the screws are way too long, with about an inch or more protruding from the nuts. Bee came to me with both these problems and the hood frame flopping about all over the place, tearing the trim panel.
 When stripping Bee for a repaint I had noticed that the nuts under the quarter-light are about three times longer than standard nuts, and given the very long screws would be an ideal match. But how to fix the nuts? Welding them to the panel would just pull out again, so I decided to weld them to a thick triangular plate, which would be held to the panel with a single screw. It's true that whilst you are fitting the three screws the triangular plate can move about a bit, but if you support the frame in the correct position while tightening the screws, once tightened - and given the thread engagement is now three times what it was before, you can get more torque on them without stripping and they are never going to move. And over the past 30 years that has proved to be the case.
June 2018:
 Moss US have produced a similar thing albeit with much less substantial nuts, and a larger pan-head screw instead of the countersunk I used, for which a hole has to be cut in the trim panel. Not listed on the appropriate Moss Europe 'Hood Frame & Tonneau Cover Fittings' page, but can be found by searching for the Moss US part number 472-328. Someone asked me whether the existing nuts should be removed. On the face of it yes as with the plate flush to the back of the panel and the screws tight that would resist twisting as the hood is raised and lowered better than if the plate were sitting on the old nuts. However if the nuts are present but the threads are damaged drilling a clearance hole through them will allow them to act as a locator, and the frame would not twist back and fore while tightening the screws. Of course if some are missing then short of replacing them with some other spacer that will allow the plate to be installed parallel to the panel, you will have to fully remove any remaining nuts. This isn't too difficult as they are spot-welded to three ears positioned around the hole, so it isn't too difficult to drill/cut/twist them off. Also supplied is a screw to fix the plate to the body. A hole has to be drilled in the panel for the threaded part to pass through and another cut in the trim panel to accommodate the head. This second hole is behind the tonneau socket and/or hood frame pivot, so not visible with everything back in place.
