
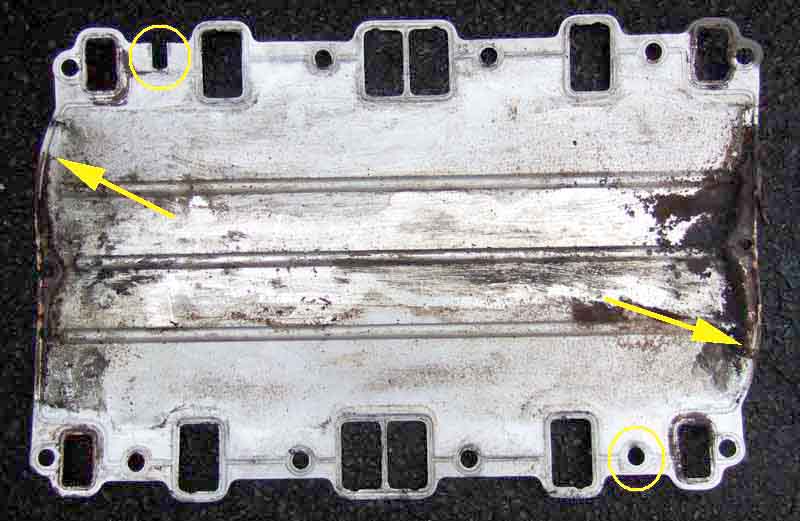
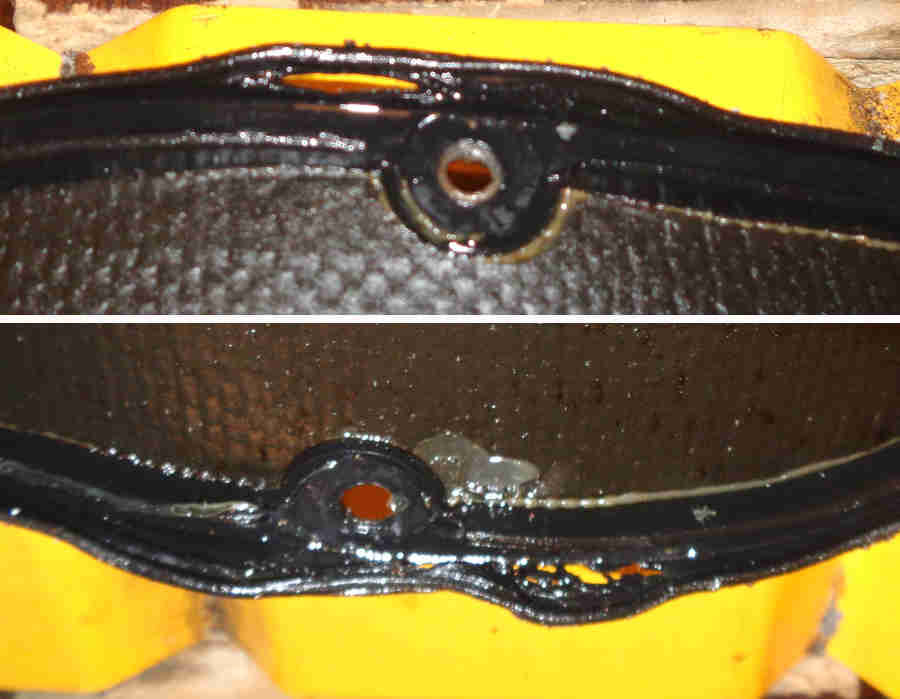
June 2017 Previous tin gasket with 'open' hole in one corner, albeit no FRONT marking. Arrows show the offset heads and ports.
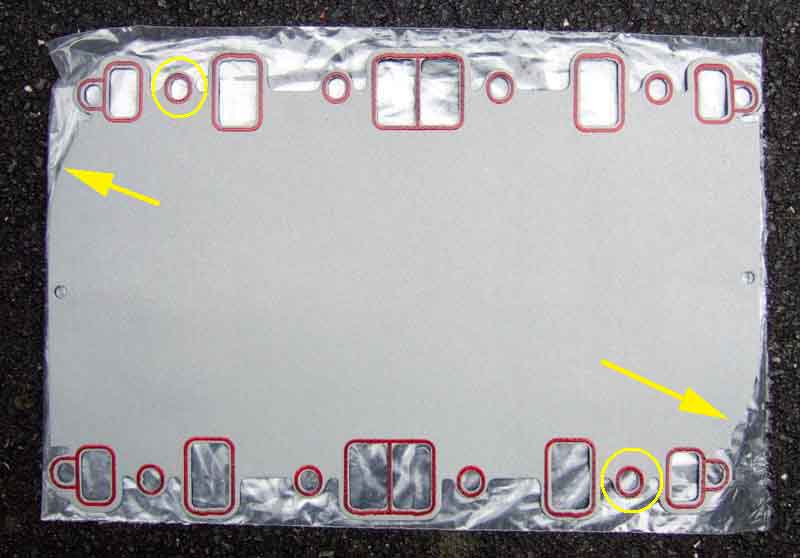
New composite gasket with no open hole or FRONT marking, and seals round all the holes on one side only.
March 2025: Time to tackle the oil leaks - decide to do the inlet manifold one first, may move straight on to the front cover/block/sump one immediately after.
First job is to remove the distributor cap and right-bank plug leads from the plugs and tuck the whole lot out of the way on the left-hand side of the engine. Next removed fuel and overflow hoses from the carb ports, choke and throttle cables tucked down the right-hand side, then air-box, carbs and adapter complete which should be straightforward ... but isn't. With the nuts removed from the six adapter studs the adapter is stuck fast to the inlet manifold despite nervously levering with a 24" pry-bar in several places. There is silicone sealant oozing out all round the join - which the gearbox people would have done when they reinstalled the engine, so I suspect it is round the studs in the adapter holes as well as slathered over the whole of the faces. And with six studs there is very little scope for wiggling the adapter one corner at a time to break the seal given the minimal clearance between the studs and the holes. Nothing for it but to remove all the studs. Fortunately they all come out relatively easily with double nuts (and as suspected sealant has been forced up between the studs and the adapter holes) but that must have cost me at least an hour, and with a bit of gentle levering it comes unstuck and is off complete with the K&N air filters and crankcase breather filter which mounts in a bracket on the back of the air-box, and the distributor vac pipe:

That much sealant over the whole of the face is ridiculous, all that is needed is a thin ring about 1/4" from the edge of each port.
Several fiddly bits round the manifold to remove but first I make sure I can slacken all 12 bolts - wouldn't want to do that last and have a show-stopper. 11 come loose easily with my breaker bar, the 3rd from the front on the right bank is shrouded by an inlet manifold port which prevents a socket going on. You can use an open-ended spanner for removal but will need an open-ended 3/8" drive crows-foot (not the flare type with partially closed jaws) for replacing and torquing, it can be turned through 120 degrees which is three pairs of flats:
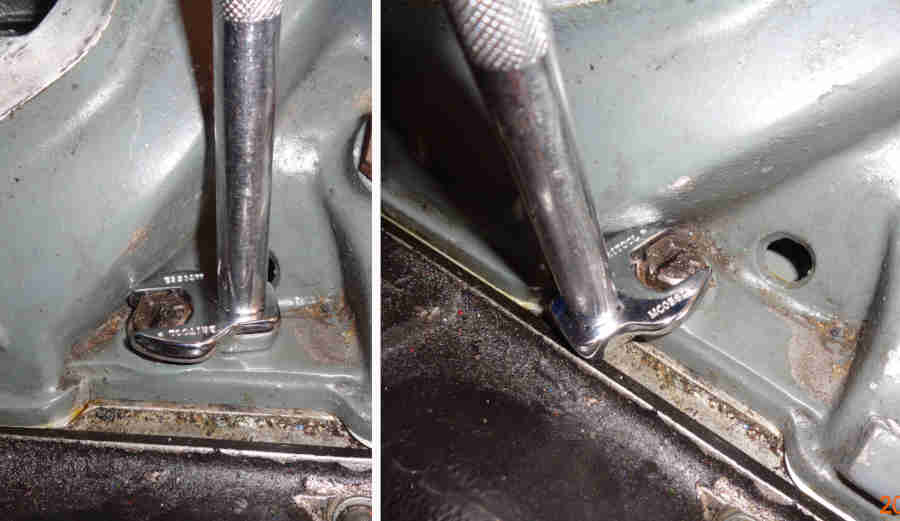
That bolt should (as here) have a screwdriver slot so once slackened you can use a screwdriver to remove and refit instead of spannering one flat at a time all the way.
With those loose the temp gauge sender is the next challenge - pretty tight and two of the flats are a bit damaged, a crows-foot 5/8" spanner is desirable here. It comes free suddenly with a bang which makes me think something has broken but fortunately not, and the nut is turning on the sensor so shouldn't have damaged the capillary, tuck that out of the way down the right-hand side. Next the heater hoses from the heater, and remove the valve from the adapter pipe rather than mess with the cable adjustment or remove the pipe from the manifold with its small screws (removing both the valve from the adapter pipe and its hose from the heater allows the valve on its cable to be tucked down the left-hand side). Top, bypass and heater return hoses to pump come off. Servo hose, fan switch wire, remove the 12 bolts, a little gentle levering and it's free and away:

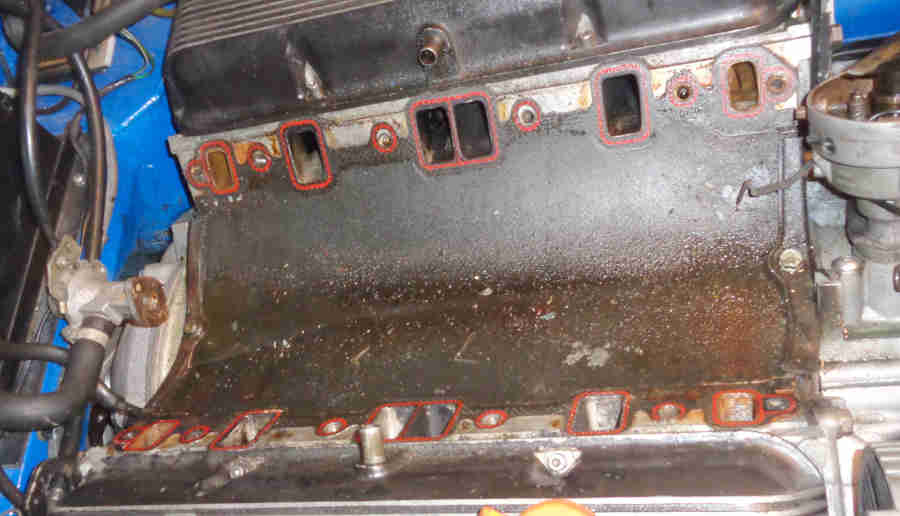
Can't see much oil on the gasket, only coolant. Whilst some of that will be from undoing the hoses the stripped thread on the 2nd bolt back on the right-hand side has been seeping ever since I swapped the heads, so that is what the gearbox people may have been talking about. Oil is more likely to come from under the gasket and run down the back of the block (which I noticed in June last year) and the front ... which may be the cause of the occasional drip from there and not the front cover and/or sump gaskets as I had thought! The valley gasket certainly isn't 'on the verge of breaking up' as the gearbox people said, and very little if any of the coating or red 'sealing rings' has transferred to the manifold:
Oddly the gasket is a uniform black both sides but at the engine rebuild in 2017 it quite clearly is grey, but even by the time of the gearbox rebuild just two years later it had turned black!
End-seal retaining plates removed, gasket only lightly stuck down, a paint scraper used in a couple of places frees that ... and Vee's engine innards are fully exposed. Brown streaks are the dried Wellseal from the previous installation, crankcase 'squeaky-clean' otherwise, but then it only been eight years and 12k since the rebuild. The composite gasket coating has stuck to the heads round the water ports and takes some scraping off, something that doesn't happen with the tin gaskets:

By laying sheets of newspaper over the valley where the gasket was and tucking the edges up behind the lower edges of the ports should catch the majority if not all of any debris scraped from round the head ports and where the end seals were located.
I can immediately see that both front and rear rubber seals have split which wouldn't help with oil leaks, although the splits are on the 'outside', and for the back one at least (there is an issue with clearance for the front one) it begs the question of how it got damaged:
Next day I helicoil the No.2 right-hand stripped thread. I had bought a kit with drill, tap, tang-breaker and a dozen coils as soon as I got the car back with the new gearbox in preparation for this job. When drilling and tapping put a bolt in No.3 hole so you can drill and tap at the correct angle as the holes are not at right-angles to the surface of the head. I duct-taped the water and intake holes either side of the damaged hole, the whole of the crankcase including crankshaft, con-rods, cam, followers and push-rods is exposed but with that and the newspaper tucked under the lower edges of the ports should catch everything. I initially considered doing the repair with the manifold in position but despite being slotted (or maybe because) that hole seems to be a 'positioning' feature as it has little or no clearance to the bolt on three sides. Drilling for the helicoil would mean widening that hole but with the drill acting on just three 'sides' and not all the way round equally it would be likely to be off line when going into the head which could cause all sorts of problems. Also the tap would have to cut a thread in that as well, and the helicoil itself be 'screwed in' through it. The clearances to all the other bolts are significantly more and working through the manifold hole would probably have been fine. In hindsight I could have left the old manifold gasket stuck down to keep bits out of the ports and crankcase, that might have been enough. But greasing drill and tap seems to have picked up most of the debris, a greased cloth dabbed round picked up more, leaving just a few crumbs in the paper to be gathered up.
Next was on the bench removing the old silicone sealant from the carb adapter/manifold join - at least with the studs out that was easier than working round them but still took a lot of scraping helped with some gasket-remover. Also the head port faces and heater valve adapter pipe. Used my air-line to blow out the manifold passages (for info see here for which carb feeds which cylinder).
Next was trial-fitting the new manifold seals that fit on the front and rear edges of the crankcase between the heads. The gasket sits on top of those as well as the heads, and clamp plates press them down onto the crankcase. This time I decide to do it differently again - using silicone sealant to 'stick' the seal to the crankcase and fit the clamping plates to hold them there overnight, hoping that gives a better join between seal and crankcase. Then remove the clamping plates, more sealant on top of the seals and fit the manifold gasket. But when I go to fit the clamping plate at the front I discover there is no gap between the front cover and the seal for a flange on the clamp plate to fit into so it's not pressing the seal down onto the crankcase. There are two vertical ribs on this Buick front cover coming up past the seal and clamp plate (red arrow) whereas the top of the original front cover sits below the fitted seal and clamp plate (green arrow). Maybe that is the cause of the oil leak at the front which I had assumed was the front cover/block/sump joins, in which case I'm glad I didn't look at that leak first! In any case I had already decided to wait until it's running again with no issues from the inlet manifold gasket replacement before tackling the front cover:
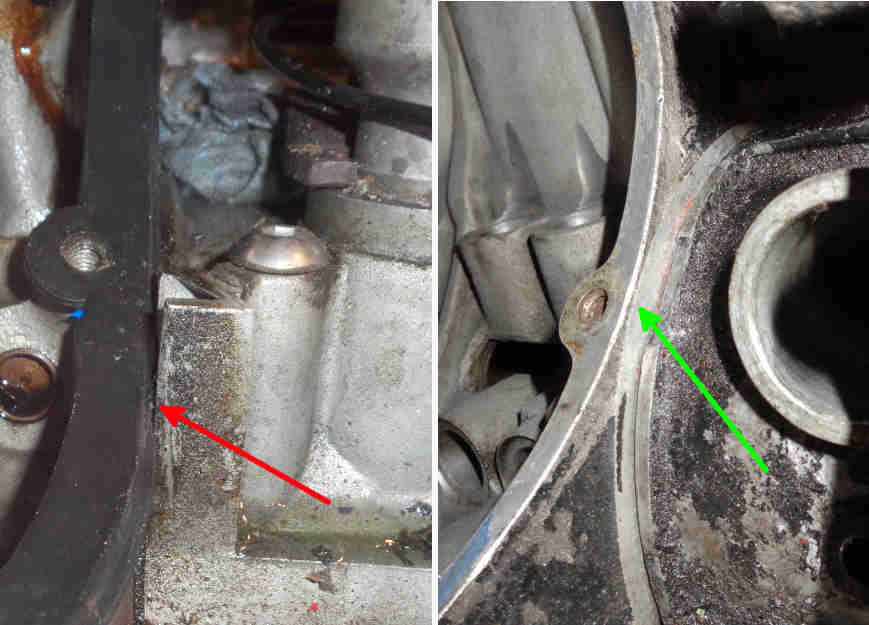
The odd thing is that I fitted the gasket and manifold etc. after the engine rebuild and don't recall any issues then, but with the gasket in place before fitting the clamp plates it may have been hiding it. Fortuitous that this way showed up the issue before I had sealant on the gasket and manifold including round the intake and water passages. But what to do about it? This is the Buick front cover which I had to use in place of the original (which was damaged by the people who removed and stripped the engine) and there have been a number of other issues fortunately relatively easy to resolve. It's two 'vertical' ribs that are causing the problem having enough clearance for the flanges on the gasket but not the additional thickness of the flange on the clamp plate. Ideally I would cut the front cover back but I don't fancy doing that in-situ with all the innards exposed! The only other thing is to cut the flange on the clamp plate back by those ribs. That will reduce resistance to bending a little as it's screwed down, but it's thick metal, there is an upward flange on the other side, and it's only held in place with a single 7/16" screw so not a lot of torque on it, and that's what I do. In fact there is a 1/2" AF UNC screw at the front instead of the 7/16" there should be - something else I don't remember so whether it was already like that or the 7/16" stripped because it wouldn't clamp the gasket and seal down I don't know. Threads are only 3/4" long and it has to go through clamp, gasket and seal and barely picking up so I find a longer one. The hole is more than 1" deep so use a grease-filled tap to extend the threads, and finally the clamp plate will tighten down onto the seal.
Opted for the composite gasket again this time, I suspect that being thicker they are better suited to mate 'old' surfaces than the original tin which was first used with freshly machined surfaces. It is also pre-curved so should drop straight into position, instead of the original tin and the previous composite being flat which need careful bending without creasing the head/manifold faces. Being curved they are in a bigger box which has to go Parcel Force at a higher price instead of Royal Mail ... but the Brown & Gammons online process quotes Royal Mail price and wouldn't complete so I had to order by phone. I tried to order from Clive Wheatley as usual, gasket listed but not end seals, emailed about them and got the response "Yes we have the gasket". Emailed back asking about the seals ... and nothing. Phoned, and again I had say twice it was the seals I was asking about and not the gasket. He wasn't sure but knew they weren't on the web site, was in the middle of a large order and asked me to call him back later ... hence going to B&G. This time I'll use the WSM recommended Hylomar 'SQ 32 M' which Googling says is now just 'M', but you have to be careful as there is also Hylomar Blue which apparently doesn't stick as well as M and is cheaper, so I'm suspicious of pictures of M packaging with 'Blue' pricing! Even that wasn't straight-forward, tried to pay by PayPal but that wouldn't proceed without me supplying a debit card (not had that before with this account), and when I tried to pay that way instead it got in a tangle with bank authorisation before it finally went through. So even ordering parts is its own saga! One surprise reading the WSM closely (!) is to see the instruction "Coat the cylinder head, the induction manifold and the manifold gasket" (my emphasis) with the Hylomar which I hadn't realised before i.e. both faces on both sides.
Next day both arrived and very pleased to see the Hylomar from Zoro was indeed M. Yet another variation in the gasket - as well as being pre-curved unlike the previous tin and the composite fitted at the time of the rebuild above, it doesn't have the sealant rings on either side (nor the 'FRONT' mark or slotted hole), but it does have the sealing channels of the original tin type and seems to have the same tin core with a coating both sides as the previous composite. Laid over the inverted manifold here:
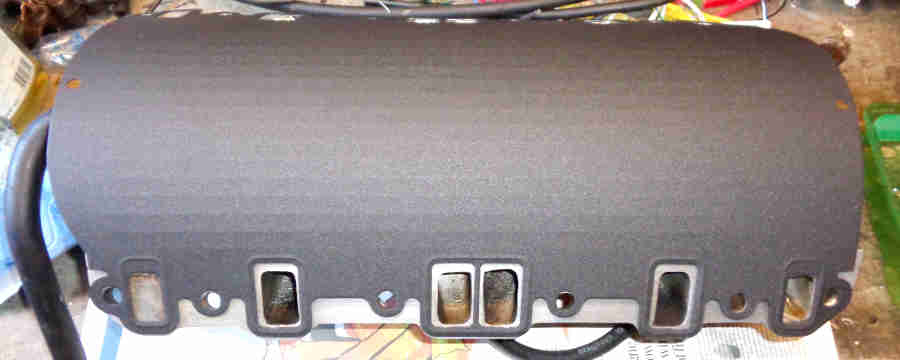
Drops straight onto the engine so installation should be relatively easy:
One tip from an RV8 site if you haven't used this type before is to dry-fit the gasket and manifold (loosely positioned with the end-seal clamp plate screws) first to check all the bolt-holes line up. With the thicker gasket and especially skimmed heads the horizontal alignment of the holes on angled surfaces changes slightly, and although the manifold holes have quite a bit of clearance the gasket holes may need relieving slightly on one edge despite being slightly ovalled. Mine was close but all the bolts did just go in without that.
A final clean of the surfaces and fit the rubber end-seals to the crankcase, being careful to get the seal ends into the angles between head and block, with sealant. The WSM says to use silicone grease on both sides of each seal which might help it slide into the correct position as everything is tightened, but it also says not to tighten the clamp-plate screws until after the manifold bolts have been tightened. I still feel it's better - once the manifold bolts have all been inserted and are positioning the gasket correctly, to tighten those screws first, but do it the WSM way this time. A thin (depth and width) bead of Hylomar M round all the water-jacket holes (including the rear of the inlet manifold which is blanked off both sides) in the centre of the overlaps. Initially it goes on shiny and quite 'wet' but almost immediately changes to matt and tacky, and remains that way for some time. Probably the inclusion of acetone which is a rapid-drying solvent which means the base sealant sticks well to the surface it is applied to, and being on both surfaces then sticks to itself when they are placed together. Bolts in, progressively torqued up working out from the centre on alternate sides, just little bobbles of sealant round the joins so hopefully the same in the passages and not great gobs of silicone half blocking them as I have seen elsewhere. Again only about an hour and that's enough for another sunny day and I leave the manifold seal to 'set' such as it does and not rush into fitting the rest and firing it up.
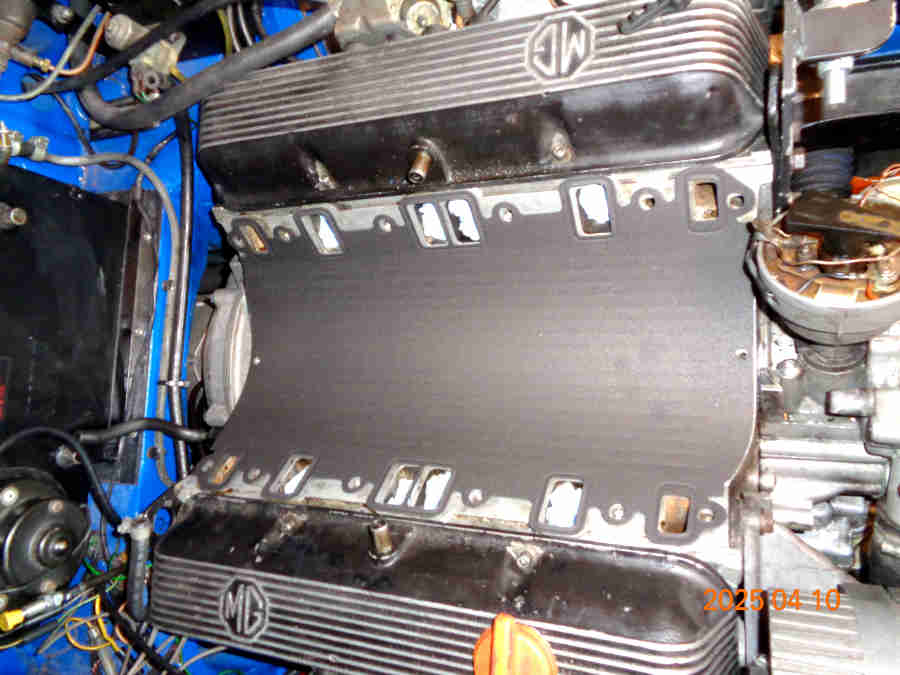
Next day refit everything round the manifold such as heater valve, hoses, servo hose, temp gauge capillary. Because the carb assembly came off easily this time I've left the studs in but there is enough space to clean the surfaces and apply a thin bead of sealant (one surface this time). But lowering the assembly onto the studs is tricky getting all six lined up. Four of the six come out easily so I don't mess with double-nuts on the other two, and the assembly drops on easily now. Refit the studs, this time using double-nuts to make sure they are bottomed, then washers and nuts. Fit the fuel and overflow hoses - ignition on to check for leaks. All good so choke and accelerator cables fitted, rocker cover breather hoses, distributor cap and plug leads, coolant added. Leave the air cleaners and crankcase breather filter off for now. Fire it up and it runs, so down to the layby round the corner, obsessively checking all round and under for anything untoward. A warm day so it doesn't take long at a fast-idle for the fans to cut in and all good. Back to the garage and leave it to cool right down giving it a good pressure test before checking coolant. Take a celebratory ride out in the roadster for an hour or two in the 20C plus (in April!), V8 engine still pretty warm so it'll need to be left overnight, but I fit the air cleaners and crankcase breather filter.
Next morning very little coolant needs to be added - less than I would have expected for a drain and refill with just one run up to temp, but as there might be a shower I leave both in the garage and get the paper in the Merc. Being a Sunday I give the neighbours a break and don't swap them round putting the V8 at the front ready for test drives either. That can wait for next day - a brief trip out, and all still seems well, and even less of a top-up next day.
While doing the job I noticed the fan-belt was beginning to fray so fitted the new spare but put the old one back in the boot as a usable 'get you home' spare.