


Replacement!
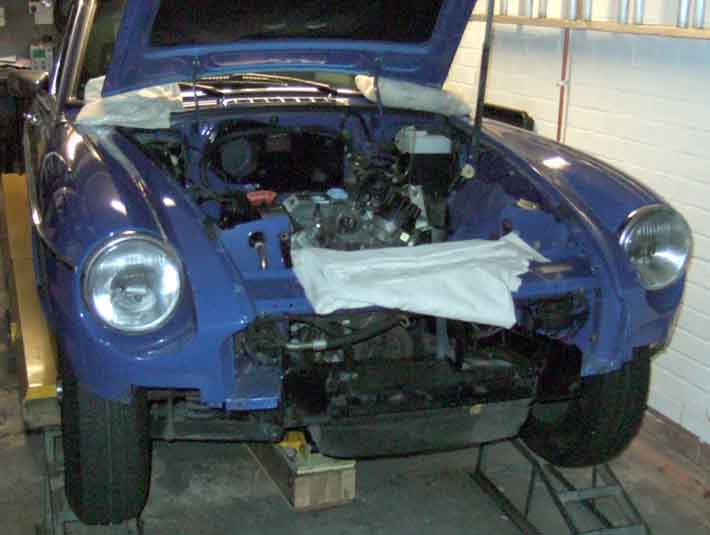
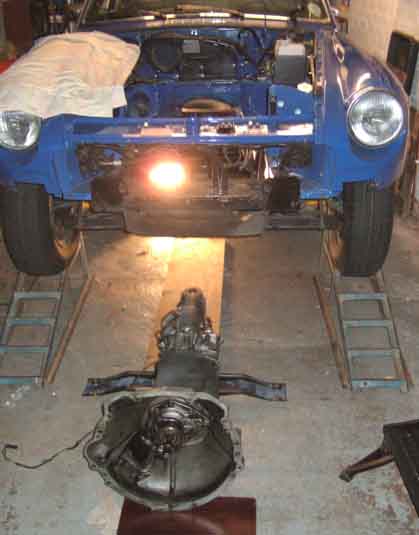
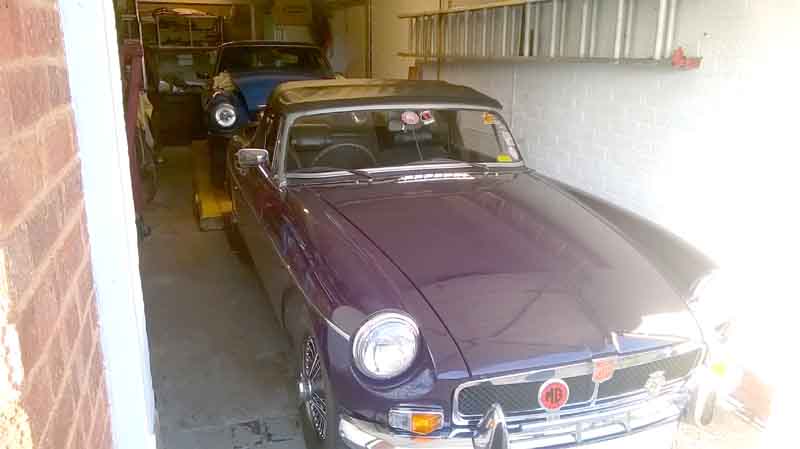
December 2019: Vee's gearbox started whining about a year after it was out for an engine rebuild and repaint - very annoying, as both have to come out again. It's usually said that the two have to come out together, which is simply not possible at home with a folding hoist, and I really really don't want to send her away again after the last time. With a double-length garage and Bee out of the way there is the length to work on the car and just shut the door on it at night. That would mean leaving Bee out for several days in winter weather, but fortunately pal Dave is in the process of remodelling a property so it's not occupied, and I can put her in that garage. The first dry day for weeks as I don't want to put her away wet sees Bee round there, and next day I can start. Also the start of a spell of cold weather with morning frosts, but there we are, just a matter of 'the right clothing'.
So my preferred method is to remove the engine first, then the gearbox, which would be my choice on the 4-cylinder as well. Not a trivial task in any event, but there are several aspects of the V8 which make it trickier:
- The bell-housing bolts sit further back on the V8 than they do on the 4-cylinder and are in the tunnel.
- But more significantly they are bolts that screw into the V8 block, instead of bolts through the 4-cylinder engine back-plate with nuts that are effectively in the engine bay, so you have no option but to undo the bolts. With the 4-cylinder you undo the nuts just holding the bolts still, so they don't need any 'swing' space for a spanner.
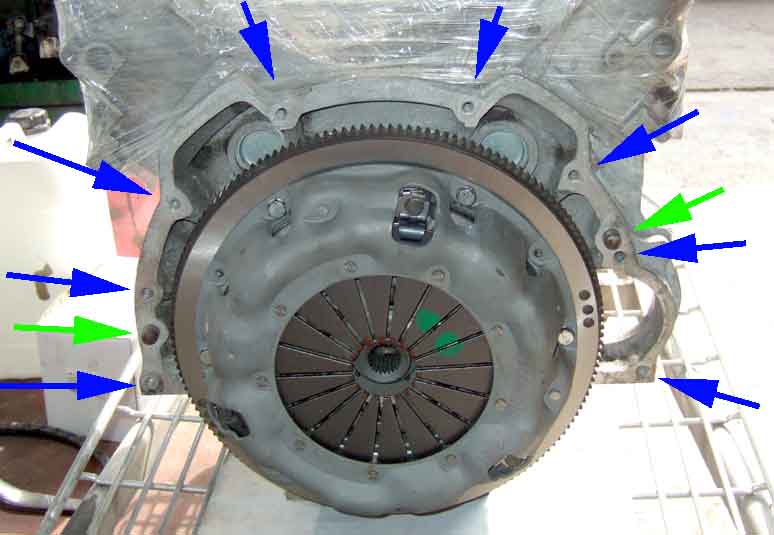
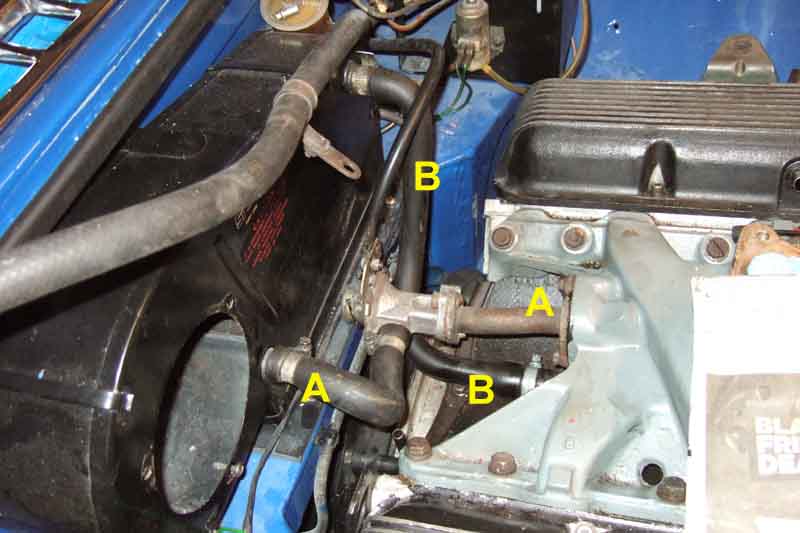
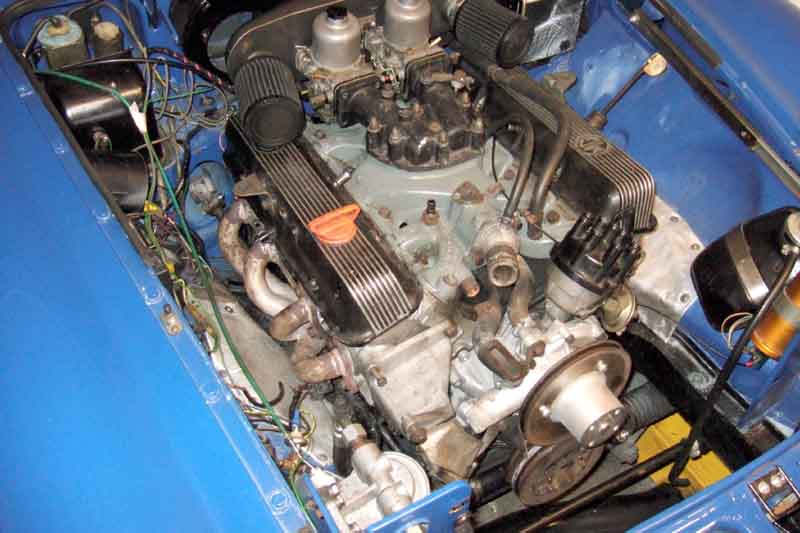
- With the 4-cylinder the bell-housing bolts are distributed fairly evenly around it, with the two lowest ones right at the bottom so easy to access. These are the last ones you undo (and the first to refit), as when the engine is hanging on the hoist and the tail of the gearbox is on one of the cross-members, the top of the back-plate and bell-housing are being pushed together, and the bottom is trying to pull apart. Once all the others have been taken out with the engine lowered, it is lifted until the gearbox is at the top of the tunnel. Then the gearbox is supported taking equal weight, the final two nuts - right at the bottom - are removed and the engine pulled forwards. That's the 4-cylinder! On the V8 all of them are round the upper half of the bell-housing and inside the tunnel (blue arrows below taken prior to reuniting engine and gearbox on the workshop floor after the engine rebuild), so the lowest two are up inside the tunnel even with the engine fully lowered, even higher when the engine and gearbox have been lifted to the top of the tunnel. The top two are right on top and not visible from underneath, and only just visible from above, at an angle inside the tunnel, with no space to fit even an angled ring spanner let along swing it.
- Whereas with the 4-cylinder several bolts are left in the bell-housing to act as guide pins when pulling the engine forwards and refitting, but on the V8 as soon as the threads are disengaged there are just a couple of short dowels (green arrows) for location, so you have to be sure the gearbox and engine are supported equally as those dowels disengage, so you don't stress the first-motion shaft. As it is, I'll have to partially unscrew the two lowest ones, ease the engine forwards to disengage the dowels, and the bolts will still be keeping the two more or less in line. If those have now become stiff to turn, I'll know the engine and gearbox are not supported equally, so can make small adjustments to one or the other until the bolts turn freely - that's the theory at any rate!
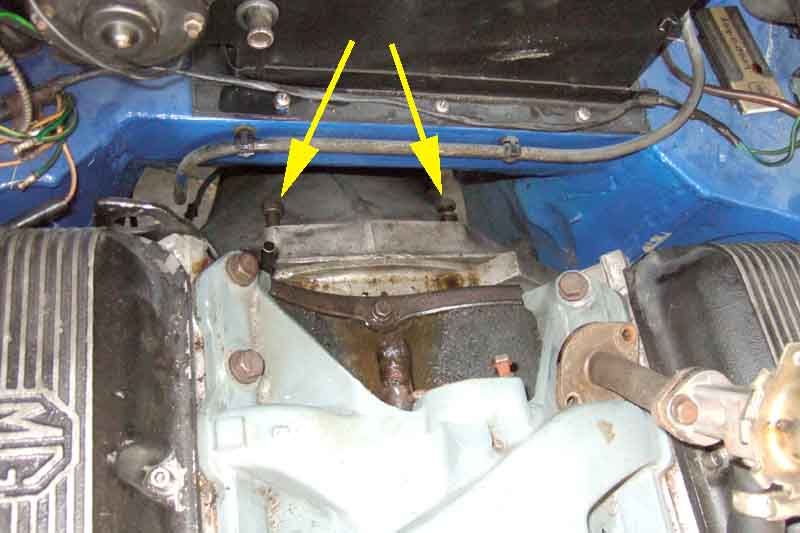
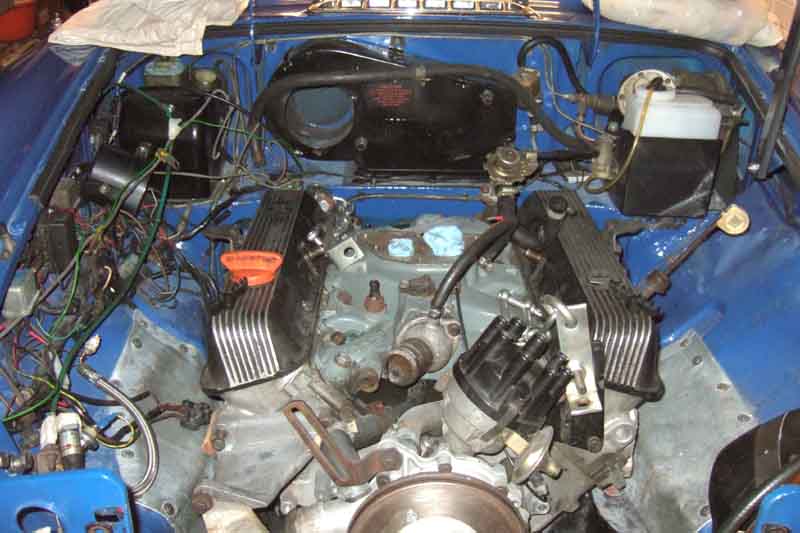
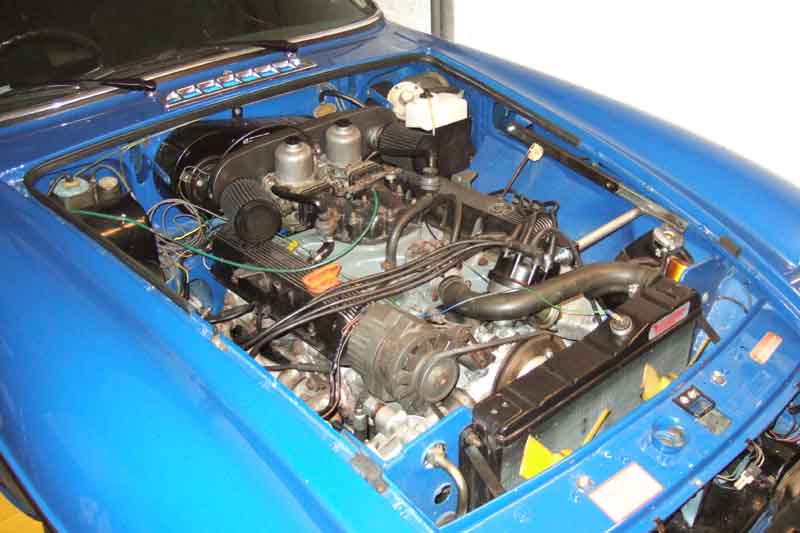
However looking ahead to getting the gearbox looked at, one of my contacts came up with a local chap, and he said it is possible to get the V8 engine out on its own. You have to remove the engine mounts and mounting plates, and exhaust manifolds, and that allows the engine to sit a good 2" or more lower in the chassis. Then with the carb assembly off and heater hoses and heat valve out of the way you have more access to the top two bell-housing bolts. To get the off-side exhaust manifold off the rack needs to be removed, and removing the manifolds gives more access to the engine mounts, so quite a bit of work needs to be done to get to the point where you know you will be able to access all the bell-housing bolts. The engine has to be lifted right up so the mount studs are clear of the chassis slots so they and the mounting plates can be removed, so prior to that I disconnected the oil cooler and gauge hoses to avoid stressing them, removed the distributor cap and leads and fitted an old cap to protect the distributor innards. As I can only borrow the hoist for the final extraction I'm having to raise the engine by jacking under the sump with a wood block, and squeezing in and out between that and the wheel ramps first one side then the other is hard work. With the mounts and plate off and the engine lowered onto the chassis rails, and the carb assembly removed, there is a lot more access to the top two bolts as shown below, even though in this picture the engine is sitting on thin wood blocks in place of the mounts and is not quite as low as it can go.
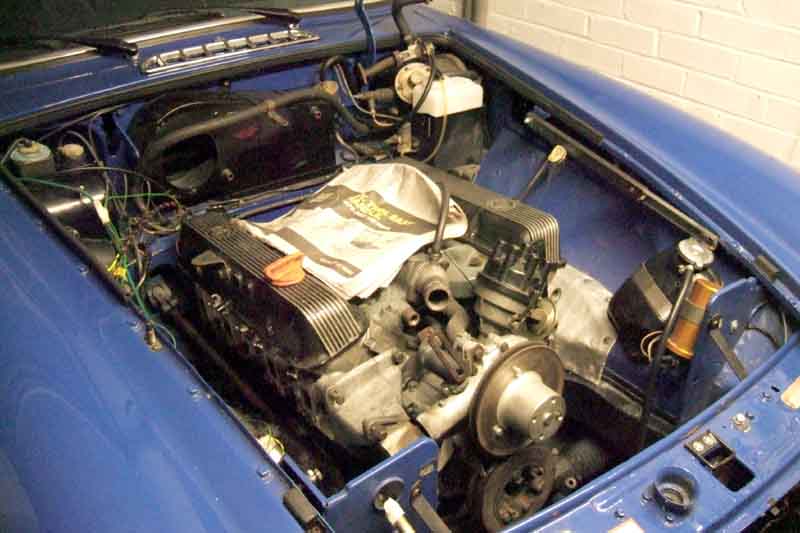
Something very odd with this picture as the valley/inlet manifold gasket is clearly black although taking pictures during reassembly as part of the repaint and engine rebuild in 2017 quite clearly show it was grey.
However as there is so much work involved to get this far it would be advisable to check you can move the six lower bell-housing bolts first - slackening each then nipping back up. If you can't then there seems little point proceeding, and if you intend driving the car elsewhere to get the job done make sure any you have been able to move are retightened fully. If you can't get a socket on any of the bolts with a 3/8" drive, multiple extensions, U/J and socket try dropping the rear cross-member which will allow you to swing the tail of the gearbox an inch or so either way, which may give just enough clearance to the tunnel. Even then there is no guarantee that you will be able to move the top two.
Having got access, the next question is will they undo! Joined together with both units on the workshop floor two years ago, and tightened with a 1/2" drive socket wrench, no torque I'm aware of. Even with the extra space it's not enough to get even my 3/8" drive socket wrench in there, let alone with a U/J, and especially not my 1/2" drive, a swivel head type might. I did lay in a 1/2" and 9/16" swivel-ended socket spanner, which did just go on, but is very close to the tunnel. My angled ring spanner went on easily, with the handle pointing out at a convenient angle. But it's shorter than the swivel ended let alone the socket wrench, and I couldn't get enough force on it to shift the nut. So get one of my oil cooler hose spanners, put the ring on that over the appropriate half of the open-ended jaw to get more than double the force ... the spanner was bending ... there was a 'crack' ... and the bolt was free. Ditto the second top bolt - phew! That took about four hours and enough for one day.
The big question for the second half-day was, would the remaining six come undone! Underneath it looks like there is enough space to do one side but not the other, which is right up against the tunnel wall. Nevertheless I get my 1/2" drive socket with long and medium extensions and a U/J, and by leaning the wrench head against convenient chassis rail and cross-member they do come undone with the same 'crack'. I don't intend to disconnect the gearbox cross-member from the chassis rails until the last minute, which is giving a degree of stability to the engine as it's going up and down and only supported under the sump. The only way I can get access to the other side is by jacking up the engine and putting a chunk of wood where the engine mount goes on the side I want to access, so when I jack it down the engine is forced across to the other side ... and those three come free just the same. So that's all eight loosened now, and I have good chance of being able to complete the job. It's only now that I start thinking about everything else that has to come off - drain coolant, remove radiator hoses, remove fan guard, radiator, cooling fans (the fan comes off the motor replaced many years ago but I have to remove the other motor complete with fan), alternator, temp gauge sender, servo hose, coil to distributor wire, and anything else round the top of the engine, and enough for another half-day.
The next half-day was removal of centre cubby and armrest, gear lever, starter, clutch slave from bell-housing left hanging on hose, prop-shaft, speedo cable, and anything else round the gearbox such as disconnecting the gearbox sub-harness from the main harness at the heater shelf. I'd been pondering lowering the gearbox cross-member to give better access to the bell-housing bolts and more tilt on the engine, but didn't want to leave it completely disconnected. I found some long bolts that fitted the chassis rails, and used one each side in place of the four short originals. I had to remove Bee's chrome bumper when getting her engine out with this hoist, so felt I'd have to do the same with the rubber bumper. I didn't want to wait until I got the hoist as I want to crack straight on getting the engine out, so decided to take it off anyway, which meant removal of the mesh grille so I could disconnect the indicator wires from the main harness. I may have to remove the front valance as it is the ST 'scoop' type and projects forward slightly rather than simply curving back, but that can wait as I'll still have the morning before we tackle the extraction in the afternoon. That really is about all I can do, the bonnet has to come off but will wait until Dave comes round to help with the final extraction. In the meantime I can remove the rear hinge-to-bonnet bolts and slacken the front ones with plenty of padding under the rear corners and the front (as recommended by John Maguire) and disconnect the prop, so all that needs to be done is remove the front hinge-to-bonnet bolts and lift it off.
I left the gearbox draining over night into a clean bucket, nothing in there next day, but some metal fragments in the hollow in the drain plug. Otherwise a day of rest, apart from constructing a support for the rear of the engine as that will have to go back minus the gearbox, which will then allow the car to be pushed back onto the full-length ramps so I can get Bee back from her temporary home. Hoist arrives that night.
Should be the big day, but Dave isn't available until 2pm which gives me the morning to ponder attaching the hoist and thinking through all the steps needed. I decide to remove the valance rather than risk damaging it, and it gives an extra inch clearance between car and hoist as well as giving me more room to slide under and back out, should have done that at the outset.
Restricted for height in the garage, especially as the car is on wheel ramps, so I set up the hoist and leveller chains for minimum length. Not ideal as the leveller is shorter than the distance between the V8 lifting eyes, which means the chains will be at an angle and tending to pull the eyes towards each other, and towards the rocker covers. Last time putting engine and gearbox in together we used a strap through the eyes to the hook on the hoist, no leveller, and both eyes did end up bent, but how much of that was new and how much old I don't know. The strap was left longish, maybe about the same angle as the chains will be, so we'll see. That leaves the leveller quite close to the long carb plenum studs sticking up from the inlet manifold, so they come out. The rear attachment point is very close to the heater motor, to that comes out with its fan, and I dig out a couple of stout bolts with nuts, and big washers, to attach the leveller chains to the V8 lifting brackets. The heads of the bolts are very close to the rocker covers, so I remove the screws but leave them sitting there as a loose cover.
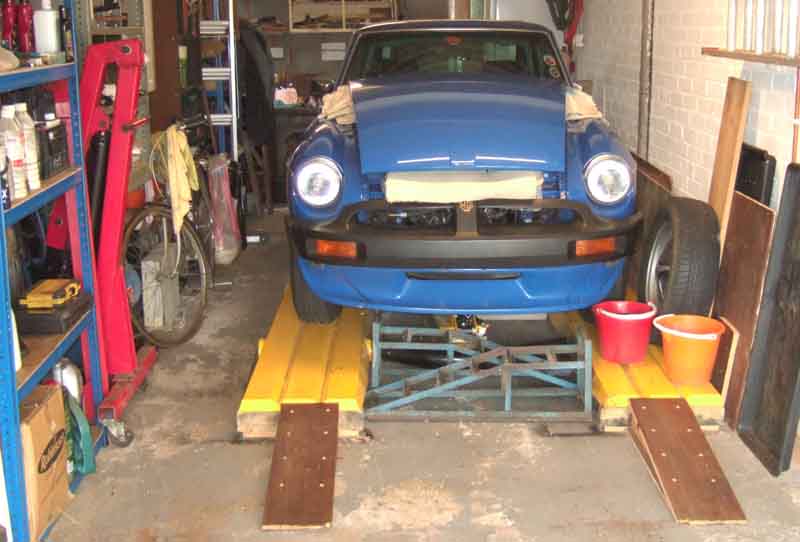
Then I have to think about getting underneath to remove the remaining bell-housing bolts with the hoist in position, and really I don't think I'll be able to lie across the hoist legs while getting underneath, and especially getting out again. When I did Bee's clutch I got in from the sides behind the front wheels. But the wheel ramps are only a few inches away from the end of the full-length ramps and not enough room. So I jack the one wheel up off the ramp and turn the ramp round, and take off the mud-flap, but still not enough room. Nothing for it but to jack the front wheels down to the floor and roll it forward a foot or so ... which needs the rack to be refitted loosely, but it would need to be anyway to roll the car back onto the full-length ramps after engine and gearbox are out, so no big deal. Then jack back up and slide the wheel ramps under, facing the 'wrong' way as before to give me the maximum space from the sides. Finally I have plenty of room to get in from the side, but with the trolley jack in place as it will be to support the gearbox I can't reach across to the other side. So the mud-flap comes off that side as well. Really the front of the exhaust pipe is in the way as well, so round the back and completely remove the rear mount (only slackened before along with the centre mount), and I can pull the exhaust system back until the centre box reaches the centre mount. As well as being largely out of the way now, it also allows me to pivot it round so the front end is by the sill and not the tunnel.
Next morning I hook up the hoist with leveller, but I'm still concerned about being able to lift the engine high enough to clear the slam panel before the end of the jib hits the ceiling, especially as the body will rise a couple of inches as the weight is taken off! With the engine pulled forwards clear of the gearbox I may need to lower the gearbox trolley jack, then jack the body to replace the wheel ramps with axle stands ... which needs two jacks ... and fortunately Dave has one as well. If we slide the gearbox out from under the car the body may have to go back on the wheel ramps again, plus be raised a bit more, as from measurements the space between the front cross-member to the floor for the height of the bell-housing is also going to be close, even though the body will be a couple of inches higher without the engine. Alternatively we could lift the gearbox out after the engine. Dave arrives in the afternoon so I start removing the side bolts between the bell-housing and the engine, leaving just the bottom two in place. Three come out no problem with fingers after a turn or two with the ratchet handle, but the fourth needs ratcheting all the way and comes out so far and no more. I think it is clear of the thread in the engine, so wedge a long screwdriver behind the head while I ratchet some more, which gets it out another half inch so must be clear. Then start jacking to raise the top of the bell-housing to the top of the tunnel ready to support the gearbox and remove the final two bolts ... and the hoist starts sinking! There is a small Mole wrench on the release valve instead of using the slot in the end of the jack handle, which is suspicious as it allows the valve to be tightened much more than it normally would be. Tighten it a bit more, and it seems OK, but then starts sinking again. So I try jacking as it is sinking but it gets to the point where is sinking as fast I can jack. Fluid? We dribble in hydraulic jack oil from a nozzle bottle, which involves lying the hoist on its back each time, but despite doing that repeatedly, when we stand it up again it still hasn't reached the bottom of the filler hole. Thinking if lack of fluid was the problem, having added a significant amount it must have made a difference. But no, once it starts sinking it does so until the engine is right back on the chassis mounts. Also before hooking it up to the engine I jacked the jib right up to the ceiling to check the clearance for the engine to the slam panel, and it didn't sink then. No way we can risk it, if it suddenly drops half way out it would all be over. Bugger bugger bugger.
Dave leaves to call on a couple of places that might have a hoist and hits pay-dirt at the first - same type as this one so we know it will fit between the ramps. Next morning he brings it round, and the other chap collects the first hoist saying when he asked the person who had it before about it sinking he said "Oh yes, I just keep cranking ...".
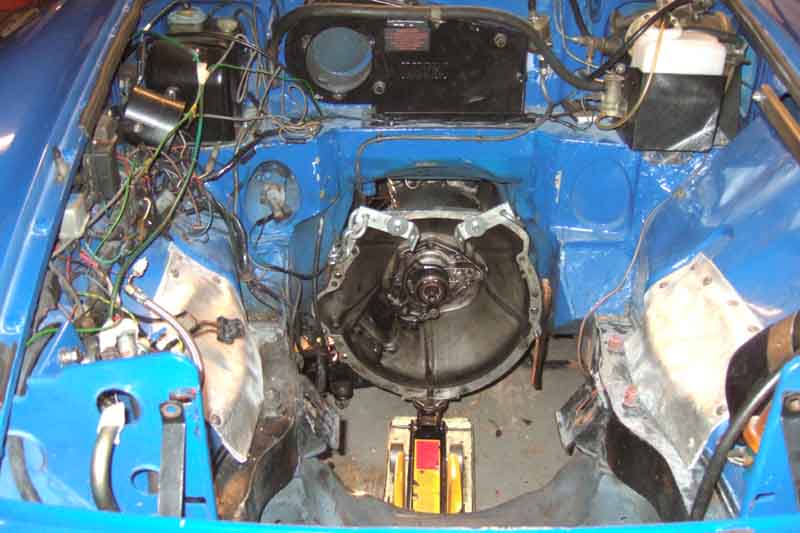
The first job is to clear as much space at the front of the car as possible which we should have done the previous day really. Hook up the new hoist with Dave suggesting we use the shackles through the lifting eyes on the engine instead of the lifting plates with bolts i.e. fit the chains the other way up, and that gives loads more clearance to both the rocker covers and the heater motor had it still been there - the power of lateral thinking. Raise the engine and gearbox ... and hoorah, no sinking! But the bolt that is stuck in the bell-housing is jamming on the side of the tunnel, so ponder a bit, can see it from above with them lowered, so get a long screwdriver in as a drift behind the head, tap it with a hammer, and out it pops. Now the engine can be raised until the gearbox is at the top of the tunnel, and I can see the sump will clear the cross-member with a straight pull forwards, unlike the CB 4-cylinder where it has to be angled once the first-motion shaft is clear of the clutch splines before it can be pulled forwards any more. Now with a trolley jack under the front of the bell-housing I can start slackening the two lowest bell-housing bolts.
One mistake was using the minimum length of chain being concerned about the headroom to get the engine over the slam panel, and we found the we couldn't turn the leveller handle as it was too close to the engine. But I'd set that before hooking it up testing the 'twang' on each chain by tapping them with a spanner and got the same sound so I was confident the engine would be at the right angle when it started to come free, and not stress the first-motion shaft or anything else. I undo the bottom two bell-housing bolts bit by bit, but can't get any separation top or bottom. So with a bit of wood against the bulkhead I put a breaker bar behind the top of the engine and the gap opens up a couple of mm. Underneath and no movement, so raise the engine a little, then Dave waggles the front of the engine from side to side - and Bingo movement at the bottom as well. So now it is a case of slackening the bolts bit by bit, pulling and waggling, checking that the gap opens up evenly all round. Then when they are about an inch apart there is a joggle and they are free! Now it's just a case of pulling the engine forwards so it is fully clear of the 1st motion shaft, and raising it to clear the slam panel. Part way up I measure the height from the top of the jib to the bottom of the sump, and compare that with the distance between the ceiling and the slam panel, and we have about 30cm spare, so that's one problem avoided and no need to lower the car, and I could have used another couple of links on the chains and been able to swing the leveller handle - must remember to do that for the refit. Hoist it the rest of the way up, pull it completely forwards, and swing it round to park it on a Workmate.
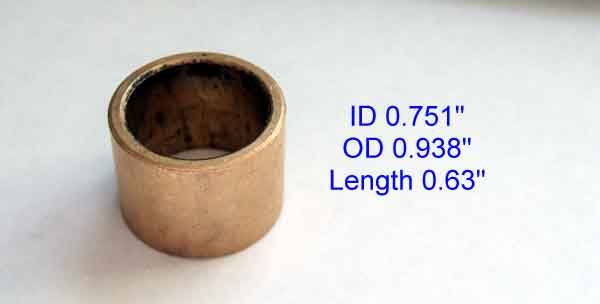
Then the first thing I did was test-fit the MGB GT V8 crankshaft pilot bush MGB549911 that I'd bought to the gearbox shaft to make sure it fitted, as I was going to use that bush to check the rebuilt gearbox had the correct shaft when I went to collect it.
Now for the gearbox - hoist chains attached to the bell-housing in preparation for the initial pull forwards to bring the OD clear of the fixed cross-member before lowering it, as with the rear cross-member disconnected I didn't want to risk it toppling off the trolley jack.
I'm deliberately leaving the gearbox cross-member on the gearbox to stop it rolling. Took the weight of the bell-housing on the hoist, got a trolley jack under the removable cross-member to lift the OD off the fixed cross-member and remove the temporary bolts though to the chassis rails ... but all that happened was that the bell-housing rose up in the air! All the weight is at the back of the gearbox, so that trolley jack has to go under the end of the OD, and I can remove the chassis rail bolts. Pull the gearbox towards the front cross-member clear of the fixed cross-member, and lower both the hoist and the trolley jack onto a plank so we can drag it forwards on that rather than the painted concrete floor. We are couple of inches short for clearance under the front cross-member, but jacking under one of the spring pans raises the car enough to pull it out ... and it's free! After the engine, this bit was really easy.
Stand the gearbox on wood blocks to keep the first-motion shaft clear of the floor, ready to remove the cross-member and mounts, sub-harness, reverse light switch. I decide to remove the tower as well to investigate the OD switch actuation mechanism further, with a view to converting it to 3rd and 4th to overcome the coming out of OD on the over-run. Drain the gearbox first while in-situ, then after standing like this for a while lay it level and drain it again, and about another pint comes out:

I remove the nuts from the mount studs going through the cross-member which is much easier without there being a car above it in the way, but without the gearbox being held firmly in the body it makes it harder to pull the cross-member off the studs - not helped by forgetting to remove the two bolts that go up into the central bracket! So I opt to remove the bolts that go into the gearbox itself from one of the rubber mounts, then it can be lifted off the other mount stud. Note this shows the gearbox earth strap on the left-hand side front, the manuals show it fitted to the right-hand side front:
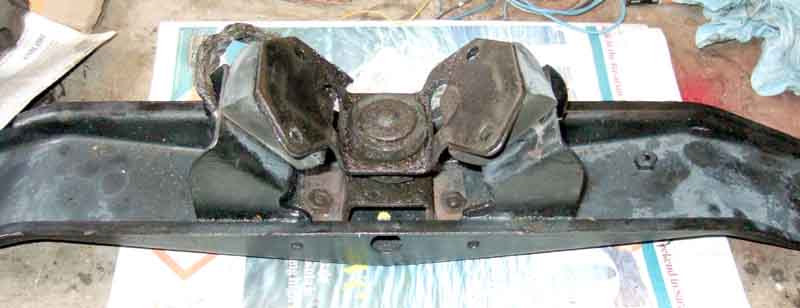
When dismantling bear in mind that there are up to 32 different ways the crossmember components can be installed!
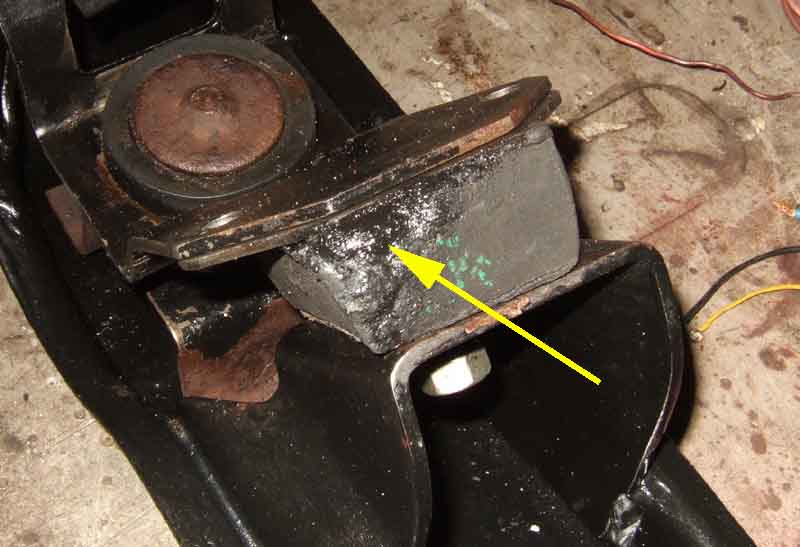
I'd been advised not to replace the mount rubbers unless absolutely necessary as new ones are so much harder, but these are definitely perished even having gone shiny and 'melted' in one area, so I will replace them. The central bracket circular rubbers can stay as there is no sign of damage and they only restrain the gearbox against excessive forward movement in the event of a severe frontal impact:
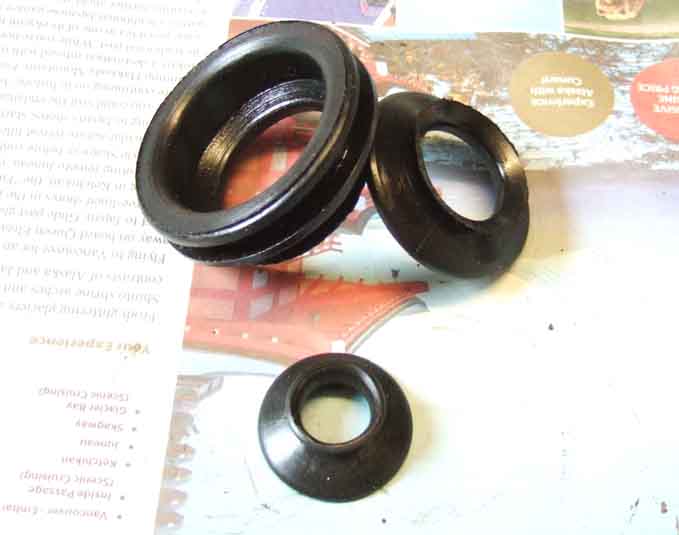
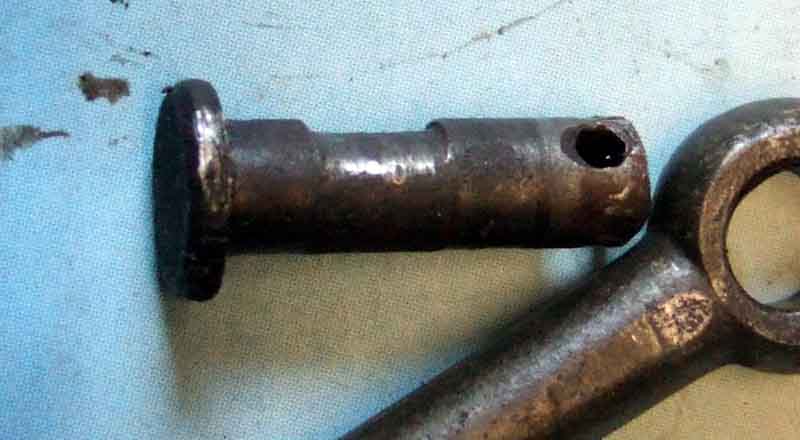
The gearbox harness (on the V8) has a clip on the upper right bell-housing bolt, and another on one of the gearbox to bell-housing bolts by the reverse light switch. The harness is really hard and inflexible, with the wrapping tape damaged in several places, but more importantly the insulation is cracked on a couple of the wires near the terminations, so that will have to be replaced. The 4-synch OD and reverse light gearbox harness AHC258 in the Parts Catalogue specifically states 'Not V8' but there is not another one shown. The V8 harness can be shorter as it only has to reach as far as the shelf under the heater motor, as the three wires involved are part of the tail leading to the heater motor and screen washer. The 4-cylinder version is longer as it has to reach the mass of connectors in the main and rear harnesses, but I suppose I'll have to use that one. MGOC and Leacy use part number AHC258, but Brown & Gammons uses '684', and Moss 'BL654'. Another purchase will be the release arm gaiter 22B450 as when removing the arm and cleaning it up the gaiter was virtually in three pieces:
The pivot pin is also showing wear but even though the hydraulics compensate for all mechanical wear at that end of the system it gets replaced, the push-rod will be fine:
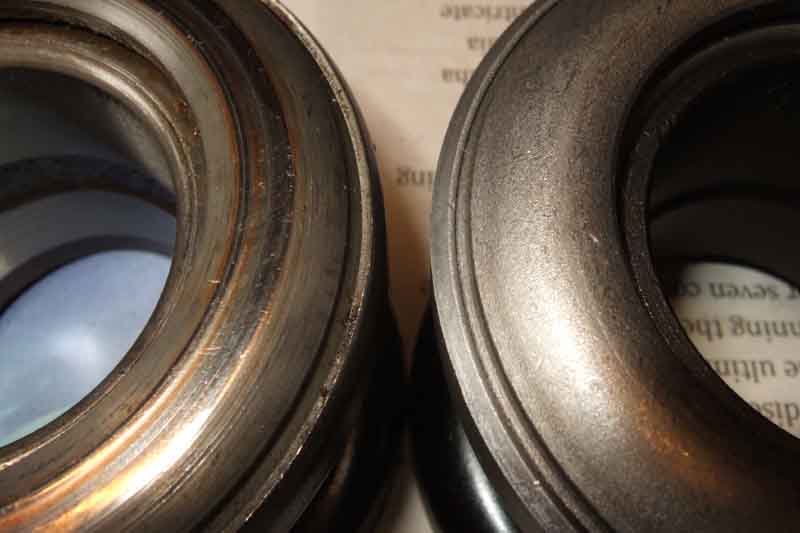
The release bearing is interesting. Although it is a bearing-type and the face that contacts the cover-plate rotates with it, there is a noticeable flat worn on that face (left), whereas the new one on the right is rounded and matt:
In the fullness of time after the gearbox has gone to the workshop (on 10th December) we will put the engine back in the car, with a support for the rear, push it back all the way onto the full-length ramps, so Bee can come back home. But in the meantime I extend the heat insulation on the inner wings. The original sections were working perfectly well, but as the manifolds extended back further it didn't look right.
January 2020: I wasn't really expecting the gearbox to come back very soon with Christmas and New Year in the way, the other garage with Bee is available until towards the end of January so we were in no rush to get her back, which means putting the engine back in, supporting the rear somehow, then rolling her back to her normal parking position, which would need some method of extending the full-length ramps to lower the wheel down onto when they came off the wheel ramps.
On a recommendation I used Geartech Midlands Ltd who phone a week into January saying the mainshaft was shot so had to be replaced with new gearsets and sundry other stuff, and quoting �775 plus VAT for the job - overdrive extra as that is farmed-out to Overdrive Spares at Rugby. Not surprised at the price, I was quoted �400 at one place and �980 at another, plus VAT and OD, so gave the go-ahead. A few months after getting back on the road the speedo got contaminated with oil having worked its way up the (new) cable which needed a replacement OD pinion and oil seal. Four years and less than 5k later 2nd and 3rd are playing up so I don't think much of the 'new mainshaft and gearsets'.
Didn't bother asking about timescales as it is unlikely to be in two weeks, by which time Bee has to vacate her temporary home, so gird my loins.
As I'm not going to be working under the car I decide to lower the front before I put the engine in, but they will have to rest on something else of the same height as the full-length ramps, so I can push her all the way back to make room for Bee. I have a collection of bricks out the back, and several boards, and with the bricks resting on their sides and a board on top is only about 1/2" low - I reckon I can push her up that with a bit of momentum. With the bricks spaced out with gaps a bit thicker than the bricks and boards on top I reckon it's safe enough for rolling Vee back. With the steering rack loosely refitted, the wheel ramps removed she is lowered onto the bricks and boards.
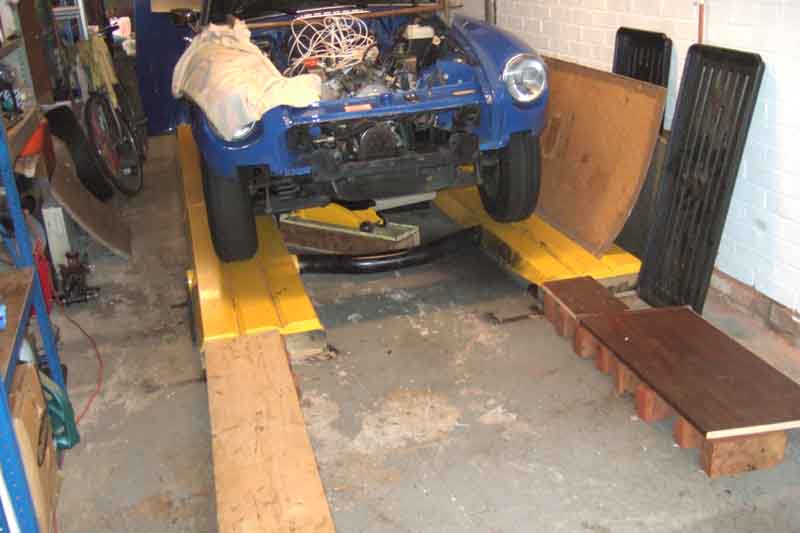
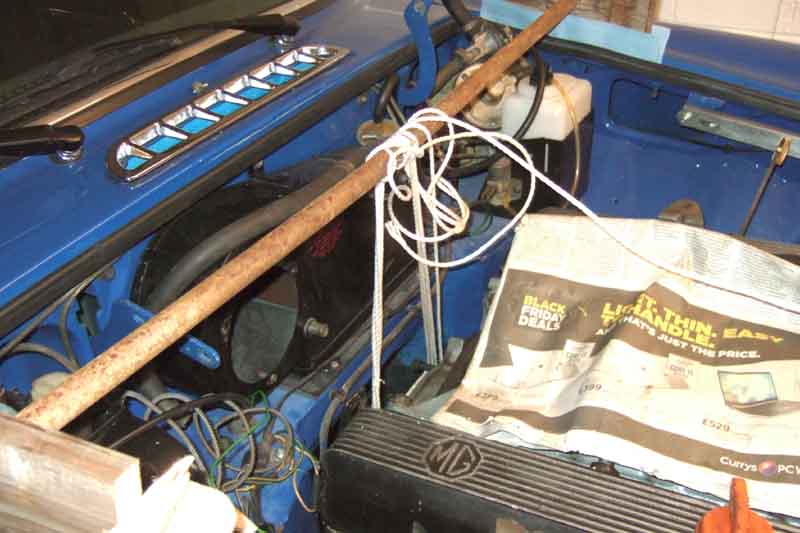
Getting the engine back in is easy, and to support the rear I come up with a steel bar slid through holes in two pieces of planking, sitting edge-wise in the rain channels of the wings, on cloths to protect the paint. First I have to support the engine under the sump so I can get the hoist out of the way, and with the two top bell-housing bolts replaced I wrap several turns of nylon rope under the bolts and round the bar and tie it off. Tentatively lower the jack, the suspension sinks as expected, but it all seems secure. With everything out of the way from behind where the bumper, air dam, and sundry mechanical parts have been stored up to now I chock a rear wheel to stop it rolling forwards, lower the jack under the sump all the way, and roll her back. I'm not leaving the engine supported solely on the steel bar so fiddle about under the full-length ramps to get the jack back in, and taking some of the load. From time to time I'll check the jack to make sure it isn't sagging.
With that done I temporarily refit the air-dam and bumper as that is the easiest place to store those two large items. All the rest fit in or under the car, the bonnet resting on thick cloths on the rear support for the engine and the slam panel. The hoist folds up and slots into a space against the garage wall where the wheel ramps usually go, they are stored under the front of Vee.
So Bee comes back home, now the wait for the return of the gearbox.
January 29th - the gearbox returns, and reinstallation commences.

First job is to get the tower off and test my modified OD plunger to see if it operates the switch any earlier, and so resists coming out if the gear lever should ease forwards on the over-run as it had been doing. One would hope it wouldn't with a rebuilt box, but one never knows. But that came to naught, the plunger needs to move further, which means welding some metal to the chamfered end, which seems a lot of work. I searched high and low for a 4-cylinder plunger to give it OD in 3rd and 4th, but that needs the 4-cylinder selector as well. They are available, but not the plungers, so I've left it with the original plunger...
... and carried on fitting the crossmember. New rubber mounts as the old ones were perished. Tried bolting it up to the gearbox loosely assembled but in the cramped space with both cars in the garage getting the 2nd, 3rd and 4th bolts started in the gearbox was a challenge. So I loosely bolted just the mounts and the upper yoke to the gearbox, then slotted the crossmember onto the mount studs. With new rubbers the studs are miles away from the holes and don't want to lean that far even with the gearbox bolts only just started. So I removed one of the forward mount bolts (easier to get at then the rears, hooked the crossmember onto the other stud and could twist the other mount and the crossmember to get the stud in, then refitted the fourth gearbox bolt, with the earth cable, and the stud washers and nuts.
Fitted the switches checking the shimming and correct operation, the harness - replacement as the old one had lost all its flexibility and had damaged wrapping and insulation, and checked continuity through that for reverse and to the gearbox casing for the OD solenoid. Ordering the harness caused some head-scratching as there isn't one listed anywhere for the V8, and the Parts Catalogue doesn't say the one that is there is for both. It's electrically the same as the 4-cylinder with OD from 67 to 76 of course, but only goes as far as the heater shelf on the V8 whereas it goes to the inner wing on 4-cylinder cars, but at least that means the 4-cylinder one should be more than long enough for the V8. Another puzzle was the description. Ordering a few parts only Brown & Gammons had all of them and I didn't want to split the order and incur double P&P. All the usual suppliers only list one harness for all years, whereas one would expect cloth braided for early cars and plastic wrapped for later, as Vee's original. The original is AHC258 which Leacy shows as plastic wrapped, but B&G have that as superseded by '684 ... MGB & MGC 67/76 O/D G/B REV SWITC PL/BRAIDED'. The picture shows it's braided, so what is the 'PL' bit which sounds like it ought to be 'plastic', Surely they don't mean the plastic insulation on the wires! But when it arrives it has a plastic sheath over part of the braiding, which can be seen in the right-hand image below. It is just long enough to reach to both the gearbox clip by the reverse switch and the bellhousing bolt, but that puts all the slack at the heater shelf end which may get in the way. So I've cut the plastic sheath in half so both clips are over the plastic sheath instead of the braiding, and the slack is between the two. It does mean it is better than the Leacy item without the additional sheath, only an Australian supplier shows that over the plastic harness wrap. Incidentally one UK supplier shows the 77 to 80 harness with the extra wires and terminals as being suitable for all years - plastic wrapped with no reinforcing.

That's about all I can do until it's dry enough to get Bee outside, and roll Vee forwards to get the engine out, and the gearbox and engine back in.
And that's Saturday. Roll Bee out, extend the ramps with bricks and boards as before, roll Vee forwards, and replace the bricks and boards with wheel ramps. Engine out, and slide the gearbox under on boards. Raising the gearbox high enough for the output to go over the fixed crossmember is tricky as it's unstable on jacks, so I opt to support the bellhousing on my jury-rig that I'd used to support the rear of the engine, several turns round bolts in the top holes, and a piece of wood twisting those to raise it bit by bit. I build up layers of timber under the ends of the gearbox crossmember while jacking under that, and eventually I get it high enough to slide back, and get my long bolts through the gearbox crossmember into the chassis rails temporarily. Fitted the release arm and bearing - which needs care as unlike the 4-cylinder it's not immediately obvious which way round the arm has to go. It's kinked, and in one position the release bearing goes right to the back of the guide tube, which is the right way round. Lubricate the release arm pivot, release bearing pivots, splines and spigot with special spline grease from Sachs and we are ready to go.
That took all morning. With a helper in the cabin it would have been easier to raise the back in one go with a rope through the tunnel hole. He offered, but I was so grateful for his help in getting it all out and taking it and me to the repairer and back, I didn't want to take the mick.
After lunch with the front of the bell-housing on a jack raised to the top of the tunnel, I removed the mounts from the engine, and wheeled it into the engine bay. With the nose of the first-motion shaft in the hole in the clutch cover plate, and bit of fine adjustment to height and angle and the engine slides straight onto the splines. In five cases of fitting engine to gearbox, 4-cylinder and V8, I've never had the problem that some describe. I always leave the gearbox out of gear (if not disconnected from the propshaft) and the first motion shaft always seems to rotate the clutch splines. Where people have the problem I think they must have the gearbox in gear, propshaft connected and wheels locked, and have to turn the crank while the engine is dangling on the hoist. Fit the bottom bellhousing bolts (short), and it's taken all of 20 minutes! At this point it would be wise to check the clutch slave against the release arm to make sure the arm and bearing are correctly fitted. Even without fluid the internal spring should be pushing the piston to the end of the cylinder, so when fitted the pushrod should be pushing the piston back into the cylinder by a minimum of 1/2" as the cylinder is slid back to get the bolt holes lined up. That done the engine is lowered onto the chassis rails, the top two bellhousing bolts (short) are fitted and I tighten them with the swivel-ended spanner with 1/2" and 9/16" sockets which being longer than my standard 9/16" ring spanner is easier than using a big spanner as a lever. Then the four side bellhousing bolts (long) not forgetting the gearbox harness clip which goes on the upper right-hand one. Still pretty early in the afternoon so raise the engine and gearbox to the top of the tunnel again and fit the engine mounting plates to the block then the mounts to the plates and they are the fiddliest part so far. Make sure you get the plates on the right sides - the mount is offset relative to the plate and needs to be in the forward of the two possible positions, to position the engine in the rearmost of the two possible positions, and make sure the mounts are fitted to the plates with the studs in the lower of the two possible positions. Lower the engine again wiggle it about to get the mount studs in the chassis bracket slots. Ideally the stud won't quite be at the bottom so the mount rubbers are in compression and not shear, if it is it needs packing. There should be at least one oval packing plate each side between the rubber mount and the mounting plate. I have an extra one on one side, plus a circular spacer between the mount and the chassis bracket. Originally this was to prevent the exhaust manifold hitting the steering column, which is a known problem. With the Clive Wheatley 'rock' steady bar this isn't needed but I still fit them all. As a final measure I use a hammer and drift on the metal plate on the mount where it sits against the chassis bracket to make sure it is fully down, and they both move a sixteenth or so. More fiddling getting the location plates, washers and nuts onto the studs. The location plates fit with the hole in the lower of the two possible positions to make sure the stud is close to the bottom of the slot. Very restricted both sides, the rack needs to be removed again as it passes through the mount bracket and makes accessing that nut almost impossible. A couple of finger-tips to get the washer on and the nuts started, with your fingers in there you can't see when the nut is square to the stud. Even then if your ring-spanner is too long you can only turn the nut half a flat at a time, a shorter one will pass over the top of the crossmember and allow you to do a whole flat at a time - whoopy-do. Not enough space to get a ratchet ring on the nut, let alone a socket. With it all in it's obvious that the gearbox harness is at least a foot longer than it needs to be, I shall have to lose that somewhere,
Only about 3pm but that's enough for one day. Apart from lifting the engine out and back in, the top two bellhousing bolts, and attaching the mounting plates to the block everything has been under the car, and continually getting up and down and crawling under and out with restricted space both sides is hard work ... at my age. I've got to pack everything away and replace wheel ramps with the bricks and boards and refit the rack again so I can roll Vee back, then pack the bricks and boards away, and put Bee back in the garage, which takes another half-hour, and I'm pretty whacked. Fortunately the weather looks equally good next week as I will have to do the rolling forwards bit at least once more to reattach propshaft, speedo cable, flywheel cover, clutch slave and exhaust. But the last needs the manifolds to be on, which I can do without the bricks and boards business, so I'll probably do that first, instead of messing with the bricks and boards twice.
Sunday is a day of rest so Monday afternoon sees me tacking the exhaust manifolds, which have been a pain ever since I've had the car. Tubulars fitted by a PO, started cracking and after a couple of sessions welding-up I replaced them with mild steel. As well as the cracking I had found that once I had got them off (for welding) I couldn't get all the bolts back in as the outer two ports had turned in towards each other. Struts welded between the flanges solved that, but I still had a problem with the outer pair stepping back from being in-line with the others, so when the bolts were tightened the outer flanges went to the head faces at an angle, and sealing was poor. Checking them with a straight-edge the outer pair were set back about 20 thou. New gaskets are 44 thou clamping down to about 12 thou once used, so this time I've used new gaskets on all the ports (of course) plus previously used but sound ones on the outer ports, in hope that all four ports will clamp down and seal evenly all the way round. I also used Holts exhaust paste on all the faces, including gasket to gasket. Previous paste I have tried seemed to go off very quickly, but this stuff is much thinner than expected - almost runny, and only dries very slowly, giving me time to get a manifold with six gaskets and eight bolts onto the head before it goes hard. A fiddle fitting them as the rack has to come out to get the off-side manifold in, I have to put the four top bolts in to hold the gaskets in place (studs in the head is sooooo much easier) and get each of them started without pushing any of the other back allowing the gaskets to slide off. Get to the end ... and find I'm a bolt and washer short! How that happened I don't know as I was sure I had counted them way back when I took them off and put them all in a small tub. Temporarily used one of the engine lifting eye bolts which is shorter, but will do until I can get replacements.
Then think about refitting the heater fan and motor, but realise it is better to start at the bottom without things in the way, so refit the heater valve and matrix hoses to the inlet manifold instead. The heater fan and motor will have to go back in next as otherwise the carb assembly will probably be in the way.
Decide to call it a day so refit the rack so I can roll the car back, and out again tomorrow ... and spot the missing exhaust manifold bolt and washer at the end of the chassis rail under the steering column UJ! So that replaces the temporary one, which can go back in the lifting eye.
Next day a lot of 'underneath' work reconnecting the propshaft (put the screws in the drive flange first as it's easier) with a rear wheel just off the 'ground' so it can be turned to tighten each in turn. Speedo cable (patience needed to get it started), (new) clutch lever gaiter, pushrod, clevis pin, washer and split-pin, and slave. Starter was the usual struggle underneath lifting it up while trying to line up the holes. In the end I used a cross-head screwdriver - in heaven all bolts where you can't see the holes are in line will be pointy ended. When I came to do the top bolt from above I realised I should have fitted the starter before the exhaust manifold that side. Not that it can't be done, after all I've had three starters on and off in the past. Feed the bolt in a 3/8" U/J on a long and a medium extension through between the middle two ports and it goes in easy enough. Back underneath to attach the cable/wires and fit the heat-shield. Then flywheel cover and exhaust system - only now discovering the clamps I bought from Clive Wheatley back in June when one broke and another looked like it wasn't far away, are too big. Stainless strap types I haven't used before so I'll have to see what can be done about those. Fortunately I bought two standard U-clamp types when the one broke so can use the second one of those to replace the weak one. The standard strap type need the pipes to be parted to fit, but the stainless like the U-clamps can be fitted without doing that, so relatively easy to sort out later.
Final refit of the rack, and hopefully that's all underneath with the rest on top which should be easier. Fit the oil filter and housing and connect up the two hoses plus the gauge hose. Prime the system with my drive shaft in a drill as usual, but as I now have a low oil-pressure switch in the engine bay it's easy to connect an ohmmeter to that to watch for pressure, and a first check for leaks. In the past I'm never quick enough running round from the front to look at the gauge and have had to rig up a mirror or camera for a video. That needs the distributor to come out, and refitting is nothing like as easy as the 4-cylinder. The distributor has a spiral gear to the camshaft, then a key on the end of the distributor shaft engages in a slot on the oil pump drive. There is no way to turn the oil pump, so you have to look at the angle of the key on the distributor shaft, then turn the pump shaft to hopefully the right angle. The problem is that when you remove and insert the distributor the shaft turns because of the cam gears, so you have to guess how the angle will change as it is inserted! Not easy, and if it doesn't engage after a few attempts you have to turn the crankshaft a bit at a time - lifting up the distributor a fraction so simple friction doesn't move the pump shaft, and try refitting it. If that wasn't enough the distributor can engage with the cam in as many positions as there are teeth, but only one is right for the position of the leads in the cap of course, so you have to turn the crank to TDC, and set the distributor so the rotor is pointing at the correct contact. Eventually it goes in, but with two TDCs you have a 50% chance of getting the wrong one - unless you slacken No.1 plug to determine from hissing when that is rising on it's compression stroke. I'll take a punt on it being right, and turn the crank 360 degrees with the distributor pulled up again if not. I'm planning on running it dry initially so without radiator and cooling fans fitted access to the crank pulley is much easier.
Then refit the carb, plenum and air-filter assembly which conveniently comes off as one unit on the V8. Connect the fuel supply hose, power up, ignition on, pump chatters away then slows and stops. Check the connection to the carb and that is dry ... but then notice a drip from the filter! It was only then I remembered that I had started removing the hose from the top of the filter to get it out of the way, but it didn't want to come off the plastic filter spigot so I left it rather than risk breaking the filter ... but didn't retighten that clamp! Soon fixed, and that'll do for today. Last time (hopefully) replacing the wheel ramps with bricks and blocks and rolling it back to get Bee in the garage. With everything else (again hopefully) on top I should be able to finish now with Vee in her parked position and Bee just rolled forwards a few feet. Another annoyance when I've finished for the day is that I realise I haven't refitted the heater fan and motor and I'm not sure if it will go in with the air-box on the carbs, even though yesterday I realised I would have to do them in that order. I won't remove the carbs again, but I can remove the airbox.
Next day first thing is to remove the air-box and fit the heater fan and motor. The screws would have been easier to get at if I had done it before fitting the carbs, but there we are. Connect up the accelerator cable and choke, overflow hoses, PCV filter behind the air-box, PCV hoses and flame-traps between rocker covers and carbs, servo hose, temp gauge sensor. That's enough for a dry test, battery a bit weak after standing for pretty-well two months so connect my lithium battery pack. Power on, pump clicks a few times, no leaks. Crank several times ... and nothing. I wonder if I have got the distributor 180 degrees out so have the idea that if I use my air compressor and modified spark plug in No.1 with the engine at TDC and there is pressure it's at the correct TDC, and if no pressure it's at the wrong TDC. I get pressure, but looking at the rotor it's 180 degrees out. So distributor carefully lifted out of engagement with the cam drive, rotor turned 180 degrees, and reinsert. This time slots into the pump drive straight away. So crank again ... and there is an almighty bang! What the hell was that? Disconnect the ignition and try cranking and it turns over OK, so nothing mechanical, probably just fuel in the exhaust. Connect the ignition and crank again, and this time it fires up, but with the off-side exhaust blowing something awful on No.2 cylinder. I'm thinking the bang was that gasket blowing, which is one of the double-thickness ones. So peer closely at it and I can see it sticking out one side as if it has never been lined up properly with the bottom bolt hole. I took loads of care lining them up - or so I thought, but now what? It's the one that needs to rack to be removed to extract from the engine compartment, as well as disconnected from the exhaust system. Maybe I can just pull it back far enough to line up the errant gasket with that one bolt removed and all the others slackened, and so it proves. Tighten all the bolts back up again, try another run, and no blowing, which is a relief. Subsequently it struck me that I could fit all the bolts and gaskets, then use thin wire above and below each bolt working along, and that would hold everything in place while I got each bolt started, then remove the wire. Oh well, next time.
Refit the bottom hose before the alternator as it's easier, and the alt was another pain. The belt squealed when she came to me, so I checked with a straight-edge and the pulley was set back from the water pump pulley, so I added several spacer washers to the lower front mount. These have to be fitted over the bolt in the alt lug, then pushed through the engine bracket with a nut on the back, with another bolt going through the rear mount and it was a fiddle getting everything lined up. Then refit the cooling fans, radiator, and top hose. For some reason the clamps are really too small for this hose and need to be bigger, but I can't remember struggling as much as this previously. Finally the gearbox harness and fan connections, and a bit of head-scratching and testing as I have a relay operated by the reverse light switch to disconnect the OD feed as belt and braces as I have the OD switch on the minimum spacer to try and stop the dropping-out on the overrun. Finally bolt down the gear-lever - to find it jammed as I have the plate 120 degrees out!
Next day it's time to put the gearbox oil in - until I discover the bottom hose connection has been dripping all night. Can tighten that some more which seems to stop it. Then I discover another hose clip in the back where I have been storing clean removed parts. That's bigger than the two I have fitted to the top hose and would have been much easier but where on earth has the under-sized one come from? We may never know. Filling/topping up the gearbox is bad enough on the CB with the cabin access and dip-stick but even worse with the RB side/fill. People use a long tube down from the engine compartment, but you still have to get underneath to fit that, it would take a long time to drain down, and still leave a significant amount in the tube to make a mess. With the rear wheels on the full-length ramps and the fronts on axle stands I have plenty of access underneath and can just get a 1 Litre bottle with it's filler tube up the side of the gearbox sideways on, but trickling in is very slow, even though the containers have been standing in hot water on this frosty morning. The new bottles are pretty stiff and squeezing while it gets some in will leave a lot behind, but I have a Castrol bottle from when I last drained and refilled some time ago and that is much squeezier, I can practically roll that up. Still leaves about 1/3rd litre behind, but I decant each of the new bottles into the Castrol bottle one by one. On the fourth litre it starts trickling out of the level hole, but from experience I know that isn't enough for OD to operate properly as it has yet to circulate throughout the OD and gearbox. So with one rear wheel safely chocked I raise the other just off the ground so I can run the engine (no traumas this time) and carefully select each gear and ease the clutch out, and switch OD in and out a few times. As expected, the OD is not functioning. Back underneath and squeeze more in, probably just short of the 4.3 litres in the book but foam is trickling out now. Don't remember that last time, so I'll probably have to let it stand overnight and check it again. But enough in for a test drive round our local road. I fit the valance and bumper with number-plate but don't bother with the bonnet. A quick circuit selecting all gears, and OD in 4th. Can't go too quickly but it is just fast enough to tell OD is engaging. So back home and after lunch the Navigator helps me with the bonnet using John Maguire's method, which is much easier on the Navigator than how we did Bee's some years ago. Basically she just helps me lift it onto thick padding at the front and rear corners, then I can reach under to loosely fit the front hinge bolts, then she lifts the front high enough to fit the hinge rear bolts, and the stay. Then once I have the twist drills through the hinges and bonnet brackets to get the basic alignment its a matter of fine-tuning the position. That done, time for a longer trip of a couple of miles, and all seems well. Back home for final fitting of the centre arm-rest, fan guard and mesh grille, and a longer run of a dozen miles or so. Without the manifolds blowing which has been the case for years and the exhaust buzzing at idle more recently the engine sounds really good.
On our return the cooling fans cut in but don't sound right. Then they stop but the light is still showing on the override switch to show they are still powered. Round the front to find the near-side stalled because my bonnet emergency release cord has got wrapped round the fan blade - which is exactly what happened after getting everything back together after the engine rebuild. Also repeated is the melting of the fuse holder from the additional current from the stalled fan, which cut the power. So another new fuse-holder needed but it connects with spades each end so no problem. I'll also have to do something like put a cable-tie round the fan motor bracket to hold the emergency bonnet release cord back, when the fan is running it's being sucked against the blades even when it doesn't get wrapped round. Also evident is some hissing from the expansion tank hose where it connects to the radiator (probably from the inadequate fan cooling). Clip is tight, but waggling the hose causes it to spurt so it must be damaged. I'll try cutting the end off when it's all cooled down.
Next day recheck the gearbox oil level with the car level instead of raised slightly as before, and it starts trickling out, so there is plenty. Miffed to discover some droplets under the solenoid and sump! More running to ascertain the source. Also annoyed to discover the bonnet isn't quite far enough forwards on the drivers side and is rubbing on the panel at the base of the screen as it is opened and closed, so that has to be tweaked. Expansion tank hose removed from the radiator and cut back an inch, and refitted. New cooling fan fuse-holder with spade connectors made up, fitted and tested. Cable-tie fitted round the motor bracket and emergency bonnet release cord to stop it getting sucked into the fan and stalling it. Pretty cold wind today, so that's enough, just the front mud-flaps to refit.
Fortunate to get a really good week for all the reinstallation as Bee would have to be outside, then the weather changed with Storm Ciara. Good enough to fit the mud-flaps but that's all, until the following week when a couple of good enough days give me an hour out - shortly before Storm Dennis! All good including the cooling fans, except it felt like it was flat-spotting when accelerating in 4th, until I pulled the choke. Back home sprayed some carb-cleaner round where the intake plenum is bolted to the intake manifold and towards the rear near-side it had an effect on the idle. Need to do a bit more testing to confirm that it is that joint, and not something else in the vicinity like the carb gasket, for another day.
Interestingly WD40 doesn't make any difference when sprayed at the plenum/intake manifold, only carb cleaner. Tested with a 3 thou feeler gauge and I could slide it in between the two castings in one area (!), so carb assembly has to come off. The non-setting sealant I used in that area has obviously been dissolved by the carb cleaner. Clean it all off and put a straight edge across the inlet manifold in various places and I can get a feeler gauge under it in that area, but nothing I can do about that now. After the repaint I had obviously used a silicone sealant, which I don't normally, and I don't know why I did. I'll have to use it again with a thicker (but not great gobs) bead than the non-setting stuff I'd used this time. Back together I leave it to set, then the weather is pretty rubbish so no chance to test.
Having to top-up the coolant more than I'd like, but no signs of leakage when hot. So fit my Schrader valve tee into the expansion tank hose and pump it with a foot pump. A drip from the bottom hose, which was difficult to seal when I first replaced the hose. A wire clamp which I prefer, but with a screwdriver slot so not as easy to get tight as more modern ones with hex heads. In my running spares I have a couple of large Jubilee-type clips with hex-head clamp screws, and can open one of those right out to fit it over the hose without having to remove the hose and drain the system. Remove the old clip the same way. Pump up the system again and that needs a little more tightening, and while underneath am aware of an occasional drip from the front cover. That turns out to be the water pump hose to the pipe that runs under the inlet manifold which wasn't touched as part of the gearbox job, so had probably been seeping very slightly since the repaint. Another wire clip with a screwdriver-slot head, I'm always careful to orientate the many hose clips so that they can be accessed with minimal if any removal of other parts and can get a bit more tension on that, which seems to do the trick. I'll have to invest in a set of wire clamps with hex heads for future use. Subsequently I spot a bit of dampness under the other small hose between pump and inlet manifold - another one not removed this time, hex head on that, so easy to tighten a bit more.
Replacement! - after less than 5k it's even worse with different problems - grinding as 2nd is selected and the lever jumping back and fore going onto the overrun. After pondering selling it (really don't want to) or getting it out again (which I really really don't want to!) and getting it repaired again (which I would never trust) I opt for the Vitesse Mazda 5-speed conversion. Expensive, but them being able to fit it and only 30 miles away, convenience trumps cost.