


Contents
Index
So you think you want an MGB or V8?
Body
Brakes
Clutch
Cooling
Electrics
Engine
Fuel
Gearbox
Heater
Ignition
Propshaft
Rear axle
Steering and Suspension
Wheels and Tyres
Miscellaneous
Downloadable PDFs
The sectioned MGB at the British Motor Museum, Gaydon
Miscellaneous
|
Links: General Body Brakes Clutch Cooling Electrics Engine Fuel Gearbox Heater Ignition Propshaft Rear_Axle Steering_and_Suspension Wheels_and_Tyres
Historical prices taking inflation into account, from Lyndsay Porter's 'Guide to Purchase & D.I.Y Restoration of the MGB', sensibly renamed 'The MGB Restoration Manual', showing massive price increases in 72-73 and 77-79:
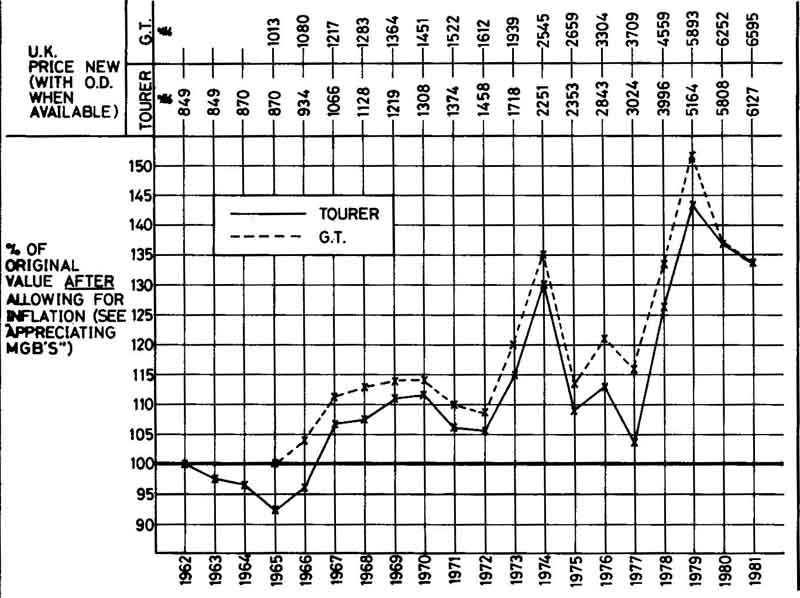
See also his annual sales figures.
Buyer Beware! April 2023:
The chap confirmed that he hadn't made a mistake with the numbers on the car, but looking at the V5 as well that quoted a much later chassis number that would have been correct for a 76, and the MOT he had asked to be done showed that number as well. I said that as far as I was aware the MOT tester should use the registration number to compare the chassis number on the car with the chassis number held on the MOT database so should have picked up the discrepancy.
In the meantime a regular contributor to the forum is an MOT testing station inspector who has access to the database, confirmed that the tester should have picked up the discrepancy, and said the new MOT was the first one that had ever been issued for that car! It was only in 2018 that a 1976 wouldn't have needed an MOT, and publicly available online records go back to 2006. So the only way there would have been no previous MOT is if it had been off the road since before 2006 (internal records may go further back than that). That's possible of course, but it still leaves the discrepancy in the numbers and the prefix.
Armed with that info he went back to the dealer who said he would take the car back and refund his money, which the buyer accepted.
I can't make up my mind whether the dealer was innocent in all this as blank plates are easy enough to obtain and stamp, or whether he knew what was going on which is why he had the car back so readily. On the face of it this seems to be someone taking a 1972 car and putting bits into it from a 1976, perhaps a scrapper, but keeping the identity of the later car. Which would be really odd, most people would want to pass-off a late car as an earlier one! There are many visual clues especially between the chrome bumper cars and rubber. The dash and other bolt-on stuff is relatively easy to swap, changing later rubber bumpers to earlier chrome is often done so I can imagine the reverse could be done (again 'why?'), but other things would be less likely to be changed as they are not so obvious and more work to change. Chief among these are these are the steering rack shaft passing through the off-side engine mount on an RB as opposed to passing below it on CB, round engine mounts (RB) instead of rectangular (CB), the one-piece column UJ (RB) which is recessed further into the bulkhead instead of separate yokes and spider (CB), the rear spring rear hanger top bolt being below the chassis rail (RB) instead of passing through it (CB), and the front hanger being lower and angled (RB) instead of closer to the floor and horizontal (CB).
Caveat Emptor - check the three chassis numbers (car, V5 and MOT) carefully against each other, Government databases, and ideally Clausager's 'Original MGB' which contains starting and finishing chassis numbers for each calendar year and model year as well as at each of the many changes that took place during a model year.
Servicing Bee and Vee was a right pain in the new house this year as I'm not allowed to use ramps, axle stands or jacks on this drive. So all the raising had to be done either half in and half out of the garage, the short ramps slide on the smooth painted garage floor so can only be used on the rougher section near the entrance, but that's narrower, and I had to keep moving the cars to get first one end up then the other.
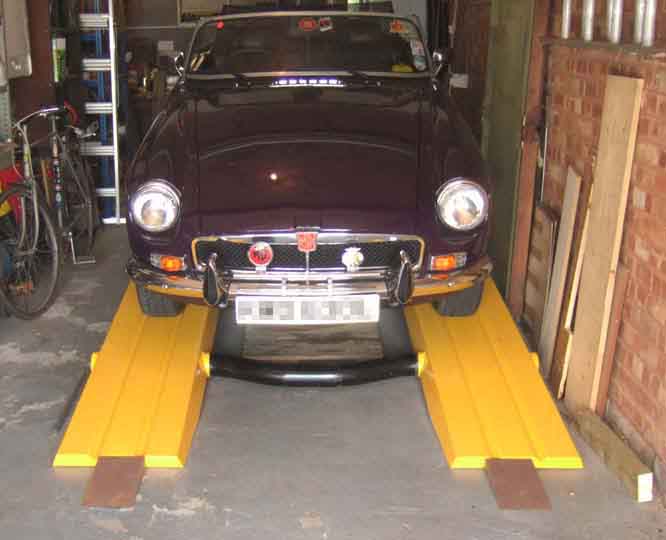
A pal of a pal was getting rid of a nearly new pair of full-length ramps (as he now has a four-post lift!) and they were offered to me for �500. As they were around �1700 new that was something of a bargain. However as they were over a 200 miles round trip away in Hertford it wasn't really feasible to go down just to have a look at the size and try and work out if they would fit in my garage, so pal took loads of pictures and measurements. I pondered long and hard over those, decided they would fit, so the next question was how to get them here. Son-in-law has a van but they were just too long to fit in that, so it meant hiring one. However we were planning on moving some furniture down to my son near St Neots, so a 'two birds with one stone' trip was planned. All went well until we got down to Hertford and I saw just how big all the bits were - gulp! Too late to go back now though, so we loaded them up.
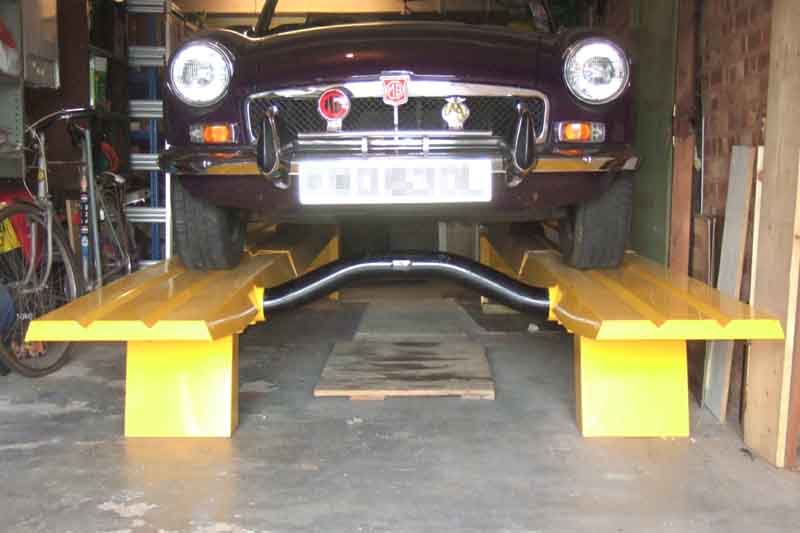
Once home I could take more detailed measurements, and realised that to assemble the two ramps and their lifting tube I either needed more width than I'd bargained for, or several beefy blokes to assemble them outside, then carry them in at an angle to get them through the door! However being American they were built for their monster vehicles, and the ramps were intended to be positioned further apart on the lifting tube than I needed for the MGBs. Even positioned as close together as they would go the centre of the ramps is still wider then the centre of the tyres. However it allowed me to chop a few inches off each end of the lifting tube, and I could assemble them in the garage. Each ramp is in two sections so the length can be adjusted as well, but even one of the sections was a struggle to move on my own, and I couldn't imagine being able to move all four of them plus assemble them. So a few days later son-in-law came round and we got them in and put them together.
The lifting tube has to be able to pivot up to allow the jack under, and down to allow the vehicle to clear them as it is driven on and off. But unless the ramps were very precisely positioned in all three orientations the tube could be very stiff to turn. But R-ing TFM I discovered the tube should have been greased where it passes through the larger tubes under the ramps! So this time single-handedly I wiggle the one ramp off the tube by dragging each end sideways a bit at a time, then I can pull the tube out of the other ramp. Grease that end, reinsert, grease the other end, then wiggle the first ramp back onto the tube again. Now the tube pivots really easily and is much less dependant on precise orientation.
 The ramps are lowered both ends when not in use so I can park one of the cars on them, and that 'raises' (ho ho) a couple more issues. Because the entry end is now about 4" off the ground the manual describes how to make a pair of pre-ramps - easy enough. What's a bit more of an issue is lifting the 'blunt' end of each double-length ramp while you position the support tower underneath it - no easy task. I can get a jack under the end (sides won't work as they are too close to the ground) and raise it far enough to get blocks under, then move the jack round to the side away from where the tower fits while I raise it the rest of the way, but that is a bit of a faff. So various Wallace and Gromit devices are being discussed, one of the maddest being a rope tied to the back of the car positioned just in front of the ramps, run over a pulley on a beam, and down to a hook at the end of the ramp - drive car forward, lift ramp, slide tower under. Split the rope and do both ramps at the same time :o) But in the end I settle for a block and tackle attached to a cross-beam conveniently near that end of the ramps.
 Another slight inconvenience is that my relatively compact jack (I tour with it in the boot of either car) won't raise the lifting tube far enough in one go to lower the swinging legs and lock them in position. I have to jack it part way, then put axle stands under the tube, then slide a block made out of timbers with a sheet steel top under to stand the jack on while I raise it the rest of the way. I've looked at alternative jacks but to get one capable of lifting all the way in one go, but low enough profile to fit under the tube when lowered, is way too expensive for the very occasional use it would get.
 High enough to get under and work with ease, but not so high I can't reach things when lying on my back.
I can only envy Herb Adler his space and 2-post lift ... I think! While Vee was at the paintshop I was able to use a 2-post lift to fit the cross-member and exhaust, amongst other things, and it was really hard work on the neck with my head bent back all the time, and on the arms. I know I'm also reaching up with my ramps, but at least I'm lying down with my head supported and can have a proper rest every now and again, instead of having to stand there all the time.
If ever there was a good reason not to put your classic through an MOT ...
22nd March 2021: MOT rules have been changed again to ACCEPT LED AND HID headlamp conversions as long as the vehicle was first registered before 1st April 1986.
1st January 2021: MOT rules have been changed to fail cars with LED headlamp conversions:
4.1. Headlamps
4.1.4. Compliance with requirements
"Existing halogen headlamp units should not be converted to be used with high intensity discharge (HID) or light emitting diode (LED) bulbs. If such a conversion has been done, you must fail the headlamp."
The full DVSA MOT manual can be found here - published 20th May 2018, at the time of writing last updated October 2019. Question on lighting frequently crop up and The Road Vehicles Lighting Regulations 1989 can be found here.
Preparation
If you are asked how much your car weighs for the brake test ...
September 2019: Still ramifications and misinformation rumbling around following the exemption for cars over 40 years old from the MOT. Some people are recommending you get a �25 safety check instead of an MOT. Others are finding garages that say they can't perform an MOT test on an exempt vehicle. And at my recent MOT for the V8 at a different place I found the car parked outside after about 40 minutes but I had to wait the full hour as they said if they completed the test in under an hour they would face questions from the DVSA. Dave Birkby on the MGOC forum, who is an MOT inspector covering 85 MOT stations writes:
Almost every vehicle type can now have a MOT even if exempt, and that includes a vehicle that is exempt because it is not yet 3 years old, or is foreign. Even your finally finished restoration of your barn find that has not been tested for 30 years can have a MOT. The MOT manual even states that a 1905 car does not require a handbrake!!! It is also an offence under the MOT scheme to refuse to test a vehicle other than for a small number of legitimate reasons.
The letter in EMG ... incorrectly suggested that there is a national scheme available for �25 or so and people should use it. There is a national scheme, it is called the MOT and prices vary from �0 - �55, you chose the one you want. There is no such other national scheme.
Re Pauls post about timings, this is a subject that I hate and is my biggest challenge. Another myth (created by MOT testers and the many millions of 'wannabe' testers) is that it takes X amount of time to test or they will be locked up. This is simply not true and those testers should concentrate on quality testing and not being tea break lawyers. The test takes as long as it takes using all of the mandatory equipment required for that type of vehicle. So, unless a car is a complete basket case that requires in depth scrutiny, then an emissions exempt classic may only need half an hour. One that needs a gas check may need more time, one that needs a decelerometer brake test will take longer again. Again, leaving a car logged on whilst it being outside is an offence. Plus, if it is common place, it makes me look harder at their data ... which sometimes shows up a bingo win result. They are using the longer test times to skew their average test time, i.e. hiding the 2 min tests for their mates. Doesn't work any more though chaps.
June 2019: Can you drive a failure away from the testing station or not? ZS failed on the back box leaking, and Halfords proceeded to give me my options including scrapping it (!) or taking it somewhere else to get it fixed, but stated that a fail immediately cancelled the existing MOT (which still had a week to run), and if I drove it away I could be picked up by ANPR cameras and fined, and my insurance would be invalid. I was surprised that I hadn't heard of this immediate cancellation before, and when he advised leaving it so they could check the rest of the system to see what else might need replacing I smelt a rat - why wasn't the full story on the failure document? Back home I checked the DVSA database and the failure and advisory details were there, but so was a statement that the existing MOT was in force until 3rd July i.e. a week hence.
Searching online threw up this document "warning motorists that they face prosecution if they drive their car following an MOT failure even if its previous test hasn't expired." However in February 2016 that was updated saying: The DVSA has updated its website again to say the complete opposite of what it originally said. It now states: "You can take your vehicle away if your MOT certificate is still valid.". Then in September 2018 another update: "The situation as it stands is as follows: an MOT fail before the previous MOT certificate elapses does not necessarily mean you can't drive it away, unless there is a dangerous problem listed on the certificate and the minimum standards of roadworthiness aren't met.", which seems fair - and clear - enough.
Then find this DVSA document dated May 2018 which states:
Major - It may affect the vehicle's safety, put other road users at risk or have an impact on the environment. Repair it immediately. Fail
Apparently still current is this document dated 20th May 2018 which says exactly the same for the Dangerous and Major failures. If it wasn't for the "Do not drive" statement for a 'Dangerous' defect I'd have said the "Repair it immediately" for a 'Major' defect also meant you couldn't drive it away - how immediate is immediate?
Then Dave Birkby (an MOT inspector i.e. inspects the work of MOT testers) came up with this document which includes the information:
You can take your vehicle away if:
- your current MOT certificate is still valid
- no �dangerous' problems were listed in the MOT
If you can take your vehicle away, it must still meet the minimum standards of roadworthiness at all times. The 'minimum standards' document really only mention lights, brakes and tyres, so very minimal.
December 2018: I thought I understood the new VHI and MOT exemption from May 2018 until I read December's EMG. That states on p6: "as soon as the car reaches 40 it will be presumed to be MOT exempt immediately from that date". However the Guidance document states "If the vehicle has a current MOT certificate but you anticipate that on expiry of that certificate you will wish exemption from future MOTs you will at the time of relicensing be required to declare that the vehicle is a VHI." which seems to contradict it. On renewing Bee's tax in December, with a current MOT, I was NOT offered the chance to make a declaration. The MOT expires in June 2019, but I won't be renewing Road Tax until December 2019. What happens in the interim when I have no MOT and have not made a declaration? Supposing one were required to present one's documents at a Police Station? The DVLA have confirmed that you will only be required to make the declaration if there is not a current MOT when you retax, and you are covered between expiry and the next road tax renewal when you will be required to make the declaration if there is no current MOT. If you don't make the declaration then the renewal will not proceed. So really the guidance document should say words to the effect of "If the vehicle does not have a current MOT certificate you will at the time of relicensing be required to declare that the vehicle is a VHI." Of course whether one has a current MOT or not, when being used the vehicle must be roadworthy at all times. Hopefully that's the end of it!
May 2018: As of 20th May 2018 there are new defect types, stricter rules for diesel car emissions, and some vehicles over 40 years old becoming exempt, see this DVSA document.
After much chatter back and fore the upshot seems to be that only the most outrageous modifications involving structural bodywork are likely to be considered a substantial change, as the 'upgrades' typically talked about can probably all come under "changes made to improve efficiency, safety or environmental performance are considered acceptable", including more powerful engines when the emissions are lower. And even then if you don't attempt to declare it VHI and MOT-free then no one will know about it anyway ... except, one presumes, your insurance company for road-going cars. If you do make the declaration then it is taken at face-value, there are no checks. Some of the various pronouncements on what the changes might have meant when first proposed can be found here.
MOT Preparation Updated March 2012 by Michael Beswick [my comments]: April 1st sees the introduction of the recent MOT changes. Up to then these items are advisories. This is not exhaustive but covers those things likely to concern classic MG owners or perhaps owners of classic MGs:
- Hazards - not obligatory prior to 1/4/80, but if fitted will be tested and must work
- Steering lock is only applicable post 1/9/2001
- Dust covers - apart from existing steering rack, those ones on the bottom of the kingpin. They need to prevent the ingress of water and must not prevent the egress of grease.....but could be contentious
- Coil springs - slight change - they fail if they do not locate properly when the vehicle suspension is put back under load, or if their function is impaired
- Engine mounts
- Drivers seat must move and lock, though not in every position! [August 2018: If there is an adjustment mechanism, then it must allow the seat to be moved, and locked in a selected position. However if the seat is bolted to the floor and cannot be moved other than by unbolting it, then that is not a fail. The regulation gives reason for failure as "fore and aft adjustment mechanism not working as intended" see DVSA MOT manual section 6.2.5 Driver's seat Defect para b i.. If the intention IS that there should be no adjustment, by the seat being bolted directly to the floor, then it is working as intended. The DVSA have apparently said that this failure for a fixed seat gives grounds for appeal, if 'discussion' at the station fails.]
- Reg plate - same as before - silver and black is prior to 1/1/73 (although some claim it has been amended to include any vehicle in the 'historic' taxation class, although I have not been able to find any official statement to that effect), but if shown as a "new" bit of the test it may remind testers of the requirement. (Keep a spare set of modern ones...)
- Tow bar security (as now) but + electrics
- Electric wiring generally
- Battery security
- Fuel pipes - damaged or chafed
September 2010: Michael Beswick found and has sent me this [my comments]:
"MOTs are a test - the tester may not adjust anything other than Headlamp aim during the test [if you suspect headlamp aim is off then drive to the test centre having removed the headlamp rings yourself, I suggest!]. Certain minor items - such as blown bulbs - can be replaced at the end of the test before the car is passed. Garages may well charge for fitting an item, especially if it is discounting the test [VERY silly to go for a test with blown bulbs ...]. (Currently �54 max but available for �39.95 etc.) So it pays to avoid this if possible. Certain failure items must be retested for no fee. Partial re-tests may or may not incur a fee. Details are shown on a poster that MOT stations must display and on the VT30 fail certificate.
"All the usual caveats apply. Your investment can go down as well as up. Your home is at risk etc. etc. This information is not governed by the Financial Services Authority......
"Hazard lights, (if fitted) must work , ignition on, ignition off
"Horn must work. Fuel cap must seal [visible rubber seal, not loose and rattling about, actually sealing is not checked]. Door mirrors to be secure. You must have a driver's door mirror and either a rear view or passenger side one [On vehicles first used before 1st August 1978 only one of interior, external offside, or external nearside mirror is required on passenger vehicles with fewer than eight seats, for those on or after 1st August 1978 there must be two one of which must be 'an exterior mirror or device that provides a view along the offside of the vehicle' according to MOT Manual Section 3.3]
"Wipers must work, with blades that clear the screen and are intact [clear an arc to give an 'adequate' view, not specified]. Washers +fluid. (push type washer is fine). Windscreen - chips bigger than 10mm in the area in front of the steering wheel will fail: as will bigger than 40mm in the rest of the area swept by the wiper blades.
"Indicators left & right. 60-120 flashes per minute is required.
"Side lights - front and back, dip beam, main beam, rear number plate lights. If fitted, rear fog light + tell-tale [if two are fitted the off-side lamp must work. If neither work but they are accessories added by an owner then you may get away with it!]. Brake lights. Indicate left then right and check stop/tail lights don't flash in time. (Reverse lights don't matter [not tested, although at one time if they were operated from a manual switch by the driver they must also have a tell-tale])
"Then put hazards on and all the above, (except indicators) to check that other lights are not "disco-ing" in time with the hazards.
"Seat belts must recoil (often slowly!), unless static type, and lock in place in the buckle. Belts must not be unduly frayed.
"Check the tyre tread depth - it needs to be 2mm (1.6mm is the legal min). Check the side walls for bulges or damage. You can't do much about the inside face without lying under the car!
"Handbrake - does the lever poke you in the eye when you pull it up? Turn the steering wheel - if it moves more than from 12 o'clock to 1 o'clock without turning the road wheels it will probably fail (depends on steering wheel diameter)
"Exhaust must be "supported" - waggle the tail pipe a bit (when cold...) - it shouldn't. Noise is subjective, as it is difficult to determine a "standard" car!
"Number plates - lots of regulations. Stick on ones on the bonnet should pass but don't always. 1/1/73 was the change year from metal black & silver to modern yellow/white. Take the V5C to prove date of first registration and/or ask first!
"Bits must not be obviously falling off!
"Play in bearings, suspension, or steering is beyond the scope of this. If you think headlamp aim may be wrong, remove the chrome bezel before the test to make adjustment easier. If you can see the front brake pads they must be a minimum 1.5mm thick (the thickness of a 5 pence piece).
"Corrosion within 300mm of a suspension mounting or seat belt anchorage or major structural item will fail
"Local classic car clubs/users can best advise on "sympathetic" MOT stations who understand older cars. High throughput / low price ones probably do not fall onto this category! If you are not sure about a particular thing , take the car in and ask BEFORE the test is due!
"If the car has no MOT you may legally drive it to a pre-booked MOT test - nowhere else. Insurance for this trip is a slightly murky area. [You can get insurance without having tax or an MOT. I'm pretty sure it is an offence to drive to an MOT station without insurance, regardless of whether it is a pre-booked test or not. It's not something you should ever put to the test, I suggest, or you may be personally liable for any damage or injury caused to third-parties as well as being prosecuted. Note that someone else may be able to drive your car on their insurance, which may be Third-party cover only.]
"Should the car fail, you can drive it home or to a garage to have it fixed [The MOT station may encourage you not to drive the car away on safety grounds, i.e. have it fixed there and then or arrange for it to be towed/trailered somewhere else, but they cannot legally prevent you driving it away].
"Should you have some days "left" on your current MOT but the car fails the test, you still have an MOT, but you are driving an "un-roadworthy" vehicle. The current MOT Pass certificate shows the earliest date at which the vehicle can be presented for test - just under a month before the certificate expires [But see here]. By having the car tested near this date, there should be ample time to fix items that fail. If the car passes, the new certificate is automatically dated for 12 months from the date of the expiry of the current certificate. However if it does fail, be aware that although you still have an MOT, you are driving an "unroadworthy vehicle" which restricts legal use. The penalties are pretty similar to not having an MOT and whilst technically covered by your insurance in legal terms, you are unlikely to have a claim settled.
[My son when living in London had no facilities to work on his car and regularly had it MOT'd twice a year].
"I've probably missed something, but it's a start! Good Luck!"
For those that have to suffer it, the emissions limits and dates applicable can be found here. Note that there seems to have been a change in rules where later engines are concerned.
You can also check the brakes to make sure the pedal doesn't sink under sustained pressure, and if you have a servo 'empty' it by repeated operations of the brake pedal with the engine off until it stops wheezing, then with the pedal firmly pressed start the engine. While emptying the servo the pedal should get higher and harder, then when starting the engine it should sink a little.
See also the official MOT Manual from GOV.UK. In addition I spend a few minutes each year under the car, at the annual service before the MOT, just looking around and waggling things, bending the brake hoses back looking for surface cracking etc.
November 2011:There are proposals to cease MOT testing of cars registered before 1st January 1960, as well as possibly make testing a bi-annual event for newer cars. One has to ask "Why?" One of the reasons seem to be that owners of 1960 and earlier cars are likely to be enthusiasts and so look after their cars better, but that doesn't follow at all. It's true that pre-1960 cars are 0.6% of the population, and contribute to 0.03" of road casualties and accidents, but that is down to the greater sense of self-preservation of people driving cars of this era. Many cars at the 'lower' end of the classic price scale are likely to be owned by younger and less well-off people, with other cars and families to support, who may well take short-cuts on their pride and joy if they are allowed to. They are equally liable to be owned by people who don't know as much about their cars as perhaps they ought to, as can be seen by some of the questions and comments in the various online communities. Another reason given is that many aspects of the current test are not relevant to older cars - which is true, but in that case they are not tested! It's difficult to see just what could be dropped from the MOT that isn't safety-related. I'm no lover of MOTs, it's taken me 20 years to lose the 'heart in the mouth' feeling on delivering my cars for their tests and getting the verdict. As a Michael Beswick has said, it will only take one child to be killed or seriously injured by a classic car that had a defect that should have been picked up on an MOT, and we might find ourselves under a much stricter regime or maybe even restricted to trailering them to private circuits etc. Nigel Case, owner of the Classic Car Club, is quoted as saying "It's nonsense. Older cars need more attention. You could buy a car which seems superficially fantastic, but it will be rotten underneath and a death trap."
Even less reason for reducing the frequency on cars less than 10 years old, with the first test being at four years. One of the biggest reasons for failure of modern cars is worn tyres, and you can see this in any supermarket car park. Manufacturers have progressively reduced the ownership experience to one of being completely passive, and most people only ever do things like servicing and replacements when someone tells them they have to. The failure rate is increasing - 35% in 2008, 37% in 2010, and 12% of tyres are illegal on replacement. In the current financial climate people are cutting down on servicing where things might get picked up, and the MOT will be the only time that they can be.
Despite the above, there are new advisories from 1st Jan 2012 which will be failures from 1st April 2012. That's the list of new and amended items, but before you groan about something like the steering lock on an MGB having to be working as I did (Vee's has never worked in my ownership) you might like to have a look at the full manual. This has new and amended paragraphs and sections denoted by a vertical bar to the left, and in the case of the steering lock it is only to be tested on cars first used from 1st January 2001. There are others, like the new main-beam tell-tale check is only on cars first used from 1st April 1986. One thing that applies to all vehicles is the battery condition and security check - all those who have fitted 'battery bins' or 12v batteries and not bothered to re-engineer the clamps take note!
Nut Screws Washers and Bolts (and Grommets)
Torque Values
Translate between part numbers and description for many MGB fasteners
Links:
'Fastener Decoder Booklet' A reproduction of the document produced by BMC in 1964, kindly sent to me by Marc.
MGB Bolt Sizes/Taps and Dies by Les Bengtson
MGB 18V Engine Bolt Sizes (threads) by Les Bengtson
British Fasteners Used on the MGB by Dave Dubois
Whitworth sizes and numbers from Samstag Sales.
British Tools and Fasteners, which says it all really (the original link was to The British Tool Company which has been out of business a couple of years.
Rask Cycle on bolt head markings and torque figures.
Uni-Thread, for taps, dies, reamers and much more.
Tracy Tools ditto (funnily enough also in Devon).
Abbey Power Tools, which has Whitworth and BA spanners as well as much else.
Baconsdozen Imperial Tools, Conversion charts for Whitworth and BSF to mm, AF, BA socket and wrench size equivalents etc.
Spanner Jaw Sizes, a useful chart for comparing spanner (wrench) sizes and common nut/bolt use.
Conversions from fractional in 64ths to decimal and metric, also useful for comparing spanner sizes.
Bulkhead Holes and Grommets.
Nuts and bolts can be assembled with dry, oiled or greased threads. From comparisons made with generic sources of information it seems that the figures in the MG Workshop Manual, at least, are probably for oiled threads. Greasing threads can make them liable to come loose. For example I read many years ago that wheel studs should be oiled, not greased.
When torquing gasketed joints don't use silicone-based sealants as they 'go off' very quickly and on large areas will 'skin' before you can get the surfaces together and not spread out to an even thin coating. Use something non-hardening such as Loctite MR5922, and only a thin smear. Great gobs of it will get extruded out into the works and in the screw holes can rip paper/card/cork gaskets as they are tightened. Overtightening screws can cause covers to warp between adjacent bolt holes and leak more, check they are flat before fitting.
Although there are a lot of figures here there are still a lot more where no torque figure is given. It is possible that those given here are 'non-standard' torque values and the rest should be tightened to the 'standard' values for the type, size and thread of the nut and bolt:
Also see this list of 'standard' values from the Rover V8 Engine Manual:
M6 . . . . . . . . . . . . . . . . . . . .6 Nm (4.5 ft-lb.)
M8 . . . . . . . . . . . . . . . . . . . 18 Nm (13 ft-lb.)
M10 . . . . . . . . . . . . . . . . . . 35 Nm (26 ft-lb.)
M12 . . . . . . . . . . . . . . . . . . 65 Nm (48 ft-lb.)
M14 . . . . . . . . . . . . . . . . . . 80 Nm (59 ft-lb.)
M16 . . . . . . . . . . . . . . . . . .130 Nm (96 ft-lb.)
5/16 . . . . . . . . . . . . . . . . . . 25 Nm (18.5 ft-lb.)
3/8 . . . . . . . . . . . . . . . . . . . 40 Nm (29.5 ft-lb.)
7/16 . . . . . . . . . . . . . . . . . . 75 Nm (55 ft-lb.)
1/2 . . . . . . . . . . . . . . . . . . . 90 Nm (66 ft-lb.)
5/8 . . . . . . . . . . . . . . . . . . 135 Nm (100 ft-lb.)
By Monte Morris.
Additions by Peter Scott.
MGB GT V8 Workshop Manual Supplement and Rover V8 Engine Manual.
Additions from Haynes.
Printer-friendly version
| 4-Cylinder Engine | Factory V8 | Conversion V8 | Gearbox | Prop-shaft | Rear Axle | Front Suspension | Rear Suspension | Steering | Brakes | General |