


Contents
Index
So you think you want an MGB or V8?
Body
Brakes
Clutch
Cooling
Electrics
Engine
Fuel
Gearbox
Heater
Ignition
Propshaft
Rear axle
Steering and Suspension
Wheels and Tyres
Miscellaneous
Downloadable PDFs
The sectioned MGB at the British Motor Museum, Gaydon
Wheels and Tyres
|
June 2023: And a second tyre failure, this time on the roadster. Travelled up the M6 for a good two hours at 60 to 65 to a lunch stop on our way to The Pendle Run, then immediately after getting back on the motorways there was a significant vibration. As the previous tyre failure had only been evident at low speed I suspected this was more likely wheel balance, and as it was in the car as whole not the steering wheel it was probably the rears. The other possibility was a weeping near-side damper having lost all its oil so that wheel could be bouncing up and down. That would be difficult to diagnose, and neither easy to sort out immediately so we carried on. No sign of it on the 84 miles of the run, but as soon as we got back on the motorway it started again. Not long after that I could hear a curious rustling noise from the left rear, then very quickly it became obvious a rear tyre had deflated. Fortunately a motorway with a hard shoulder so we stop and get out ... to see hundreds of reinforcing wires sticking out of the tread! Near-side so safer than the off-side, didn't take long to put the spare on and continue, with no vibration. Got two new tyres and the fitters said they had never seen anything like it. These tyres were just under 12 years old, and whilst the recommendation is to change them at 10 years (not that I've ever changed them by age in over 30 years, only wear) they have only done 18k which is equivalent to about two years use on a daily driver when used for commuting, garaged so no subject to UV degradation, so surely this has to be gross premature failure? Nevertheless I probably will go by the ten year recommendation in future.
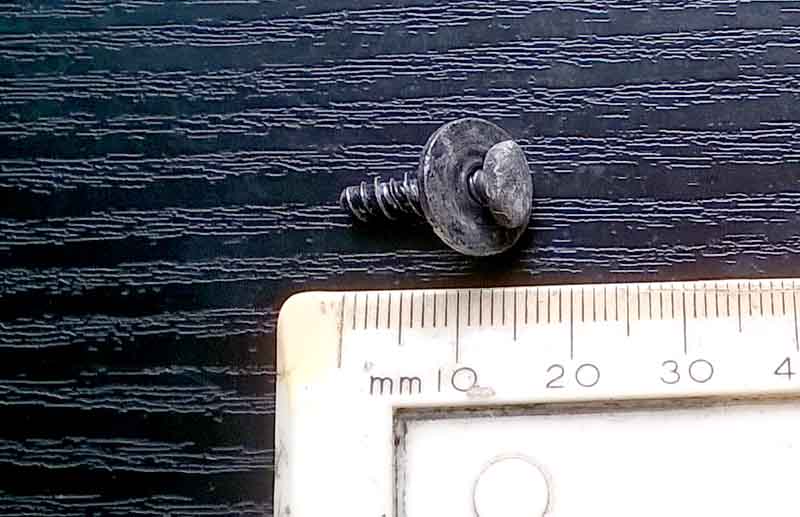
July 2018: If anyone needs to be convinced how valuable the advice "Listen to your car, it is talking to you" is, this may well do it. I knew the V8 tyres were near the wear bars and had already changed the front pair and a very old spare before a 300 mile trip to the Lake District in July. On the way back in the inevitable stop-start and crawling traffic on the M6 one very hot afternoon I was conscious of a strange slight but regular jiggle, which I put down to the road surface. The Navigator didn't comment, and she is usually very sensitive to unusual sounds, smells, and sensations in any of the cars. Back home on local roads it wasn't apparent, and I forgot about it. Then a couple of weeks later back on the M6 heading south on a 100 miler on another very hot afternoon, it was there again. On our arrival I knew I couldn't ignore it, started checking round and just glanced into the nearside rear arch to see a bulge on the tread. Can't leave that, so went to put the spare on, and was shocked to say the least at what I found. Not only a bulge but a large distortion in the tread, together with canvas and even steel belting showing either side of a deep split, and some of the wires cut through! How close that was to a blow-out at '70' mph on the M6, A14 and A1 I dread to think.
Barrie Robinson asked on the MG List for opinions on how to stop the theft of wire wheels. He got a number of replies both serious and humorous, I have to admit I contributed to the latter. Barrie then summarised these under various headings which made me laugh out loud and with his permission I reproduce his summary:
| The Practical | Put car in lock-up garage |
| The Humorous | Tie an aggressive dog to each wheel, or use one dog with a very long lead |
| The Economical | Get a big enough dog and something for it to chase and save petrol |
| The Comical | Use knock-offs incorrectly labelled "UNDO" |
| The Easiest | Do not anti-seize the wheels so they rust on |
| The Philosophical | Wire wheels are not an easily disposed of item - so not attractive to thieves |
| The Saddest | Current "of-age" thieves would not know how to get them off neither would they know what to use them on. |
Another smile was raised by an aside in a description of how centre-locks work by Wilson McComb attributed to a North American writer. Large diameter wire wheels were an uncommon sight in post-war America, but with a number of early MG T-series cars having been brought back by American Forces personnel after WWII, they were christened 'coffins riding on four harps'.
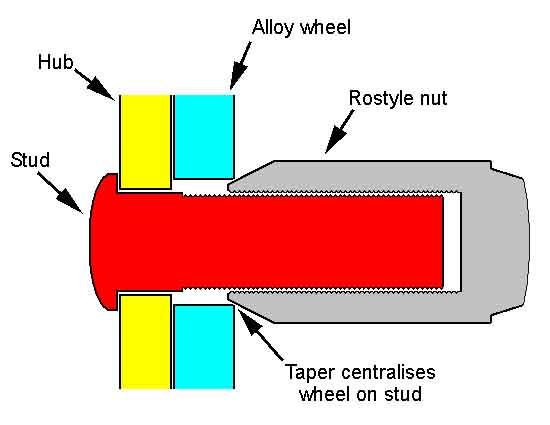
Stud-mounted e.g. Disc, Rostyle and V8 alloy
Centre-lock
Care needs to be taken with all original types of wheel if having them balanced at modern tyre fitters with computer balancing machines - it is crucial how the wheel is supported on the machine. Modern wheels are relatively high-precision items compared to original MGB wheels, indeed I've heard it said that Rostyle wheels were often neither round nor concentric and they rejected many! Unlike the Dunlop V8 alloys which were (centre hole excepted) very accurate and very strong - the factory apparently never managed to break one in early tests with massive over-loads.
Modern wheels are mounted on computer balancers using the centre hole and a quick-release spinner as this is much quicker to mount and demount than using studs and nuts. All MGB wheels have these centre holes as well, but on disc, Rostyle and V8 alloys the hole was intended simply to clear the hub nut and so its positioning wasn't precise. Mount one of these wheels on its centre hole and the tyre fitter is likely to advise you that it is so out of balance/out of round that is unsafe. Centre-lock wheels have to be mounted on the centre hole of course, but the adapters used are crucial, they need to be held at the same machined surfaces as they on the hub, but these are rarely available. Speaking to the MGOC they told me they had to purchase their own balancing machine and get a suitable adapter made as no-one else was able to do them properly. This Dayton Wire Wheel document on taper angles seems to be saying that their centre-lock wheels manufactured since 1990 have had a fully machined hub and as such will mount correctly on a modern tyre balancing machine using two inside cones of 70 degrees (as measured on screen) as opposed to an inner cone of 60 degrees and an outer of 20 degrees (both stated) that are needed for earlier wheels, and presumably those from other manufacturers.
Personally I reckon on-car balancing would be the answer, for all types of wheel, as was the norm in the 70s and 80s. However tyre places with those machines are now few and far between. Another possibility is the home static (anything that spins the wheel is a 'dynamic' balancer) balancer that uses an air-bubble, but I've read these are a bit hit and miss.
Incidentally 'Rostyle' is actual 'R-O style' abbreviated from 'Rubery-Owen style' after the manufacturer of the wheel.
Stud-mounted: These wheels all have stud holes and if the tyre fitter has a four-stud adapter plate for his balancing machine then ask that it be used. If not then you are better off going somewhere else that does, even to pay extra for balancing only. But I'm still not convinced that is the whole answer, see below for my V8 balance problems.
V8 Balance Problems: From being fine when I first bought the car I started getting problems as soon as I replaced the fronts. They lasted the life of one particular pair of tyres despite repeated rebalancing even with the 4-stud adapter plate (see above), so it was obviously the tyres that were at fault. But along the way I read that the wheel nuts used with the V8 cast-alloy wheels can cause a little imbalance and of a way to avoid it.
 Unlike Rostyles the V8 wheels and nuts do not have the conical seat to aid location. The shank of the nut goes right through the wheel and a flat washer as a shoulder does the clamping, therefore right up until the time the nuts are fully tightened the wheel can move up and down and side to side a little way, which means that when they are fully tightened the wheel can be in one of a small range but infinite number of positions in relation to the hub. Unless the wheel is exactly concentric with the hub some imbalance is inevitable. The recommendation was to use a pair of Rostyle wheel nuts on opposite studs and lightly tighten them. The taper on these nuts, even though it is bearing against a parallel-sided hole, will always locate the wheel in the same position on the hub. The first two V8 nuts are then replaced and tightened, then the Rostyle nuts are removed and the final two V8 nuts replaced and tightened. The Rostyle nuts are a different size 'across the flats' to the V8 nuts, so I welded a strip of metal around the Rostyle nuts to build them up to the same size as the V8 nuts to avoid having to use separate wrenches or spanners for each type. I also mark one hub stud and one hole in each wheel to ensure each wheel goes onto its hub in the same position each time as well as ensuring each wheel goes back onto its own hub (I never rotate my tyres around the car, it leads to premature replacement and all four, or five, wear out together). Since doing that (and junking the dodgy tyres it has to be said) I had no more problems with wheel balance, although after replacing the front tyres again (normal wear) the wobble has come back, and again I have been unable to get rid of it.
Update July 2009: It has been quite significant for a long time now, despite repeated rebalancing, more new tyres, and swapping fronts and backs over. It's not a steady vibration, but fades in and out at a regular rate, as if both are out of balance, one is rotating at a slightly different speed to the other, so they are alternately cancelling each other out and adding to each other. Also on a long curve on a motorway one way the rate of fading in and out speeds up, and the other way it slows down, also tending to confirm that both are out of balance. As all four wheels are doing the same it could well be that the so-called balancing machine is actually leaving them all unbalanced by the same amount when the machine says they are balanced. A couple of months ago on one trip it seemed particularly bad, which made me do another Google search, and this time I found a reference to BMTR in Birmingham having a special 'Road Force Measurement' machine, and also Vibration Free in Bicester who are balancing specialists, any rotating machinery, and do have on-car balancing facilities. At the MOT the other week the tester made a verbal observation that the rack is showing some play, which it is in the straight-ahead position, so almost certainly due to this wobble over a long time. I don't want to replace that while I still have the problem, so it really is time to do something about the vibration. �55 (plus the dreaded VAT) per hour for Vibration Free and usually a minimum of 2 hours required for four wheels, as compared to �15 per wheel at BMTR, so that was my first port of call.
I had great hopes of it as they tested the wheels with the existing weights first and both were out, one by a long way, whereas other places have just ripped the old weights off and started from there. They were also mounted on the machine much more securely. Ordinarily places will simply mount them by the centre hole against a cone, but MGB wheels were never made accurately enough for that, pre-dating those machines by several aeons. Some fitters including the one I usually go to have a gadget which holds them by the stud holes, but it consists of a hub with four arms which can be swung out to fit any stud spacing, and I've never been convinced that method is accurate enough. BMTR have a set of circular plates with holes drilled at gradually increasing distances from the centre. Pins are put into these holes that engage with the stud holes in the wheel. Instead of a cone on the back of the wheel there is a cylinder, which fits inside the hole in the wheel with some play and a shoulder that butts up to the back of the wheel. That just supports the back of the wheel same as the hub, whilst the four pins with tapered ends are clamped onto the front of the wheel in the stud holes and do the accurate positioning. This method of mounting is used on all wheels, so obviously the machine manufacturer doesn't think location by the centre hole is a good idea on any wheel! As soon as I drove out of the place I was amazed to find it felt smoother even at low speeds, but then dismissed that as probably wishful thinking. When I was finally able to get on some open road (this place is in the middle of Birmingham frustratingly) I was able to do two or three sprints of 70+ with no wobble - marvellous after all this time. Shan't be totally sure though until I can get on a longer run at those sorts of speeds.
Update May 2010: Will this saga ever end? True enough the balance remained good. But on removing the drivers front on various occasions the very large weight (the only weight) that was on the inside was obviously coming loose, and eventually at the annual service last month I found it was missing altogether, but had noticed no wobble. Thinking it was possible that it had come off on the last outing I took it for a fast run, but on that, and on subsequent longer motorway journeys, the balance was still perfect - very weird! Even weirder had the fronts replaced this week and got them to assess the balance before removing the weights or tyres, and whilst the left font had 10 grams too much on their machine the right front (lost weight remember) was a massive 160 grams out! He couldn't explain why the balance was the same with and without, and I suspect he thought I didn't know what I was talking about, but to be honest I doubt I would believe me either. Had the new tyres balanced as normal, and whilst they are nowhere near as bad as before there seems to be a very slight tremor some times, but not consistently fading in and out as it did originally. On an 80 mile motorway run the only tremor seems to be on concrete surfaces, on new tarmac it is fine. So now that raises questions about the balance machine at the tyre place I have been using for years, as I got these somewhere else.
Incidentally, I noticed that when replacing the wheels the fitter used an air-gun to do up the nuts and only used a torque wrench to check they weren't under torqued. Correct torque is 60 ft lb, and back home I used my torque wrench to loosen a couple on the rears (tightened by myself previously) and they needed about 70 ft lb to undo. One of the fronts got up to 100 ft lb before it started to move, very slowly, needing torque to keep it moving whereas they usually loosen quite quickly, another got up to 120 ft lb and then the torque wrench (bendy bar type) broke! I had to use a breaker bar on the rest, and they were very variable in how much force was required. This place (National Tyre and Autowreck) also use a different method of raising the car - you drive over a short ramp that the wheels straddle, then they place rubber blocks under the body and lift it with those, which I really didn't like. I may take wheels there for tyre replacement in future, but I would never take a car again.
Centre-lock:
 Centre-lock wheels must be held by the inner and outer tapers just as they are by the hub and locking-cap or they will not be centralised, with similar comments to mounting studded wheels by the centre hole as above. Modern balance machines usually have a set of tapered adapters of different sizes that are slid onto the balancer machine shaft so as to mount wheels with different sized holes. All the ones I have seen are conical in shape with the contact surface for the wheel on its outer angled surface. These are fine for the inner face of the wheel as it is similar to the hub, but because the quick-release spinner presents a flat surface to the wheel it doesn't hold the outer face of the wheel properly. I've seen them slide another taper onto the shaft and then the quick-release spinner, but this utilises the inside surface of the hole in the wheel and not its taper with the same results as before. Unless your fitter has a taper of the correct type i.e. one with a conical hole then again don't have them balanced. When first fitting chrome wire wheels the last thing I wanted was weights attached, especially to the outside, so opted to try them unbalanced first. Maybe I was just lucky, but I have never had any balance problems.
Updated January 2010: Following a discussion on the MG Enthusiasts bulletin board Richard Davidson emailed to anyone who was interested details of an adapter that will mount centre-lock wheels correctly on balancing machines. I'm sure he won't mind if I make his documents available here. He is going to have some made up by a friend with the necessary CNC facilities, making further copies relatively easy to obtain. Unfortunately he lives in South Africa, so postage to places like the UK and North America is likely to be an issue! I'm making enquiries locally to me in the UK about having some made here. However, it occurs to me that maybe only the outer cone that replicates the spinner may be needed, one of the balancer standard cones being adequate for the inner taper. Come to that, maybe an old spinner could have the end machined off to slide onto the balancer shaft. Or even an old hub and spinner modified to clamp the wheel correctly and slide onto the balancer as an assembly.
Updated April 2010:
 Son-in-law found me a machinist in Birmingham who quoted me �35 to make an outer cone, and �30 for an inner (collected prices), had one set made and collected them this month. I replaced two rear tyres last year and since then have felt some body vibration at typical wheel imbalance speeds of 65mph and greater. Put these on the fronts and had severe vibration. Took them and the cones to my local tyre place, and first had them assessed using how they would normally mount them (test 1), then with just my outer cone (test 2), then with my inner and outer cones (test 3). A noticeable improvement in run-out using my cones, and more balance weight required, in tests 2 and 3 over test 1. Had them weighted up using my cones, and back on the car they are as right as ninepence (which is more than it cost me to have them done (apart from a bung), which is why I'm reluctant to say who did them in case they get into trouble). Incidentally these are Cooper tyres and one needed 110grams and the other 150grams, which are large amounts. As the first tyres I put on when changing from Rostyles to wires needed no weights, I rather suspect these tyres are the problem instead of my wheels. I need new tyres for the front soon, so it will be interesting to have the wheels checked with the tyres off first, then again with the new tyres on, and I shan't be buying Coopers!
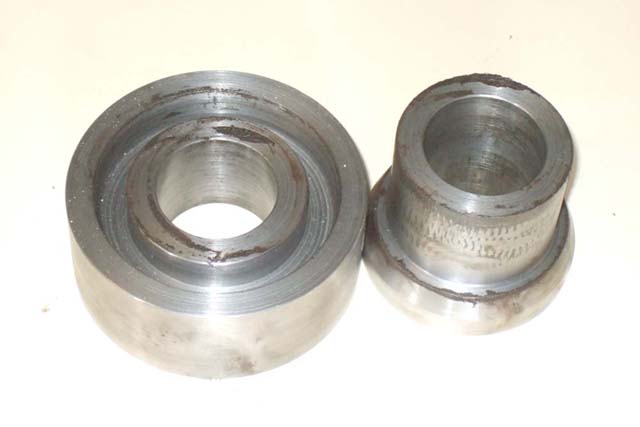
There was no difference between tests 2 and 3, which indicates that the standard cones used on the inside of the wheel is perfectly adequate on its own, hence only the outer cone is required. However offering the standard cone up to the wheel shows that it is contacting the taper right at the inner edge of the taper, i.e. right where the splines start. If there were any damage i.e. burrs in this area then it would hold the wheel incorrectly. By contrast my inner cone contacts the wheel right in the middle of the taper. This inner cone sat exactly square in the wheel, however the outer cone exhibited a slight rock on all five of my wheels. As the axis of the rock stayed with the wheel as I tried the cone in different positions it can only be a slightly warped hub. Perhaps not surprising, it is only a pressing (India Dunlops anyway), this taper is right at the edge and not in the middle as with the inner cone, with spokes close by under significant and variable tension. On the car the spinner is banged up pretty tight which probably helps to overcome this, on a balance machine it won't be as tight. Nevertheless my wheels came up with zero after balancing, and feel perfect on the car, so that is proof enough.
If you want to obtain the cones then I have left the drawings with the machinist for him to use as and when he wishes. He is:
B & M Engineering Services
6 Rowan Court
Crystal Drive
Smethwick
B66 1RB
Tel: 0121 541 1216
October 2018:After finding some play in the steering column UJ which will need replacement - again!, I decide to get the wheel balance checked first. These are Cooper tyres above which - despite originally running the chrome wires with no weights at all, and then just a few grams on subsequent tyre replacements - ended up with 110 grams on one and 150 grams on the other. Checking them first the 110 gram wheel was only about 10 grams out, but the other was 50 and the fitter showed me a wobble at the rim of about 1/4". I said to leave it and I get the wheel checked and trued. But back home I put it on the axle, and with a wire pointer against the recess in the rim (not the outer edge which might not be 'true') the run-out was no more than about +-1mm. I also backed the pads off to allow the hub to rotate completely freely, there was no tendency that I could see for the wheel to continue rotating with just very small pushes in any part of the rotation compared to any other part. So both balance and true-ness would appear to be OK. I know their machine is good as I recently had some fronts fitted by them, tracked as well as balanced, and it felt like a different car. I've always had balance problems with Vee - some quite severe and some less so, the only time it felt like this before was after having them balanced at BMTR on their 'road force' balancing machine. The only thing I can think of is that the wheel wasn't held dead square on their machine using my 'outer cone' adapter. The outer end of that is flat but I'm wondering if really it should have an over-sized centre-hole which can be supported with one of their inner cones. But it hasn't been a problem before.
Self-Tightening? Or not?
Fitting to axle
Balancing
Lubrication
Spline Wear
Grease Caps
Converting to Wires from Rostyle/Disc June 2016
Spinners/Nuts
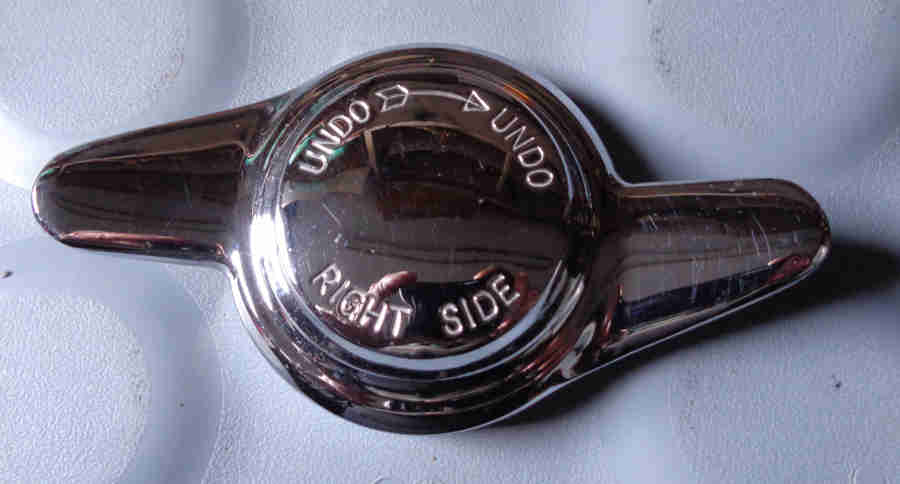 Wire wheels were retained by two-eared spinners in the UK until some time in 1968 when they were replaced by octagonal nuts, other markets changed to octagonal nuts earlier in some cases from the beginning, on safety grounds. This was because the two-eared spinners were seen as a bit like the wheels on Boudicca's chariot! However it's likely that retro-fitters (including myself) prefer the eared spinners. Both types use differently-handed threads on different sides of the car - the MGB uses a right-hand thread on the left-hand side of the car and vice versa for reasons of physics, note that other marques can use the opposite thread because spinner and wheel interface differently. Originally the threads were 12TPI but changed early in 1964 to a coarser 8TPI. For those reasons one must be very careful when fitting hubs to axles - to get them on the correct sides as well as matching threads when replacing components. Hubs may be stamped 'RH' and 'LH', maybe not, the spinners/nuts are marked in the case of MGB components with RIGHT SIDE or LEFT SIDE as appropriate and the word UNDO either side of an arrow pointing in the direction they are turned to be removed. Even clearer on spinners is the design of the ears which are tapered, one side aligned with the centre of the spinner and the other angled off to one side - to remove you apply force to the side aligned with the centre, and to tighten you apply force to the angled side. Yet another recognition method is that with a wheel raised and rotating as if travelling forwards the spinners and nuts should tighten, and that is the case on both sides of the car.
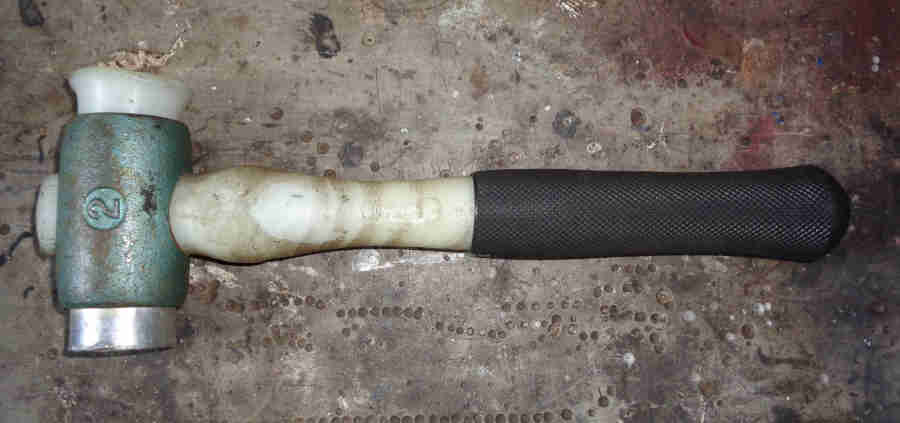 Nuts are obviously going to need a spanner for removal and tightening - an octagonal one as they have eight flats not six as for most nuts. Some are relatively small that you have to belt with a hammer, others are much bigger giving more leverage but still have an angled face if you need to use a hammer as well. Spinners are completely different of course and there are at least three types or tool: A heavy duty metal bar that engages with the ears and you use leverage, a wooden former that fits over the the whole spinner and you belt with a hammer, and just a hammer to belt the spinner ears with! Both devices for octagonal nuts are metal and I can imagine will damage the chrome over time, as will the large metal implement for eared spinners. The wooden one won't damage the spinners but having used one once on a rear wheel I was concerned about the proximity of the rear wing when I was hitting it. And if you are going to have to hit that with a hammer, you might as well use one on the spinner directly and be well away from the body. Obviously a steel hammer is going to damage them, I bought the MGOC 'lead-faced' hammer with my wire wheels but the 'lead' seemed far too hard to me - one tentative whack confirmed my fears by marking my brand-new chrome spinner. So I had to resort to using a block of wood as a buffer for several years before discovering a Thor 'super plastic' hammer in my local Halfords that has plastic one side and aluminium the other, and in 30 years of use it (the plastic end) hasn't left a single mark on the spinners. Anglo American are agents for Thor hammers, see here for North American stockists. Thor also do the correct (for older MGs) copper and leather hammer but they are more expensive.
With poor maintenance spinners can seize onto the hubs and the advice is to drive in reverse (see 'self-tightening' immediately below) in a tight circle with the seized spinner on the outside, and for the same reason never tow a centre-lock equipped car backwards for anything more than a few yards with any wheels on the ground.
Self-tightening? Or not? The theory is that centre-lock spinners, or locking-caps, are self-tightening, although some poo-poo it. Certainly the threads are different from side to side - with left-hand threads on the right-hand side of the car and vice-versa. November 2010: This is not the same on all cars, for example the Lotus Elan has the left-hand thread on the left-hand side, because the spinner contacts the inside surface of the wheel hub and not the outside as on the MGB. However there is an error in the logic part way down the link: One contributor writes "I don't fully follow the LH & RH thread thingy because the loads reverse themselves depending upon whether the car is accelerating or braking." The forces involved are not dependant on accelerating or braking, but are simply the weight of the car and the direction it is travelling in, which is the same for both accelerating and decelerating (but not reversing hence the advice above). Definitely mine take more effort to undo than I put in to doing them up, and that is when clean and lubricated and after only a short journey so not seized. I came across a description of the self-locking action on a TR Register web-site, reprinted by permission from Safety Fast (MG Car Club), written by Wilson McComb, which he attributes to The Autocar Handbook of 1918! I reproduce the guts of what he wrote here, I hope none of the aforementioned object:
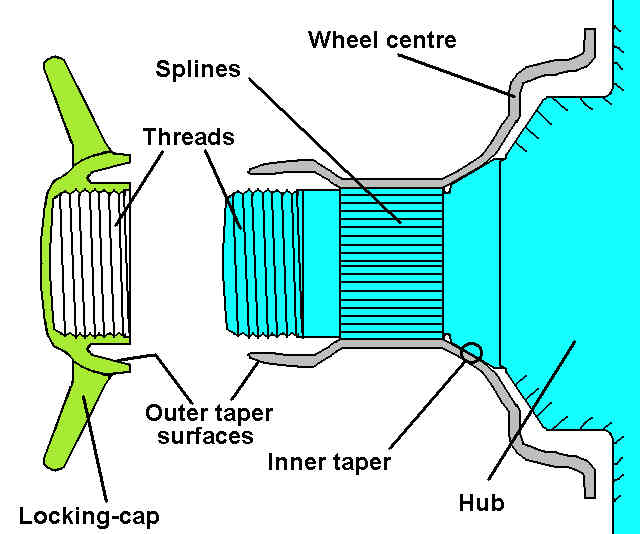 Let us take a closer look at this assembly, referring to the central portion of the wheel as the "wheel centre", which is fitted to the "hub" and fixed in place with a 'locking cap'. The first thing to be appreciated is that the wheel centre does not come into contact with the brake drum. There is, in fact, a clearance of about 1/8" when the wheel is fully home. It is the inner taper of the wheel which comes into contact with the back taper of the hub. Notice the taper which is formed on the outer surface of the wheel centre. This engages with yet another tapered surface formed on the inside of the locking cap. When the wheel is fitted to the hub, and the locking cap screwed on, it is therefore centralised and held between two pairs of tapers.
The only other contact between hub and wheel centre is provided by the splines, which carry the driving and braking forces. The locking thread, on the hub and cap, is right- handed on the left (near) side of the car and left-handed on the right (off) side. One of the endearing ('enduring'?, although 'endearing' may be rather apt) mysteries of the wire wheel is that the spokes are not, and indeed never can be, in compression. The weight of the stationary car is suspended from those spokes which are uppermost in the wheel when the wheel and locking cap are loosely fitted, therefore, the upper portion of the outer taper is pulled firmly into contact with that of the locking cap taper, and the lower portion of the locking cap thread is in contact with that of the hub.
A slight clearance then exists between the tapers at the bottom, and also between the threads at the top. As the car moves forward, a different portion of the wheel rim takes the weight, and relative movement occurs between wheel centre, locking cap and hub. The effect of this is to tighten the locking cap, and the locking action continues until there is firm contact between the tapers all round when it ceases.
The clearances involved are, of course, minute, but the locking action is nevertheless completely positive and entirely automatic. There are people who deny the very existence of the locking action, and presumably attribute the left and right hand threads to sheer cussedness on the part of the manufacturer. They are, no doubt, the people who bash their locking caps with heavy hammers.
Still don't believe it? See this on mechanical precession from Wikipedia:
 Not exactly the same as a wheel, hub and spinner where all three parts normally rotate as an assembly, but it demonstrates what happens when one circle rotates inside the circumference of another without skidding - as the point of contact moves the relative rotational position of the two circles changes. As the spinner tightens the tapered contact surfaces are brought closer and closer into contact until they are clamped together tightly and are fully in contact all the way round. They are then effectively the same circumference so no further precession can take place, and the spinner does not tighten any more. The tricky bit with this animation is that on the MGB the wheel has the smaller circumference and the spinner the larger, which seems counter to the theory. But you can try it yourself with any two circles, and a rubber band and the forefingers of each hand are probably the simplest. Make a mark on the band, put your fore-fingers in and stretch it a bit, rotate one finger about the other, and the mark on the band will rotate in the opposite direction. OK, still not exact but it does show that the outer 'circle' in this case still moves in the opposite direction as the point of contact between the two travels around the two surfaces. Still not convinced? At the end of the day (in fact just after a mile or two ...) centre caps of either type on either side will be tighter than with normal manual tightening.
This effect is nothing to do with a quirk of wire-wheels e.g. their flexibility, it applies equally to alloys which are very rigid. On the other hand I have read that one North American motor manufacturer used left-hand threads on one side of early stud wheels believing that the same principle applies with these too. But the forces involved in a multi-stud mounted wheel do not rotate around the centre-line of each stud and nut but move across them from one stud to the next around the wheel, and relatively small (compared to spinners) nuts on studs are tightened to around 60 ft lb. I think we have been living with right-hand threads on studs and nuts on both sides of the car now to dispose of that theory.
Note that the hub (that part that remains on the axle when the wheel is removed) nuts on the MGB at least are right-hand thread all round the car as they are retained by split-pins.
How tight? McComb in the same document says the earliest instruction he came across was never more than finger-tight. However the looser they are the more the one set of splines is likely to fret against its opposite number, causing wear, and instructions for many years have been to hammer them up then check after 20 miles and retighten if necessary. 'Hammering' means with a copper, hide, lead or similar hammer and not beating the living daylights out of it with a steel sledge-hammer. Manually overtightening could well distort the wheel centre affecting the tightness of the spokes and the 'true' of the wheel, hence causing balance problems. The recheck after 20 miles can only be a belt-and-braces check maybe against having left it finger tight or less when refitting, by then - given the self-tightening action - it will have fully tightened anyway.
Installation to axle: July 2022
 Most important is to get the hubs on the correct side of the car! The wheels are retained by threaded spinners or nuts which as explained above have a different handing on opposite sides of the car for reasons of physics - the MGB uses a right-hand thread on the left-hand side of the car and vice versa, note that other marques can use the opposite thread. For that reason one must be very careful when fitting hubs to axles - to get them on the correct sides. They may be stamped 'RH' and 'LH', maybe not. The spinners/nuts are marked in the case of MGB components with RIGHT SIDE or LEFT SIDE as appropriate and the word UNDO either side of an arrow pointing in the direction they are turned to be removed, so it is suggested that you loosely fit a spinner to the hub while it is being offered up to the axle to be absolutely sure.
Unlike stud wheel hubs, centre-lock hubs have the hub nut down a long tube so a means to install (and remove) the hub nut split-pin through the hub is required. Both front stub axles and tube-axle half-shafts have two split-pin holes passing through them at about 90 degrees to each other, which means the nuts only have to be tightened beyond the specified torque (70 ft lb for fronts and 150 ft lb rears) about half a castellation to get to the next hole. That means either hole through the axle may be used, but you won't know which one until you have the nut tight, by which time the hub is on the axle. The front hubs rotate on the stub axle so it's just a case of turning the hub to align its access hole to the position you want to install the split-pin, but rear hubs rotate with the half-shaft of course. They should have two access holes - again at about right-angles to one another - for split-pin insertion so you have to position the hub on the half-shaft splines so that BOTH access holes line up with those in the end of the half-shaft, then you can use either split-pin hole via the appropriate access hole once the nut has been tightened.
Lubrication: Essential to avoid the wheel, hub and locking-cap seizing together, with the aforementioned difficulties in the event of a puncture. Splines, locking cap and hub threads to aid self-tightening as well as removal and the surfaces of the tapers. When first fitting new wheels and hubs one probably puts on too much as it fills up the grooves in the splines and the threads, the excess working its way out into the wheel centre. Once on the spoke nipples it will work its way through the wheel centre and along the spokes. I've seen a recommendation to use silver grease so it doesn't show, but in my experience it is the dust and dirt that stick to the grease that you can see on the spokes, and this is always black or very dark brown, making the original colour of the grease immaterial. In 15 years and 40k miles since fitting my wire wheels I didn't have to re-grease the splines or threads, and once I'd cleaned the excess out of the centre of the hub, where the spoke holes are, I very rarely get any up the spokes. Since then (32 years and 70k miles now) I've maybe added fresh grease just once. At each service I just wipe the thinnest smear over the tapers, redistributing what wipes off the area between the taper and the splines with a finger-tip and applying it to the tapers. The tapers should keep dirt out of the splines and threads in normal use, make sure you don't introduce any when removing wheels e.g. by dropping the wheel spinner-side down onto the ground.
Spline wear: Because the splines have some clearance, and even when the centre-cap is fully tightened, it is inevitable that there is very slight rotational movement between wheel centre and hub when repeatedly accelerating (rear wheels only) and braking. Initially this is very slight but each time the one does move relative to the other the faces of the splines are brought together with a bit of an impact. This 'hammering' gradually deforms the splines, making them thinner, which increases: the gap between the faces of the splines; the distance each spline travels when it changes direction; the impact when it finally reaches its opposite number; and the rate of wear. Initially and with lubricated splines, this movement and impact is inaudible, but eventually wear increases to the point of causing an audible 'clonk' (not to be confused with a similar noise from the diff which is caused by worn thrust washers). New splines have a cross section that looks like a triangle with the top cut off. As they wear i.e. the splines get thinner the flat top narrows, until the top of the triangle is pointed again, and the triangle may lean to one side. Further wear will eventually cause the triangle to bend right over and the two sets of splines can wedge on top of one another seizing the wheel to the hub. Alternatively, i.e. under sudden heavy braking, the tops of the splines can be snapped off and then the wheels can rotate independently of the hub, which can be a bit traumatic! I'm told that new hubs have a diameter at the splines of 2.440", fairly worn (sharp point instead of flat top) may be greater than this, stripped splines will be less than this.
The following drawings have been taken from British Wire Wheel. However in my opinion the flat top to an unworn spline is much more evident than shown in their drawings:

Updated July 2010: As stated above there must be some play in the splines or you would never get the wheel on and off without a press or puller. Some spline wear is inevitable as the wheels and hubs get older, and when you start hearing clonks that is when you start keeping an eye on the shape of the splines, and definitely replace both (unfortunately) at the latest when the splines develop a sharp point, if not before. You may find the brake drum is turning slightly with the wheel with the handbrake hard on, and that can come from the shoes moving on the back-plate, which can come from a loose shoe adjuster and also make a noise. Yet another source of clonks can be if the hub is not tight on the half-shaft.
Wire Wheel Conversion: Wire wheels are a bit like Marmite - you either love them or hate them. The reason for loving is the 'classic' appearance, especially chrome wires twinkling in the sun, the reason for hating is the effort needed for a full clean to keep them twinkling. As someone who loves them (chrome) the effort of cleaning (about an hour per wheel two or three times a year, and in-situ was with a hose brush in between) is well worth the end-result. Although some people at the factory said they hated them as an anachronism, they were fitted - both painted and chrome - to some cars as standard, and were always available as an option.
I'm specifically talking about wire wheels here even though other styles such as Minilite and other centre-lock alloys are available as after-market items. Although the process for converting to both types is basically the same, there are special considerations affecting wire wheels that don't apply to the 'solid' centre-lock wheels and this is due to the different 'offsets' on wire wheels to 'solid' wheels. The upshot is that due to their design and construction the mounting face of wire wheels is much closer to the centre of the wheel than for solid wheels, which usually have a 'positive' offset which moves the mounting face closer to the outer face of the wheel. What this means is that for a given axle, the track with wire wheels will be significantly more than with solid wheels such as disc, Rostyle or LE/Jubilee/V8 alloys. "So what", you might say, but given that on chrome bumper cars the tyres are tucked up inside the arches, and the only lateral axle location is performed by the leaf springs, on cornering the body tends to move across the axle towards the outside of the bend, and as it does so the arch lip on the inside of the bend is very likely to rub on the sidewall of the tyre. It's true that at the same time the arch on the inside of the bend tends to rise relative to the tyre, but with a standard chrome bumper ride height it's not enough to clear the tyre. For that reason MGB wire wheel axles are almost 2" shorter than stud wheel axles, giving more clearance to the arches, both banjo and Salisbury. There are special conversion hubs for standard axles that bring the wheels in a bit, but there are also two offsets of wheel - later factory wheels and aftermarket being positioned further out, and with those you can still get rubbing with the correct wire wheel axles, even more so with conversion hubs on standard axles.
This only affects chrome bumper cars - or lowered rubber bumper. On unlowered rubber bumper cars the arch is clear of the tyre to start with, and that clearance increases during cornering. Also it also only affects wire wheels, as 'solid' centre-lock after-market wheels would presumably be obtained with a suitable offset.
 But conversion is quite popular, and replacing the axle is quite a large and expensive undertaking (and the job is already pretty expensive anyway). You could fit standard wire-wheel hubs to a stud wheel axle (only with the Salisbury axle, on the banjo the half-shafts and other components differ as well), but with chrome bumper cars the tyres would rub very badly. For that reason there are conversion kits available for existing axles, which consist of specially machined rear hubs - to replace the original stud wheel hubs. These allow the wheels to sit a little closer together, compared to standard wire-wheel hubs on a stud wheel axle. However it's only about 1/4" - 1/2" closer each side, and given that the axle is nearly 1" wider each side, this still leaves the wheels sticking out more than they would on a pukka wire wheel axle. And the upshot of that is that you can still get rubbing, in some cases severe. It's exacerbated by later wheels having less inset that sets them further out (wider track) than originals and they seem to be the only ones available new. The first time I went out in mine after the conversion I swung round a corner and was shocked by the graunching noise, and the marks it left on the tyre, and it was even worse when touring two-up fully laden, even though I cut the arch flange back to about half its depth. Something Had To Be Done, as I was concerned that it would fail the MOT. Subsequently I lost the oil from the axle and it started whining badly, so I took the opportunity to swap it for a pukka wire-wheel axle. But they still rub, although nowhere near as badly - only if I corner a bit hard when when touring fully laden.
Something to note when fitting conversion (or indeed standard) hubs to a tube-type axle is the need to line up the split-pin access holes in the hub with those in the half-shafts before fitting the nut.
There is another aspect of MGB construction that makes this lack of clearance worse on one side than the other. For some reason the clearance between the tyre and the arch on the left is almost always less than that on the right, both left and right-hand drive, and the reason has never been fully explained. Some think the axle is the problem and cut off and reweld the spring mounting points, but I've done a full longitudinal, horizontal and diagonal alignment check and my rear axle is in line with the front wheels, so moving the mounting points would simply make the car crab - not good - and I've seen the same offset when a non-MG axle was used in a V8 conversion. Also on my car the left rear arch bulges out round the wheel slightly, which in theory should increase the clearance to the tyre, making the smaller clearance even more strange. You may be able to get a more even clearance by supporting the body, slackening the U-bolts, levering the axle to the right and holding it there while retightening the U-bolts. Some people have described using a baseball bat to 'roll' the flange on the left-hand arch upwards, almost completely back on itself, however this will create a dirt and moisture trap.
In an effort to control the rubbing I fitted new rear springs which made no difference, then rubber bumper roadster rear springs, which did lift the rear of the car enough for the arches to clear the tyres. But over some surfaces the ride was very choppy and unpleasant, so I decided to fit a pukka wire wheel axle, and refit the correct springs. I found one at a small parts supplier that was from a dismantled car. The CW&P was bad but I had the axle rebuilt including new bearings through Clive Wheatley in 1998, who had a stock of good 4-cylinder CW&Ps removed from axles that had been modified with V8 units as part of his V8 conversion business. This also needs a replacement handbrake cable because of the shorter axle. Another thing to bear in mind regarding the brakes is that Mk2 roadsters have smaller wheel cylinders than GTs, which have locating pins in different positions on each type, and consequently the back-plate being drilled slightly differently. This needs to be borne in mind if the replacement axle comes with back-plates and you decide to refurb them so the axle change becomes a simple swap, rather than having down-time while you refurb the originals.
The axle swap was successful ... until I fitted 175 tyres at the rear in place of 165s (when I couldn't get 165s). They now rub again, but only very slightly and occasionally, so I can live with it, but will go back to 165s in the future if possible. So in conclusion I can't recommend the conversion kits with after-market wire wheels for a CB such as mine at least, you try them at your own risk. If factory wheels (or other) have a greater inset and give the narrower track then they will probably be OK. Really I need to fit the conversion hubs to this wire-wheel axle which would bring these wheels further in and have the outer face of the tyres the same distance from the arches as originally, but I sold them on when I swapped the axle! The same considerations apply to centre-lock alloys, which can have many different offsets.
More info on wheel sizes and offsets/insets, wheel track , and axle length.
It's not an issue at the front, the lateral locating of the front wheels relative to the body is much more positive than with the leaf springs at the rear, and the arches being clear of the tyres (to cope with steering!) will never rub anyway. If you chose to go the conversion kit route the kits available these days contain simple conversion hubs which bolt onto the wheel studs (which may need shortening to clear the wheel) of the standard hub, but you will need a method of locking the hub while tightening the nuts (similar to locking the gearbox output shaft to remove/tighten the flange nut). When I did mine these weren't available, one had to obtain a pair of standard hubs. Second-hand it is wise to replace the bearings, so the end-float has to be set-up, and you will need the correct grease caps with the threaded stud. Using the conversion hubs you could get away with the original grease caps, but would need to remove the hub extensions in order to remove the grease caps for any reason. The big benefit of these front conversion hubs is that it makes life much easier if ever you need to remove the hub and reset the end-float e.g. for replacement wheel bearings, compared to working down the long tube of standard wire-wheel hubs. You would almost certainly need to swap the front hubs if replacing the axle with a pukka wire-wheel one as I can't imagine the front conversion hubs are available on their own.
With Dunlop wires at least you will need inner tubes (although some more expensive brands may claim to seal the spokes). Some people say that you need special tubed tyres to run tubes, or imperfections and knobbles on the inside of the tyre will puncture the tube, but I haven't had that in 27 years and several sets and brands of tyres. However I have found they exhibit a very slow air loss and can benefit from slight over-inflation, more info here.
But bear in mind it won't be repairable afterwards.
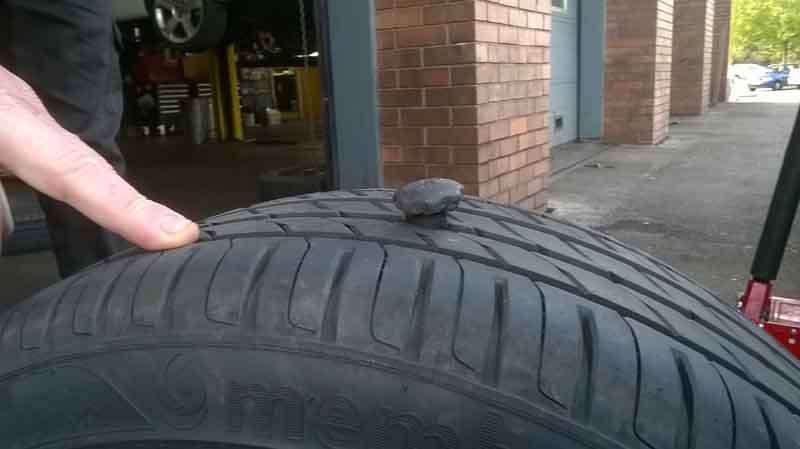
September 2017: Yet another puncture on the ZS, this time in a tyre barely a month old, from a massive hand-tightening clamp like something off a bike carrier or roof rack! Halfords manager said it trumped anything he'd seen before.
Spare Wheel December 2019
GT Wheel Cover
Someone on the MGOC forum wondered if he could use a 14" Rostyle in place of a 15" Minilite in the event of a puncture. On the face of it 'no' based on the MOT Manual - "Defect (b) Tyres on the same axle or on twin wheels are different sizes - Major". The DVSA Categorisation of vehicle defects Section 5 Part 2 (p185) seems to confirm that with "One tyre is of a different nominal size or aspect ratio from those on the same axle (see notes 3 and 4) - Delayed Prohibition". The 'delay' is from 3 to 10 days depending on whether it is safety-critical or not and how many defects there are, I suspect tyres would be considered 'safety-critical'. Space-saver spares were raised, and note 3 in that document says "Manufacturer supplied �temporary use' spares (�Space-Savers') are acceptable" - 'Manufacturer supplied' perhaps being the critical point. Dave Birkby came up with the following from the Construction and Use Section 27 Paragraph 3 - "Paragraph (1)(a) does not prohibit the use on a road of a passenger vehicle (not being a bus) by reason only of the fact that a wheel of the vehicle is fitted with a temporary use spare tyre, unless the vehicle is driven at a speed exceeding 50 mph." which doesn't specify 'Manufacturer supplied'. So a grey area perhaps open to interpretation. One solicitors web page states "the law requires that all tyres on a motor vehicle (including the spare) have a minimum depth of tread ... " but that seems to be a one-off, it would be a bit harsh on someone carrying four slicks for track use. As the original poster's question was definitely not a 'manufacturer supplied space-saver spare wheel', it's the age-old question - what would your insurance company say about it if a claim was made?
Clamps:
Note that even though the disc wheel clamps are NLA it's distinctly possible that the wheels can be stored upside-down like the V8 wheels to give more storage space inside the wheel, and use the short V8 clamp, as can Rostyle wheels. However, despite being the shortest the V8 ones seem to be the most expensive for some reason, so any of the others could be shortened and re-threaded to suit.
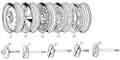 The V8 clamp is short as the wheel is stored upside-down as said above (and incidentally means the hole in the cover board for wheel centres of other wheels isn't needed). The wire wheel clamp is long as the centre of the hub protrudes so has to be stored with the outer face upwards, as does the LE wheel and its clamp is even longer. The disc wheel clamp is longer than the V8 but shorter than the others, and this wheel could also be stored upside-down as the widest part is the tyre. The Rostyle clamp is long like for the wire wheel, and early versions do have the centre of the wheel protruding past the rim slightly, but only by a few mm. In fact this wheel can be stored upside-down as the boss in the boot floor fits inside the wheel centre with a clearance, the V8 clamp fits perfectly and again gives additional storage space as can be seen in the pictures. I've not been able to try the later Rostyle with the narrower offset and slightly wider track where the wheel centre does not protrude past the tyre. No problem with the wheel centre clearing the boot floor boss, the clamping face is a few mm higher off the boot floor, but given how many free threads there were with the earlier wheel I have no doubt the V8 clamp would work with this wheel also. Why no-one twigged out the outset that the disc and Rostyle wheels could be stored upside down and so use a shorter (and hence cheaper?) clamp and offer a bit more storage space, I have no idea. Much less why - when they started fitting the V8 (and Jubilee) wheels upside down - they didn't realise they could do the same with Rostyles using the V8 clamp which by reducing the number of types and increasing the quantity in theory would also reduce costs. However the short V8 clamp is as much as �30 when the longer Rostyle clamp is �15 and the even longer clamp for the LE can be had for �12, all from the same supplier, I have no idea why!
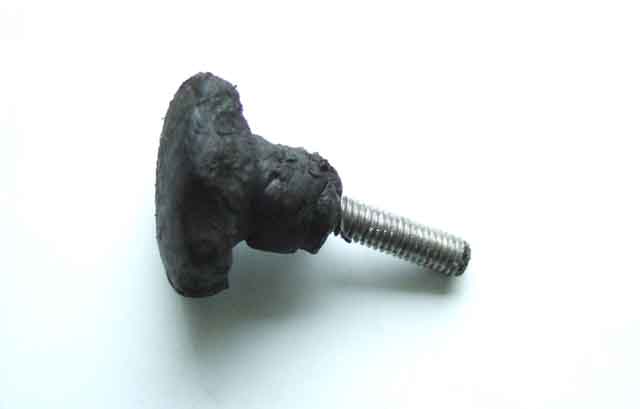
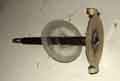 Bee came to me without a spare clamp for when she had Rostyles, then 30 years ago I converted to wires and ran clamp-less for quite a long time, but could hear the wheel bouncing in the boot from time to time. Eventually I investigated them but as at the time of writing they are �20 from a decent supplier I decided to see what I could do from sundry bits. Found an old Ron Hopkinson rear ARB drop link with one end sheared off, and welded the threaded part of a bolt that fitted the boot floor to the end of that. After that it was just a case of making a top part with 'wings' to screw it on and off, and a plastic protector between it and the wheel, both from materiel I had lying around, and attaching them to the other end of the shaft. The wheel-cover carpet section sits on top of the clamp, and luggage sits on top of that, so I was careful to make that end of the clamp smooth so as not to wear through the carpet.
Decoding the tyre wall. For modern tyres you will typically see (on the ZS for example) '205/45 R17 88W' where 205 is the width of the tyre in millimetres, 45 is the aspect ratio or height of the tyre sidewall as a percentage of the width (in this case 45% of 205mm), 'R' is Radial construction, '17' is the diameter of the tyre's inner rim in inches, '88' is the Load Capacity (in this case 560kg), and 'W' is the Speed symbol indicating the max. speed for the tyre at full load (in this case 150mph).
Originally radial tyres for the 4-cylinder would have been marked '155SR14' for the roadster, '165SR14' for the 4-cylinder GT and '175HR14' for the V8. '155/165/175' is the width of the tyre in millimetres, 'S' and 'H' are the speed rating (113MPH and 130MPH respectively), 'R' signifies Radial construction, and '14' is the rim diameter in inches. No aspect ratio is given as most tyres were 80s, i.e. the sidewall height is 80% of the tread width. 80 profile tyres aren't commonly available these days, so it is quite normal to see 70 or 75 profile tyres used with an increased tread width to keep speedo accuracy. No load rating given either. Modern tyres, for the V8 for example, will be marked '185/70 R14 H88' i.e. 185mm tread width, 70 profile, radial construction, 14" rims, H speed rated, 88 load rated.
It's interesting to note that with the change from crossply to radial the tread width units changed from Imperial to metric, even though it was long before general metrification in the UK. This may well have been to give a clearer indication of construction than a simple code letter, as crossply and radial must never be mixed on the same axle, nor can their be radials on the front with crossplies on the rear. However the rim diameter continues to be in inches, because there are few exact, round number conversions between metric and Imperial, and the rim diameter needs to be to very close tolerances or you won't get it on, it will leak, or even worse come off the rim, and there is little point in specifying tyres for a 14" wheel as '355.6mm' just so as you can use metric units. Why do UK wheels continue to have rim diameter in inches when they could be metric? Probably because tyre manufacturers for the UK market would then have to produce tyres in both Imperial and metric, with only tiny differences between some of them.
Speed ratings:
"P" For cars with a speed capability not exceeding 150 Km/h (94 MPH)
"Q" For cars with a speed capability not exceeding 160 Km/h (100 MPH)
"R" For cars with a speed capability not exceeding 170 Km/h (106 MPH)
"S" For cars with a speed capability not exceeding 180 Km/h (113 MPH)
"T" For cars with a speed capability not exceeding 190 Km/h (119 MPH)
"U" For cars with a speed capability not exceeding 200 Km/h (125 MPH)
"H" For cars with a speed capability not exceeding 210 Km/h (130 MPH)
"V" For cars with a speed capability not exceeding 240 Km/h (150 MPH)
"W" For cars having speed capability not exceeding 270 Km/h (170 MPH)
"Y" For cars having speed capability not exceeding 300 Km/h (190 MPH)
"VR" For cars having speed capability over 210 Km/h (130 MPH)
"ZR" For cars with a speed capability over 240 Km/h (150 MPH)
"ZR+W" Tyres marked with both designations for cars with speed capability over 240 Km/h but not exceeding 270 Km/h (168 MPH)
"ZR+Y" Tyres marked with both designations for cars with speed capability over 240 Km/h but not exceeding 300 Km/h (186 MPH)
Load ratings:
| Load Index | Load in kg | Load Index | Load in kg | Load Index | Load in kg |
| 62 | 265 | 84 | 500 | 106 | 950 |
| 63 | 272 | 85 | 515 | 107 | 975 |
| 64 | 280 | 86 | 530 | 108 | 1000 |
| 65 | 290 | 87 | 545 | 109 | 1030 |
| 66 | 300 | 88 | 560 | 110 | 1060 |
| 67 | 307 | 89 | 580 | 111 | 1090 |
| 68 | 315 | 90 | 600 | 112 | 1120 |
| 69 | 325 | 91 | 615 | 113 | 1150 |
| 70 | 335 | 92 | 630 | 114 | 1180 |
| 71 | 345 | 93 | 650 | 115 | 1215 |
| 72 | 355 | 94 | 670 | 116 | 1250 |
| 73 | 365 | 95 | 690 | 117 | 1285 |
| 74 | 375 | 96 | 710 | 118 | 1320 |
| 75 | 387 | 97 | 730 | 119 | 1360 |
| 76 | 400 | 98 | 750 | 120 | 1400 |
| 77 | 412 | 99 | 775 | 121 | 1450 |
| 78 | 425 | 100 | 800 | 122 | 1500 |
| 79 | 437 | 101 | 825 | 123 | 1550 |
| 80 | 450 | 102 | 850 | 124 | 1600 |
| 81 | 462 | 103 | 875 | 125 | 1650 |
| 82 | 475 | 104 | 900 | 126 | 1700 |
| 83 | 487 | 105 | 925 |
For years I've felt I'm the only MGB owner in the world that uses the manufacturers pressures of 21psi front and 24 rear for 'normal' use. The discussion cropped up again last week when a new owner complained of a poor quality ride. As well as questions of 'What are you used to?' and vehicle condition, once again I chipped in with the manufacturers figures, had those dismissed as being for cross-ply tyres (they aren't, the pressures for cross-ply tyres are lower than that at 18 front and rear for 'normal' use) and others as usual saying they should be in the 30psi range. But it did occur to me that my old Celica, my Son's BMW, and my new ZS all do have pressures in that area for normal use, so I decided to make mine 28 front and 32 rear prior to the Daffodil Run this year. It was immediately apparent how much harsher the rise had become, and going over larger bumps the suspension was crashing whereas previously even bottoming the suspension was done quietly albeit with a bit of a jar, so mine are going back to what they were before. A couple of days later the original poser of the question writes back:
Those figures are for the roadster, for completeness 4-cylinder GT figures are 20 or 21 front (cross-ply or radial) 24 rear, V8 21 front and 25 rear. At maximum weight increase the rear pressures by 2psi, and for sustained high-speeds increase front and rear by about 6psi.
MGC: June 2022 The MGC had poor handling when using factory figures as the engine was so heavy (didn't they drive it themselves?) and were subsequently increased. Quite a bit of info online, with fora saying they should be around 30psi, with some saying the rear lower and some the same. Longstone say 34 front and 30 rear. As ever, experiment with those and see what suits best.
Rolling Radius
The original tyres for the roadster were 5.60-14 (crossply) or 155-14 (radial) as an option. The first number is the tread width - 5.60 inches in the case of the crossply, 155mm for the radial, even though 5.6" converts to 142mm! '14' is the wheel diameter at the tyre bead. When the GT was introduced its tyres were 165-14. At the time the sidewall height (which is the major factor in rolling radius) wasn't specified, but was always '80', which represents 80% of the tread width. It was the same for both 155 roadster tyres and 165 GT tyres, which means the GT has a slightly higher rolling radius, which will have a small effect on speedo reading. Wheel width was something else altogether, at 4" for roadster disc wheels, 5" for GT disc wheels, but 4.5" for wire wheels on both! It's this difference (in disc wheels) that accounts for the different tread widths. When Rostyles replaced disc wheels both models used 5". The alloy wheels used on some special models late on were also 5", but had 185 width tyres, with 70 profile instead of 80, and RV8s used a 65 profile! Confused? You have every right to be. Speedo reading isn't as much as an issue as you might think, as most markets accept speedos that fit into a band where they don't under-read, but can over-read (i.e. show you are going faster than you really are) by up to 10%. 5mm increase in the width for the same profile results in about an extra half inch (in typical MGB tyres) of radius, which equates to about 2%, so well inside the 10%. Germany was the exception and required more accurate speedos on Mk1 cars, so GTs had a different speedo to roadsters to cope with the wider tyre with the same profile and hence the larger rolling radius, with a lower turns per mile - 640 as opposed to 660mm (which is actually turns per kilometre not turns per mile). Speedo operation is governed by a number of factors including tyre rolling radius, axle ratio, speedo drive gears in the gearbox, as well as the gearing inside the speedo.
As well as width, profile and wheel size speed rating is also important. Neither the Leyland Workshop Manual nor Haynes specify a speed rating for the 4-cylinder cars, but Clausager states it was SR. However today the 'R' seems to have been dropped and the rating is just 'S' which is good for up to 112mph, comfortably over what a standard car should be able to achieve. However the MGOC seems to only be offering MGB tyres in T and H ratings, T is rated up to 118mph and H is 130mph. They also offer them in 15", which is the MGC diameter, which should definitely have H rated. Originally V8 tyres were specced as 'HR' ('H' in today's parlance) which is good for up to 130mph, which doesn't give much leeway. Of course any increase in performance that even reaches these figures, let alone exceeds it, means that the appropriate higher rating must be fitted. Beware those websites that show speed ratings with column graphs, as well as being pointless and taking up far more screen space they are confusing if not downright inaccurate as they appear to show each rating as having a lower speed than they actually have. You are better-off with a simple table from the likes of BlackCircles.com or the RAC.
I'd always been aware of various tyre sizes listed in the Workshop Manuals/handbooks for successive cars and in the early days I was always able to get like for like 'off the shelf', as it were. However things change with low- and ultra-low profile tyres being standard fitment on many cars including the ZS. None of the roadster or V8 tyres quote a profile on the sidewall, and when enquiring about tyres for the roadster I was asked what profile I wanted. I had an idea that '70' was the default profile where none was specified on the tyre (it's actually 80), a quick web search seemed to confirm that, my fitters had those in stock, so along I went. However when they took the old tyres off they said they were 80s, and 70s would give a significant reduction in rolling radius which would lead to over-reading speedo and poorer touring economy, albeit with better acceleration, which I didn't want. They had some wider (175) tyres at the same (70) profile which gives nearly the same rolling radius as 165/80s so I had to go for those as I needed them for the imminent New Forest run plus a few days touring Dorset. No big deal with that (except the considerably increased cost!) but I subsequent found fully laden over bumpy twisty unclassified roads one of the tyres is occasionally rubbing the arch, so not ideal. Not much I can do about that now, as I can't swap them with the fronts (which has a lot more room) as it is illegal to have tyres with more grip on the front then the back. So time to do some research into tyres sizes.
Table of standard tyres, plus various options for 4-cylinder cars as compared to the original 155/80 roadster radials:
| Wheel size | Tyre width | Profile | Speedo Error % | |
| Roadster (cross-ply) | 14 | 5.6 | 100 | 0 |
| Roadster (radial) | 14 | 155 | 80 | 0 |
| GT | 14 | 165 | 80 | -2.5 |
| LE/Special Alloy | 14 | 185 | 70 | -1.7 |
| Option 1 | 14 | 175 | 70 | 0.8 |
| Option 2 | 14 | 165 | 70 | 2.9 |
| Option 3 | 14 | 205 | 65 | -2.9 |
| Option 4 | 14 | 195 | 70 | -3.8 |
| Option 5 | 14 | 175 | 80 | -5 |
| Option 6 | 14 | 185 | 80 | -8 |
| Option 7 | 15 | 175 | 65 | -0.8 |
| Option 8 | 15 | 165 | 65 | 1.7 |
| Option 9 | 15 | 185 | 65 | -2.9 |
| MGC | 15 | 165 | 80 | 0 |
| Option 1 | 15 | 175 | 80 | -2.4 |
| Option 2 | 15 | 175 | 70 | 3.1 |
| Option 3 | 15 | 185 | 70 | 0.8 |
| Option 4 | 15 | 195 | 70 | -1.2 |
| Option 5 | 15 | 195 | 65 | 1.6 |
| V8 | 14 | 175 | 80 | 0 |
| Option 1 | 14 | 185 | 75 | 0.4 |
| Option 2 | 14 | 195 | 70 | 1.2 |
| Option 3 | 14 | 185 | 80 | -2.8 |
| Option 4 | 14 | 185 | 70 | 3.2 |
| Option 5 see note 2 | 15 | 195 | 65 | 0 |
| Option 6 see note 2 | 15 | 185 | 65 | 2 |
| Option 7 see note 2 | 15 | 175 | 65 | 4 |
| RV8 | 15 | 205 | 65 | 0 |
Note 1: A -ve error means that the speedo will under-read and a +ve that it will over-read. Under-reading makes it more likely that you will inadvertently break a speed limit.
Note 2: Recommended for the 15" all-alloy wheel by the V8 Register site, but the 175 is significantly under-sized and will give a significantly harder ride. 70- and 75-profile tyres would be much closer to the originals, but unfortunately 70s are about four or five-times the price and 75s are not available for a 15" rim. This makes 185/65 the best option out of those two, with a slightly less hard ride. 195/65s can be had for around �50 each and are virtually an exact match for the originals. But they are a struggle to get under the cover in a GT and will have a harder ride, but not as hard as option 6 and especially option 7.
A wider tyre with the same profile will have a higher rolling radius and will result in the speedo reading lower for a given road speed by the percentage shown in the table above i.e. the original GT radial tyre will under-read by 2.7% compared to the original roadster tyre. The speedo usually over-reads by up to 10% but should never under-read, so it might be considered that somewhere around the middle of that band would be the norm, giving some degree of leeway with a tyre that results in a speedo reading lower than before. However from my tests and others, the speedos are pretty accurate in the lower speed ranges, maybe getting progressively more optimistic at speeds over 60mph. In that case you have to be careful that your tyre choice doesn't result in the speedo under-reading at 30, as some cameras have little or no leeway despite the oft-mentioned '10% plus 3mph'. A higher rolling radius may give the car a slightly higher top speed, but will reduce acceleration. Conversely a 'smaller' tyre will cause the speedo to over-read even more than originally, will probably reduce top speed, but increase acceleration.
To calculate other options see this comparative calculator from 'Tiresize.com' (other tyre size calculators are available ...).
Replacement interval is something that generates a number of opinions. Obviously for a typical daily driver and especially a modern front-wheel drive the front tyres are not likely to time-expire as they are doing all the work, and probably not for a rear-wheel drive car either even though a significant portion of the work is done by the rear. But with classics generally covering a low annual mileage, and with the wear being spread fairly evenly between front and rear, it's easy for them to get 'old' before they 'wear out'. But how old is 'old'? Most tyre places recommend that they should be inspected periodically for visible deterioration once they get to five years old but that should happen at every MOT anyway, and replaced in any event at ten years old. For some years now tyres have carried a date of manufacture on the sidewall as here from ATS - the lozenge on the right shows the week number as the first two digits and the second two are the year:
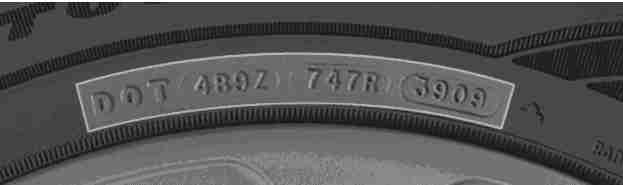
Some argue ten years is the absolute latest and should be done earlier but that is up to them. They are not going to suddenly fail at ten years and one day, and if they started getting dangerous at ten years tyre manufacturers etc. would say they must be changed earlier so they are still usable beyond that date. However as well as wear increasing stopping distances in wet weather, as the rubber ages it can get harder and 'shiny' which also reduces wet grip, although differences in manufacture and construction can give different wet grip from one brand or model to another as well as different noise and rolling resistance (economy). The following chart should be shown by suppliers for each tyre they sell with this good explanation from Halfords:
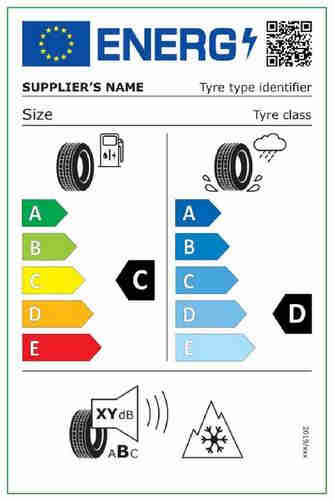
|
|
Finally(?), when fitting new tyres to one axle where do you put them? Ideally on the back as the best grip there reduces the chances of over-steer which not everyone can control, as opposed to under-steer at the front where it's a natural reaction to turn the wheel more in compensation. Definitely on the back in the case of front-wheel drive cars as the rears are only there to prevent the back of the car from dragging on the ground and get little wear. Moving the rears to the front to use the remaining life will reduce the chances of them becoming too old. For rear wheel drive where both axles are changed as frequently as each other it's less of an issue, and tyre choice may decide it. I put two new tyres of a brand I hadn't used before on the back of the V8 and twice in quick succession I had the back break away in the wet on familiar roads at 'normal' speeds. The grip was so poor I had to swap them with the older fronts and after that had no more problems with them i.e. no unexpected locking-up or under-steering. They were an American brand and a pal over there said that even though they could get a good deal on that brand because of a tie-up with his employer, no one would buy them!
June 2023: After another structural failure of the carcass this time in one of Bee's rear tyres coming home from the Pendle Run I replaced both and this time Black Circles worked OK having them delivered to my local tyre place - 165/80 R14 T at �185 the pair.
August 2018: Structural failure of one of Vee's rear tyres, two ordered from Black Circles for Vee, selected to pay by PayPal ... and that was as far as it got. No confirmation or order number, the money wasn't taken from PayPal but it was shown as 'pending', no tyres and I needed them. Black Circles absolutely no help whatsoever varying between not cancelling the pending order and not responding at all. Eventually the automatic PayPal process cancelled the pending payment, and I went to my local Just Tyres and got them slightly cheaper anyway.
April 2014: Black Circle seems to have quite a few 165/70s now, at reasonable prices. A pal went to his local garage (not tyre fitter) asking about tyres, mentioned Black Circles, and they said they could get and fit them for him. He thought that 'one-stop shopping' would be more convenient, having already looked into buying on-line, but ended up paying noticeably more for them. The price you pay online covers everything, even though they are supplied to and fitted by a fitter of your choice.
Updated July 2011: Bee needs two front tyres, and sourcing is now much harder. My usual place said they should be able to order two Toyo 165/80 14s but then started mucking me about with tales of the ordering system being down and may not be back for a day/week/month. Black Circles seem to have the size, but you have to be careful to filter out the van and commercial tyres and just look at car tyres, and that leaves just one 'value' tyre that isn't even named. Selecting 175/70 S rated (minimum speed rating for the MGB) returns 51 options from �45 to �82, and selecting T (next highest speed) returns 43 from �45 to �82. The cheapest one with a name is Falken, but at the time that name meant nothing to me and as they are cheap I was a bit doubtful. In the event my son told me he has a set of Falken winter tyres for his BMW M Coupe which have been very good in the wet and frost, and they are highly recommended in BMW circles (pun not intended). Black Circles have an arrangement with 1200 tyre fitters across the country so you order and pay for them online selecting a fitting centre, date and time. Service was good with emails confirming order, and delivery to the fitting station, and I was able to bring the fitting date forward as something else had come up in the meantime. The fitting station was a bit further away than my usual place but not that much so, and I took just the wheels in. They had all the pukka fitting and balancing kit, and I gave them my wire-wheel balancing cones which they were happy to use, but 'elfin safety' being what it is I had to wait elsewhere. The proprietor popped back to say they had done the first one and put 25 gram weights each side. I hadn't thought to say I didn't want weights on the outside as my usual place avoids that automatically. So round to the workshop where they take the outer one off, saying it would need 130 grams of stick-ons on the back of the spokes instead, which they weren't happy to do for some reason. So I left it with just the rim weight on the inside, although they said I might get some vibration over 65 mph. The problem is this is Thursday, and we are off on Saturday for three days for the Pendle Run. No problem for the run but the journey up and back is going to be motorway, and I don't really want to have to keep below 65mph. I could take the car out and see if the vibration is there, but Thursday afternoon is wet, the car is all fettled to go, which only leaves Friday morning (Friday lunchtime being spent at the pub...). In the event I decide to swap front and back wheels over as I have run the rears on the front when I had those balanced and they are fine, and out of balance wheels are much less of an issue on the rear. Convenient I ended up with 175/70 on the front as well as rear then, otherwise I wouldn't have been able to (safely) swap them. So should be OK for the run, then I can swap them back at my own convenience and see how the new tyres are on the front, and get them balanced at my usual place (OK, for a fee) if needs be. The 175/70 do rub a little bit at the rear so I would have preferred 165/80s all round, but I'm stuck with them now. It's likely to be another 10 years before I have to replace them, and I don't like to think how old I'll be then!
Rolling Radius and speedo error: January 2017
Correspondence in the MGOC mag has been arguing about radius, circumference and distance travelled for five months now. It started in September 2016 with one contributor giving his experiences of different tyre sizes and the effect on speedometers.
Next month someone who put a string of letters after his name said "It is obvious from observation that the distance travelled by a vehicle for a complete revolution of the wheel is the distance that would be measured by putting a tape measure round circumference of the inflated tyre" which just goes to show that not everyone with letters after their name knows what they are talking about.
The original contributor came back in November with a very simple test that anyone can do to prove the point, which boiled down to making a chalk mark on the tyre and another adjacent mark on the road. Roll the car forwards until the tyre chalk mark is again in contact with the road, and measure the distance from there to the first chalk mark, and compare that with the measured circumference. His tests also showed how the same tyres with different pressures rolled different distances. He also indicated that this isn't the whole story, one would have to do the same as the factory and measure at a specific speed with a specific pressure in order to get precise speedometer gearing information, which anyone who saw Guy Martin take his Transit van to Nevada's 'Open Road Challenge' will see in practice. Despite pressure sensors on the wheels and sophisticated computer software, they miscalculated the instantaneous speeds they had to travel at in order to complete a given distance in a given time and achieve an average of exactly 150mph, purely because the local expert miscalculated how much the tyres on the Transit would change in size with speed.
A brief respite in December, then in January someone else pops up basically saying what the first person said can't possibly be true, invoking his own engineering credentials and making comments about the curvature of the earth, epi-cyclic gearboxes, tyres slipping round wheels etc., and saying the distance travelled is solely governed by the length of the tread round the circumference of the tyre. He obviously is an arm-chair theorist and hadn't bothered with the simple test given in November.
I have, and my results are as follows:
| Unloaded radius | 302mm
| Loaded radius | 276mm
| Unloaded circumference | 1884mm
| Loaded circumference | 1887mm
| Loaded distance travelled | 1836mm
| |
One of the arguments against the difference in measured circumference and distance travelled is that 'you can't travel less than the length of tread around the circumference of a tyre'. But rubber is 'elastic' in that it will stretch, compress, bend and twist under various forces, so perhaps it is just down to the bulge in the sidewalls at the bottom of a loaded tyre. The body of the tyre is continually being distorted as it goes through this 'bulge' region where it contacts the road - this is one of the factors that causes a tyre to heat up while driving not just cornering, accelerating and braking, and it is my contention that it is this distortion that results in the rolling circumference being less than the measured circumference. E&OE!
There are any number of tyre size calculators on the internet that give the effect in speedo accuracy, and the vast majority of those talk about rolling radius or circumference. Some go as far as including the effects of speed, dynamic rolling radius is higher than static loaded radius as at speed the tyre tends to expand outwards, the figures shown in the tyre size table above are for 60kph/37mph. There is no way that number of web sites would exist if the effect did not exist practice - now that is 'obvious from observation'!
Note that a wider tyre with the same profile, will have a higher rolling radius, and will result in the speedo reading lower for a given speed by the percentage shown in the table above. The speedo usually over-reads by up to 10% but should never under-read, so it might be considered that somewhere around the middle of that band would be the norm, giving some degree of leeway with a tyre that results in a speedo reading lower than before. However from my tests and others, the speedos are pretty accurate in the lower speed ranges, maybe getting progressively more optimistic at speeds over 60mph. In that case you have to be careful that your tyre choice doesn't result in the speedo under-reading at 30, as some cameras have little or no leeway despite the oft-mentioned '10% plus 3mph'. A higher rolling radius may give the car a slightly higher top speed, but will definitely reduce acceleration. Conversely a 'smaller' tyre will cause the speedo to over-read even more than originally, will probably reduce top speed, but increase acceleration.
To calculate other options see this comparative calculator from 'Tiresize.com' (other tyre size calculators are available ...).
Tyre Valves Added January 2011
April 2011: Not checked the other valves yet, but after a longer period between checking pressures the rear tyre with the replaced valve but the original tube seems to have lost the same amount as the two fronts with the original valves and tubes, whereas the other rear with the replaced tube still had lost virtually nothing. So I'm back to thinking it is tubes again, and not valves. As it means pumping them up before every run or it does feel heavy and soggy, including a Sunday morning jaunt, I now inflate to +5 i.e. 25 front and 29 rear, which seems to be a good compromise. Not too harsh just after inflation, and it stays above 21 and 24 for two or three weeks which is fine for short jaunts.
Tyre Wear and Replacement March 2023
Uneven tyre wear is down to differences in camber and castor angles between the sides, and swivel hub positioning determined by the A-arms, dampers, front cross-member and chassis rails. But if you regularly drive round roundabouts at high speed with large steering inputs then the outside edge of the near-side tyre will wear more than anything else.
There are many sites out there showing the various wear patterns and their causes all showing much the same thing, this is probably one of the clearest:
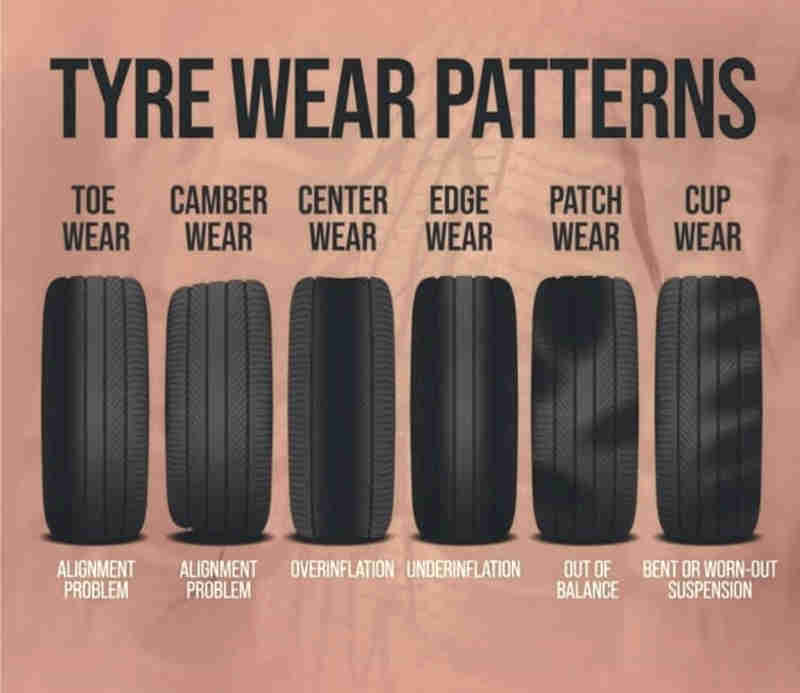
- 'Toe Wear' refers to steering tracking alignment and by itself will cause the same wear on both tyres and not cause the car to pull to one side.
- 'Camber Wear' refers to incorrect positioning of the swivel axle and can affect one or both sides and be on the inner or the outer edge. If one side it will probably cause the car to pull to one side, which may not be the faulty side.
- 'Centre Wear' is caused by overinflation which affects tyres individually, or overloading which if the tyres are the same type and size and are inflated to the same pressures will normally affect both tyres on the same axle.
- 'Edge Wear' is caused by underinflation if the wear is evident on both inner and outer edges. Wear on the outer edge only can be caused by excessive cornering speeds or incorrect camber (see above).
- 'Patch Wear' from imbalance should be evident from rapid shaking of the steering wheel at speed of 40-60 mph or other vibration evident on the car.
- 'Cup Wear' can be caused by insufficient damping and/or imbalance where the wheel and tyre bounces up and down as you travel along a flat surface.
Some sites refer to regular wheel rotation which I'm not a fan of. Yes it will 'hide' uneven wear from alignment faults by spreading it round all four (or five if you include the spare) tyres instead of being concentrated on one, but a tyre always takes up a 'set' from it's position and when moved it has to adjust to its new position which causes rapid wear on the high spots while that takes place. It also means you have to replace all four (or five) at the same time instead of just one axle at a time. The only argument for rotating all five i.e. including the spare is that the spare will be used and eventually replaced, whereas by not rotating them it will probably never be used but will time-expire, and it's easy to forget about it.
Tyres - What to do with old ones ...
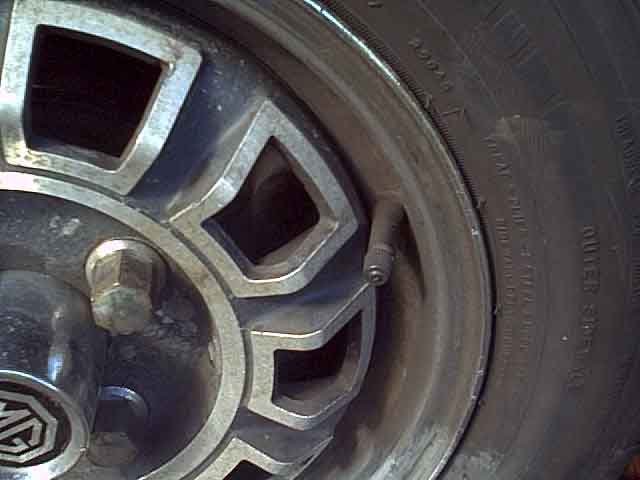
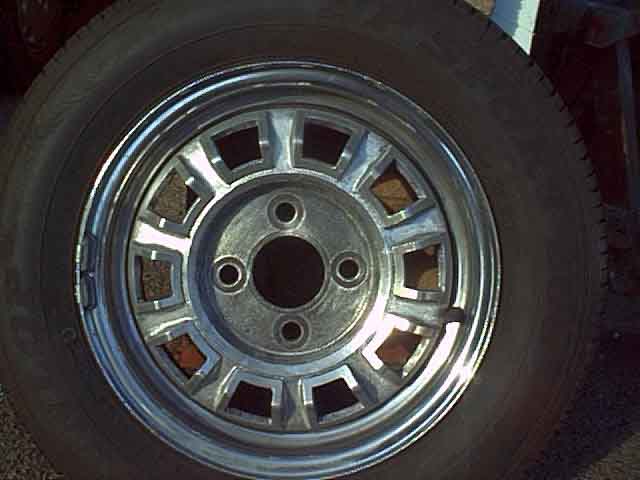
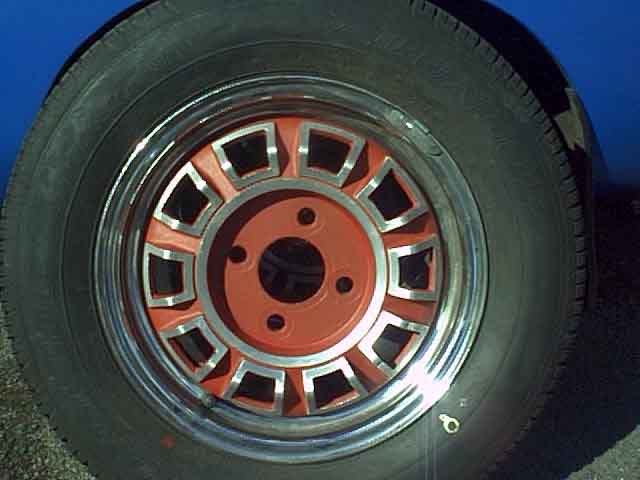
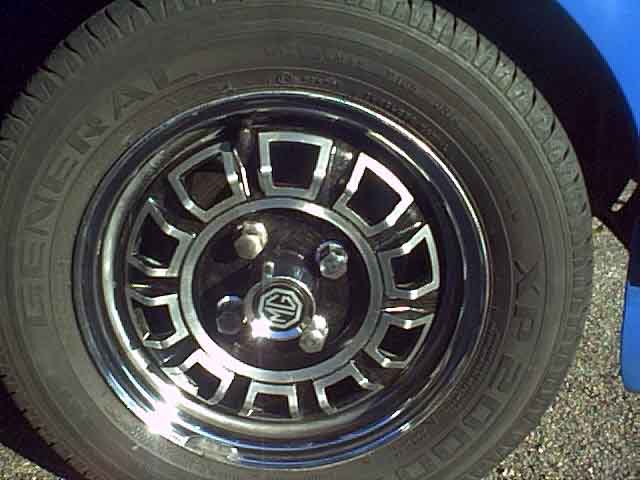 Vee's wheels have never been in the best of nick, the chrome moderately pitted, the paint on the alloys lifting and flaking, and the wheel-nuts a bit rusty where the chrome has peeled off on the edges. A PO had also taken a drill and wire brush to the alloy which had ruined the edges and obliterated the fine concentric rings that should be there, as well as putting circular scratches in the facets. I had attempted to remove these but the only way had been to replace them with longitudinal scratches albeit finer ones. Simple cleaning made the chrome rims look a bit better but they were never going to withstand close examination. I had decided that when I eventually do a full respray I will treat her to new wheels, hub-centres and nuts, but that is a long way down the road. Having done the quarter-panel replacement prior to the 2003 V8 Cornish Tour I was enthused to cut and polish the body, and 'Black Chromed' the bumpers, but that still left the wheels. In a rush of blood to the head I suddenly decided to refurbish them in the ten days or so before the Tour, knowing full-well that once I started I would have to finish! Click a thumbnail for the full story.
Since writing this someone has posted to the V8 Register BBS their experiences with Solent Wheels. Their chrome was in fairly bad condition and for �50 (�69 'all-in' as of October 2016) Solent stripped and powder-coated the whole wheel - rim and alloy centre - silver then top-coated the alloy part in satin black, finally polishing the areas round the cut-outs. Photo looks pretty good and had my chrome been any worse a better bet than spending eight hours per wheel!
January 2022: Another possibility is Tudor Wheels who apparently do 'chrome spraying', something I saw recently on an episode of Wheeler Dealers and the results of that on a radiator grille (I think) looked very good on the TV screen. Another one down on the South Coast though and as long a trek as for Solent Wheels, albeit to a nicer destination on the edge of the New Forest.
September 2017: Having had the engine and body done, that left the wheels! I'd spent so long debating what to do about said body and engine, taking minimal care of the body and wheels in the meantime, that when I got the car back after over 11 months in sundry restorer and paint shops the wheels looked absolutely dreadful. A wash improved matters slightly, but every aspect of them still looked pretty bad. More research, and I came across this link. Primarily they only restore the centres, which have to be split from the rim. They will split and re-rivet at extra cost, but you have to get the rechroming done yourself, the total cost then approaches that of Clive's alloys. On the plus side they are 'original', but on the minus even if you can get good chrome the reassembly is critical, each centre has to go back in its original rim, in the original orientation, or you may get problems. They also state that apart from the offset of the rims the centres are identical to Scimitar wheels (which they also do) but this is definitely not the case - Scimitar cut-out facets have sharp angle on the sides, V8s have a rounded angle. This raises doubts as to their attention to detail.
I also spoke to Solent Wheels and was happy with what they told me, however they no longer offer P&P i.e. you have to arrange that yourselves after a couple got lost! OK you can insure them, but at what value for something that is No Longer Available? If I were closer I'd take them myself, but at about 5 hours and 250 miles per round trip that's not trivial, and unless I take all four (or five) at once that's at least three trips. It would also mean Vee propped up on axle stands for some time which would create problems in the garage, although still having five old Rostyles from Bee's conversion to wires 30 years ago I could have put the tyres on those as of course nuts aside they are a direct swap. In fact that's what I did with one wheel for a while when having a go at painting the spare on which about half the chrome has peeled off.
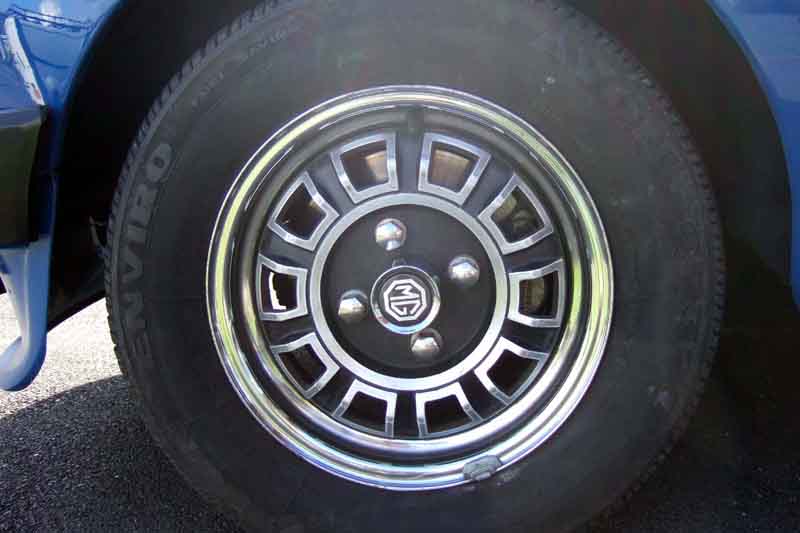 In the end I opted to have a go at cleaning mine up. The chrome was the hardest, very discoloured with crusty lumps in the recess between rims and centres. But patient work with Solvol Autosol and a pan-scourer (!) brought most of it up quite well. The crusty bits had to be attacked with a blunt flat-blade screwdriver (!!) to scrape it off, then the polishing. The removable wheel centres came up surprisingly well, apart from the odd dent they look almost as good as new (saving another �100), and the nuts are stainless so they came up well. That left the centres, painted in 2003, and I was surprised to discover how good the condition of the paint was. More polish and pan-scourer brought those back to satin black with very little by the way of defects. The facets came up best with Solvol Autosol again, better than emery cloth, albeit to a smooth finish whereas I think the originals were slightly textured. Six hours work, saving �400-�500.
October 2016: MWS indicate on their web-site that they 'refurbish and restore' V8 wheels but an enquiry as to the price elicited the response that they don't do them any more, neither does Clive Wheatley even though they are shown on his web-site as well. However a very interesting alternative from Clive are these 15" all alloy wheels, which consist of an alloy rim with the correct alloy centre. Being 15" they will need lower profile tyres than normal, and 175 or 185/65 R15 are recommended. However 175/65 have a 7% lower rolling radius which at an indicated 65 mph result in about 5 mph slower actual speed than the original 175/80 R14, with 185/65 at about 2% and 1.5 mph respectively. On the face of it 70 and 75 profile tyres are a much closer match, but unfortunately 70-profile tyres are about four or five times the price, and 75-profile tyres are not available for a 15" rim. Currently �333 plus VAT or �400 each, plus a tyre, and you also have to consider the effect on suspension going down to a 65 profile from 80.
July 2010: In December 2007 I added a paragraph about someone in the West Midlands who would split and rechrome V8 wheels. I've recently had an email from someone who has had a very poor experience with rechromed Rostyles from this person, commenting on a crude technique for splitting and reassembling, severe balance problems afterwards, and chrome that rusted over winter in a dry garage. So on balance, link deleted!
Differences between 4-cylinder and V8
Stainless wheel nuts
Stainless wheel nuts: In 2010 I replaced Vee's wheel nuts with stainless after national tyre and auto wreck, following replacement of the front tyres, used an air-gun until it chattered to refit the nuts, and then checked they weren't under-tightened with a torque wrench! After I had freed them using about 120ft lb according to my torque wrench - before it broke - the front ones seemed loose on the studs compared with a couple of rear nuts on the front studs, so I opted to replace them all, the original chrome ones were looking pretty bad anyway. Had to smile as the new ones simply reflect the muck and rubbish on the wheels so they look just the same :o). However if and when I do get the wheels done properly they will look good then.
April 2011: After a winter largely garaged I note that a couple of the washers on the new 'stainless' wheel nuts are showing traces of rust ... hmmm.
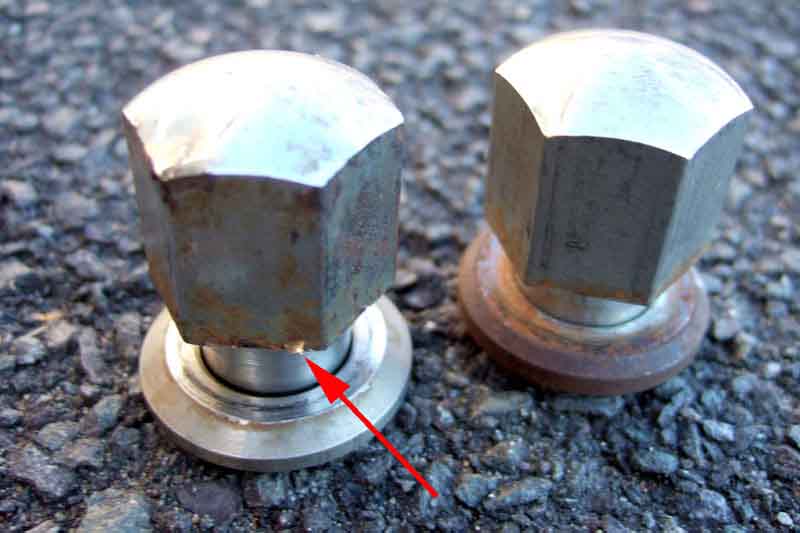 November 2013: During 2012 they were a little worse, even though the car is rarely run in the wet and never in the salt, and one of the nuts looks like it is starting to peel - i.e. chrome and not stainless! And by late 2013 one of the nuts is definitely peeling and about half the washers are showing rust to various degrees.
Aware that stainless steel usually has different magnetic properties to ferrous metals I tested a couple of the original chrome, and all of these 'stainless' items to see how they compared. I was quite shocked to find that not only was the peeling nut magnetic, but no less than seven of the nuts had magnetic washers although some showed barely any rusting. The washer on the magnetic nut was non magnetic, as were the remainder of the nuts. In summary I had eight nuts with one of the two components magnetic i.e. ferrous, and the other eight had both components non-magnetic i.e. stainless steel. Therefore it was down to shoddy manufacture, and not the supplier mixing the two types up as the washers are retained by the nut during manufacture. In any case this supplier said they didn't stock the original type anyway.
I got onto the supplier and despite emails back and fore, including a copy of the original invoice, and a couple of phone calls, they said they didn't know anything about magnets, weren't prepared to test their stock, and offered nothing more than 'to fight my corner with the manufacturer' if I returned them i.e. in total contravention of the Sale of Goods Act. I consulted Citizens Advice (Trading Standards no longer deal with individual complaints), the MGOC (who were surprised they hadn't offered to replace them at the outset) and the Metallurgy Department of Birmingham University. The upshot was to send the faulty ones back via 'Recorded Delivery Signed For', with a covering letter based on a template from Citizens Advice pointing out my rights and their responsibilities.
Fortunately common sense took over and the supplier agreed to replace them almost immediately. I had asked for a refund as I had no confidence that I would get all stainless this time, but they said they had tested all their stock with a magnet and would definitely send the correct items so I accepted that. A pity they hadn't offered to do that in the first place. I was relieved, as the alternative would have been suing them through the Small Claims Court. I would have taken that route, regardless of the time and effort required on my part, as I refuse to be sold duff stuff without a fight.
Within a couple of days replacements had arrived, all non-magnetic. I also notice that the washers are retained in a slightly different manner, so perhaps the supplier has changed their source! I can't be the only person to have received nuts like this, but maybe other people don't bother complaining - to the supplier that is - and insisting on their rights.
Wheel Sizes and Offsets/Insets Added January 2010
Wire wheels
Track Width
Rim Width:
Disc (GT) 5J
Wire (60 spokes) 4.5J
Rostyle 5J
Alloy (V8/LE) 5J
Offsets: Rostyle 28mm (early) or 22mm (late)
Rim Width:
Wire (72 spokes) 5J
Offset - one source has an OEM wheel being measured at 22mm, another states both the MGB and MGC were 22mm. However it's pretty clear from elsewhere that only late MGB Rostyles were 22mm (actually 23.84mm), earlier i.e. while the MGC was in production they were 28.14mm.
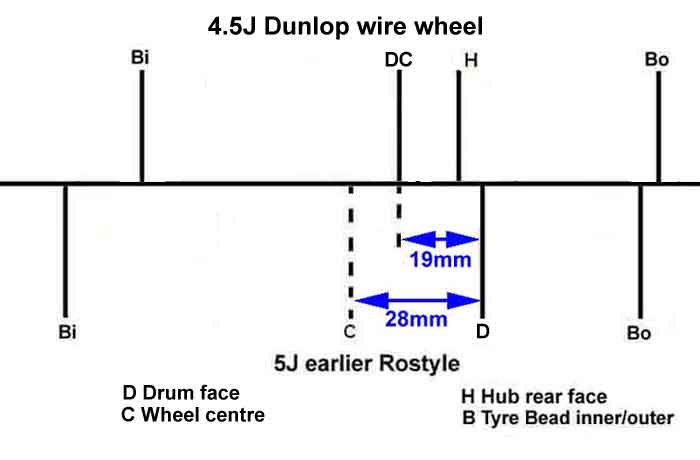 22mm offset is mentioned in various places, but I measured my Rostyles more like 28mm positive offset. Updated November 2013: Brian McElroy posted a link to a page by Richard Thompson detailing how early and late Rostyles differed in offset by a significant amount. Richard measured them at 2.814cm for early and 2.384 for late (Hemmings.com gives the identical figures), making mine (came to me on a 73 roadster) 'early'. However offset is the distance between the centre of the wheel and the mounting face, and the centre is difficult to determine inside the rim. So it is typically derived from the backspacing, which is the distance between the outer edge of the rim and the mounting face. However unlike the bead seat I doubt the rim is necessarily true and consistent, especially with kerbed wheels. You also have to determine the width of the wheel outer rim to outer rim, not the stated wheel width, which in itself isn't easy with the tyre fitted, then halve that to derive the centre - hoping each outer rim protrudes from the bead seat by the same amount both sides. For example Richard gives his rim to rim measurement as 5.945 inches, whereas I measured mine at anywhere between 5.911 and 5.954. Richard's rim to mounting face 104mm, and initially I got the same, however depending on where on the rim I measured it, and to various places on the mounting face, I was getting anything from 103.89mm to 104.90mm. Subtracting the centre position from that gives me 28.27 to 29.8mm, so I suspect that the figure of 28mm assuming a 6" wheel rim to rim and a backspacing of 4.1" which gives 27.94mm. Not having a late wheel I can't do the same measurements for that.
MGOC seem to be the only supplier to show two standard Rostyles - BHH2090NE and BHH2090WE, and they tell me NE (narrow track) is for Chrome bumper and WE (wide track) for rubber bumper, so indicating the date of the change as well. However the Leyland Parts Catalogue doesn't confirm that, specifying 'BHH 123 primer' (painted?) or 'AHH 9149 CP' (chrome plated) as an option up to 76, then from September 76 on 'BHH 2090 painted'. The Workshop Manual General Data section states that from car No. 410002 (September 76) the rear track was 1264mm (up from 1250mm on banjo axle disc wheels for example) indicating that the Parts Catalogues are correct after all. Wheel type not specified but presumably Rostyles as that was the standard wheel. That's 14mm wider, or 7mm per wheel, close to the 6mm change from 28mm to 22mm of the 'round number' measurements, less so for Richard Thompson's figures. Additionally Clausager says the wheels had a different paint finish from that date. The higher ride height of the rubber bumper would indeed allow for a slightly wider track at the rear without the tyre rubbing the arches, but would the factory really go to that trouble when they were so strapped for cash? Hemmings mentions wider tyres as the reason, but the GT always had 165s as opposed to the 155s of the roadster, and the special alloys with 185/70 tyres and reduce clearance to the inner arches weren't around until 1979 and 1980 i.e. three years later. As the rear anti-roll bar was fitted at the same point i.e. for the 77 model year it could have been a concerted effort to improve handling by maximising the track as well as fitting the bar. The later wheels i.e. less offset i.e. wider track should fit all rubber bumper cars without problems, but would make rubbing on chrome bumper cars more likely, which is what led Richard to investigate.
March 2014:
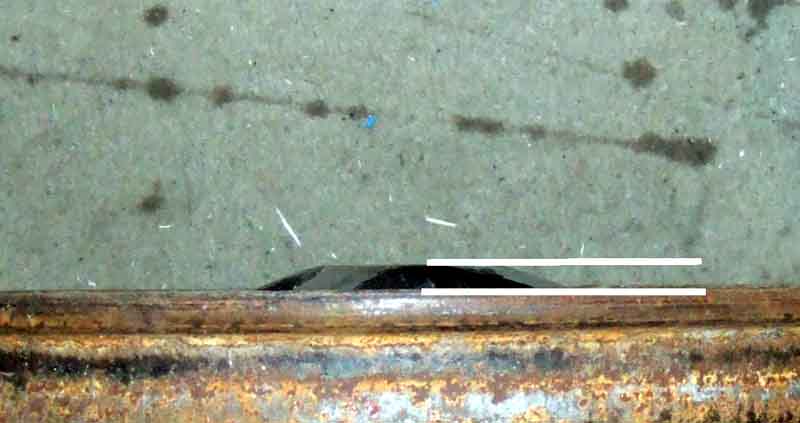 Steve Hunt (no relation) writes to say there is a quick way to see which wheel you have. The earlier, narrower-track wheel has the mounting face for the 'hub cap' sticking out past the line of the rim by a few millimetres. The later, wider-track wheel has the mounting face virtually flush with the rim. If you have a bare wheel the early one will wobble about on the hub if laid down flat that side, whereas a later wheel will rest flat on the rim.
Without access to cars with guaranteed factory wheels of both sizes it's another of those things that falls into the category of "We may never know". The only other reference to the later BHH2133 wheel I can find is an old eBay item saying it has been in stock 15-plus years. All the usual suppliers reference the earlier AHH6487 wheel, but what the actual inset of those are I don't know.
April 2023:
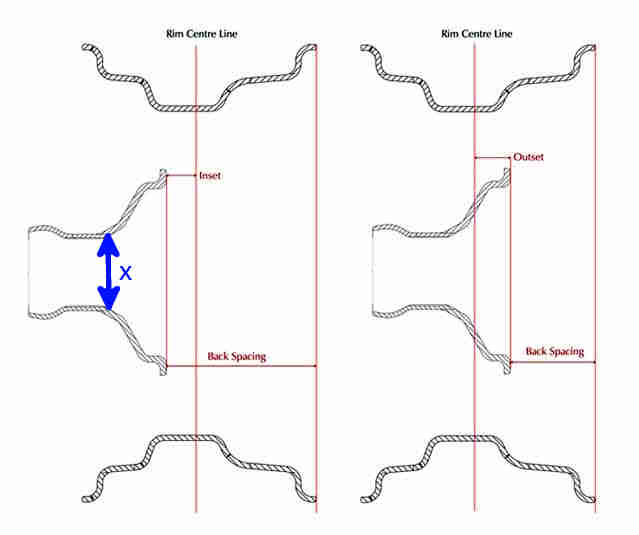 And how you you measure it? Stud wheels are easy as the back of the wheel hub bolts up to the brake drum, but wire wheels have a significant clearance from the angled mounting faces of the wheel and axle hubs and the brake drum. MWS (as here) show it using the outer edge of the wheel hub which is a long way from the mounting face both radially and laterally, out past the spokes which could be causing some distortion, and the hub they show is also a very different shape to the MGB hubs. With the MGB hub as you move outwards from the splines and mounting surface it bends back on itself and this gives a convenient measuring point close to the mounting surface both radially and laterally, and some distance away from any distortion from forces on the spokes. But.
I measured my spare (no stamped markings) again. This time I measured between the two outer rims (instead of at the tyres which are likely to introduce quite a bit of variability) to get the overall width (5.5" or 140mm), halved that for the centre-point (70mm), then took measurements from the back rim to various points on the hub and subtracted the centre-point from those. The 'logical' point near to the mounting faces was 93mm which gives a 23mm inset which is close to the 21mm of the original wheels, but these wheels give the wider track i.e. have less inset. The centre of the mounting face was 98mm giving 18mm inset, which is mid-way between the two. But when I measured using the MWS point on the outer edge of the rim that was 85mm which gives an inset of 15mm which is less than 1mm from what I have assumed is the 14.3mm inset for these later wheels! So somewhat of a surprise.
Before that I'd wondered if the inset could be altered by tightening the spokes in the centre of the drum and slackening off the ones to the outer rim, to move the whole rim back relative to the hub. But then if the hubs are stamped maybe the spokes have to be positioned where they are to support the rim correctly, and different offsets are obtained by the hub having different shapes moving the position of the mounting face in or out relative to the the spoke holes around it's edge. But if the MWS measuring point is the correct one then to obtain different offsets the whole hub must be moved in or out relative to the centre of the rim, which means the different offsets are either obtained by tensioning the spokes differently, or maybe the positions of the holes in the rims are different ... but that would make the rims inset-specific and not the hubs, and as you will see below it seems to be the hubs that are stamped with the inset.
Unfortunately I sold my original conversion hubs when I fitted the correct wire-wheel axle with standard hubs. Really I could do with them as they compensate for the reduced inset of the later wheels by moving them in 10.6mm each as can be seen here. That's more than the theoretical difference between the two wheels 21mm and 14.4mm, but on the ground they do seem to be 10mm wider each as in this table of track widths. MWS have them RSK213 and 214 at �116 each inc VAT.
August 2021:
 After a comment on the MGOC forum about changing a wire wheel Mike Bennet sent me some pictures of his 'original' (Mike's quotes). It is stamped '4.5Jx14x21', and has the Dunlop logo with 'x461' on another part of the hub. So if the third figure in the first stamping is the inset (which seems likely) that is 6.7mm different to Ryan's 14.3mm, which is close to the 6mm difference between the early and late Rostyles. If the 21mm is 'early' and the 14.3mm 'late' it would also make the 'late' track wider, like the late Rostyle. But. Mike also measured his track but between the inner rims rather than the centres of the tyres and got 44". I did the same and got 44" plus about 3/16" or 4.8mm which is less than the difference that there should be between 21mm inset wheels and 14.3mm inset wheels (6.7mm). However I measured my inset as per the MWS drawing and got 12mm, and 2.3mm x2 or 4.6mm equates to a fraction under 3/16" which would be about right if Mike has 14.3mm wheels and not 21mm! Continues ...
Although we have the track of the earlier wire wheel (1250mm) and the inset of the later wire wheel (9/16" or 14.3mm) it's not possible to obtain the earlier inset or the later track without examples of both as they are on different axles with very different hubs. The 1977 and 78 WSMs have front and rear track, but whilst the Rostyle rear shows the wider track the front doesn't, and the wire wheel tracks are exactly the same (front) and almost the same (rear) as for the banjo axle wire wheels. The Salisbury stud wheel axle is 1.5" longer than its wire wheel version whereas the banjo stud wheel axle is 1.75" longer than its wire version, but whether that 1/4" difference represents the difference in hubs or is for some other reason I don't know.
On my Dunlop wires using the bulge of the tyre as a reference point the overall width is 172mm i.e. the centre of the rim is at 86mm. The inner face of the hub is at 74mm which gives an inset of 12mm as opposed to 14.3 of the MWS wheel and the later factory wire wheel. The face of the drum is at 85mm i.e. just 1mm outboard from the centre of the rim, as opposed to 28mm outboard for the early Rostyle. But my track is 1270mm i.e. 20mm more or 10mm more per wheel than either wheel on the banjo axle. It's also 20mm wider than my V8 alloys, 18mm wider than Rostyles on the V8, and 6mm more even than WSM figure for the later - wider - Rostyles. If MWS have given the correct way of measuring inset, and if I have measured it correctly, then I don't understand why my wires with only 2mm less inset than the later wire wheels have a track that is 18 to 20mm more than the factory figures for the earlier wheels, or examples of factory wheels on the same axle. Doing a simple rule-of-thumb measurement of how close my roadster tyres are to the arches, the 175s on wires are about 10mm closer than the 185s on V8 alloys, which tends to confirm the wider track, and probably explains why I get rubbing with 175s whereas others with factory wheels say they do not. Really I need an example of a car with a 1250mm track on a tube axle for a detailed comparison of wheels and hubs.
July 2021:
 Ryan Frederickson in America has asked me about arch clearances. His recently purchased car had 2" between sidewall and arch on the right, very little on the left and it had been cutting into the sidewall. He'd checked the axle and the hubs - both wheel hubs had the same 10mm clearance to the brake drum which is what you get with original centre-lock hubs, and his mechanic had made other checks but could find nothing to explain the difference. One thing he did notice is that he had three wheels with the same Dunlop stampings, and one with nothing which was on the rear. 2" on the right seems to be much more than normal, and after commenting that all MGBs seem to have less clearance on the left I suggested he swap the rear wheels over ... and Lo and Behold the clearances became the same. So his rear wheels have different insets, fitted one way they equalise the clearances, fitted the other they amplify the difference in clearance. However his left rear as originally fitted (and both fronts) is stamped '4.5Jx14x14.3' whereas the odd one out has no markings. '14.3' in mm converts to 9/16" but this wheel gives the reduced clearance, and gives the lie to Clausager's statement that the change was to increase arch clearance. As said above that would be illogical anyway as with the higher ride height rubbing was no longer an issue, and Rostyles went to a wider track at the same time.
June 2020: A series of articles in Enjoying MG on the construction of a steel wing Sebring replica had the interesting comment when they first fitted wheels to the shell, in that the tyre on one side was closer to the arch by 10mm than the other! It turned out they were using two wheels with a 10mm difference in inset between them. Two of the wheels giving a wider track would account for the 20mm difference I (and others) are getting between the book figure of 1250mm and the measured figure of 1270mm. I've asked if the author can supply the actual measurements of his two wheels, so I can see if mine do indeed conform to his 'wider' one (sadly not forthcoming).
October 2017: Moss for their MWS 60-spoke wheels specifies 14.3mm 'inset' i.e. the same as the later factory wheel. MWS themselves offer for the MGB that wheel as well as other widths and diameters with insets ranging from 6.4mm to 22mm.
So does offset/inset vary with tyre or wheel width? To keep the same track they would be the same, which would reduce the clearances both side of the tyre. But if the track was originally made as wide as possible with a minimum clearance to the outer part of the arch, then with wider wheels more offset/inset would be needed to retain that clearance, i.e. moving the wheels closer together, which would reduce the track, and the clearance to the inner part of the arch would reduce by the whole of the increase in tyre width.
See this drawing showing other wheel dimensions. More info on wheel sizes and offsets/insets, wheel track , and axle length.
Wheel Ramps January 2022
Update summer 2007. Had the other wheel with three broken spokes completely replaced with polished stainless after the May Tamar Valley and June New Forest runs. These were more highly polished than the ones I had seen earlier, the only real difference being a slight grey tinge to the stainless whereas the chrome have a slight blue tinge. We shall see how they go. As far as the other wheels go I shall get a handful of stainless spokes with a view to replacing them myself as and when they break. Getting the tyre bead off the rim will be interesting, the tyre shouldn't need complete removal as the broken spokes have always been in the outer edge of the rim, not in the well. I have a couple of ideas, including using the weight of the V8!
Update May 2008. Following the rash of breakages found early last year I only had one broken spoke at the end of the season, and so far about 700 miles this year with no more. Quite why that should be with so many last year I don't know, but I've decided to proceed with the experiment of replacing them myself.
Finally I tested the wheel for roundness and run-out by spinning it on a front hub, it had no more than 1mm of run-out and no out of roundness I could detect so that was good enough for me. I ran at various speeds up to 70mph (OK, a bit over) and no detectable wobble or vibration anywhere. Time will tell if this repair holds up, at under an hour and �1.50 per spoke it is certainly cheaper and easier than driving to a wheel place and getting the tyre taken off the wheel, then driving to the wheel place and waiting while they change the spoke(s), then driving back to the tyre place to have the tyre refitted, plus cost at each place.
Update May/June 2009. After the May Yorvik run found one spoke broken, which is the first in twelve months or so, so replaced that prior to the New Forest. On the return from that plus a few extra days in Dorset one more broken in 640 miles, so no big deal, but this is in the wheel that I had completely replaced with stainless just two years ago, which rather gives the lie to the claim that it is the chroming process that makes those spokes brittle, as I went several years before I got my first chromed failure.
November 2018: Hope I'm not tempting fate but since buying ten spokes in 2008 I've only used four of them so far! The last one nine years ago.
May 2019: Maybe I did, as I find one during the Big Clean prior to the first organised run. Odd as I had the wheels off for the service and always check the spokes, but none noticed then. Used the weight of the ZS this time to push the bead off the rim at the required point. However the V8 is easier as I can jack under the spring pan rather than having the suspension hanging down with the ZS, so less jacking is needed to get the wire wheel tyre under the other one, but the V8 was behind the roadster on the ramps.
Last but not least, the rebuilder I have used is Ray Phillips & Son at Unit 3, Seven Stars Road, Oldbury, West Midlands, 0121 544 9060 just a couple of minutes from J2 of the M5. On the left (as you look at this map) just about where the green arrow is on this map i.e. between the canal bridge and the A457, even though that is shown as Park Lane and not Seven Stars Road. They've always replaced mine (individual spokes) while I wait and are very reasonable in price compared to the one or two other rebuilders I have found much further away. But ring before you start out to make sure they are there, don't just turn up (even if arranged in advance) as they come and go as they please.
Cleaning:
Off the car, spray with degreaser of your choice, and hose nozzle jet to clean off. Since I got a single-phase garage compressor I use that with a jet attachment to blow the water off and dry them. Then spray-on polish front and back, hub, spokes and rim. MkI digit in a stockinette cloth spreading polish to all parts of rim, hub and spokes, rubbing at any stuck-on black bits. MkI digit in a clean duster to polish off all parts of rim, hub and spokes. BT miniature 'bottle brush' (about 1/4" in diameter) wrapped in several turns of the corner of the duster to poke in the small 'triangles' where two spokes join the rim and hub.
The fronts can take longer, brake dust that has got wet then baked on can be difficult to shift, but it does vary according to disc pad manufacturer I have found. I did buy the 'wire-wheel brush' advertised in certain places when I first had the wheels but I think the bristles are too harsh for chrome. I did try wrapping that in a duster for a while to clean the spokes but find my digits are more effective. I only ever use a so-called chrome cleaner (actually an abrasive) like Solvol Autosol to shift baked-on brake dust from the spokes if I have been unable to shift it with wax polish, stockinette and digit.
Can make the fingers a little sore after four wheels, but you get lovely shiny nails...
Subsequently I bought a Halfords microfibre wheel 'glove' to do a 'proper job' of the Mercedes alloy spokes and the rim behind them which also does a good job for a 'quick clean' of Bee's wheels.
July 2015: I've had a large (biggest that will run off single-phase apparently) compressor for a while now and one of the tools is a sprayer tool, which if used without the container for whatever liquid would normally be sprayed gives quite a concentrated jet of air, which is very useful for blowing the water off and drying after the wash. Also I won a bottle of engine degreaser spray a couple of years ago and have found that sprayed on then hosed off as the first stage shifts the grime and brake dust very effectively. Together these save two lots of finger-work, leaving just polish application and removal.
Dunlop vs Dayton Added January 2010: There are usually quite a lot of disparaging remarks about Dunlop, not least because they are made in India. I've had mine 20 years/50k miles and apart from one or two rust specks on a couple of hubs which appeared some time ago but don't seem to be getting any worse mine still polish up beautifully, as I say above. I do spray them with WD40 at the start of winter, which I think help keeps the damp off them when garaged with my non-hermetically sealing, manual up-and-over door. I don't use the car in winter unless dry and salt-free. The usual recommendation is to go for Dayton, which I'd always imagined would be quite a bit dearer. However a British Wire Wheel (USA) price list shows that Dayton standard chrome wires are less than 10% dearer than Dunlop. Dayton's balancing instructions state that from 1990 their wheels have a fully machined hub that allows them to be mounted correctly on tyre balancing machines using standard cones. Before that, and quite possibly still the case for Dunlops, they have to be mounted using special inner and outer cones of the correct angles, which very few if any conventional tyre places have, or they will never balance correctly. On that basis alone it would be worth paying the extra for the Daytons. On the question of spokes British Wire Wheel states that both types have stainless, although Dunlops are chrome-plated. That certainly isn't the case with my 20 year-old Dunlops, which are ferrous. British Wire Wheel also says that if you want a high polish on their Dayton spokes it's another $40 per wheel, which is quite a lot! You would need to see just how dull the standard finish is before splashing out on that, I suggest, except for an all-out show car. There is also some confusion over truing. Dayton say theirs don't need truing. Victoria British say their Dunlops have been shipped 8000 miles and although trued in the factory will need truing before fitting, and again 'after a period of time'. Moss US says to check for loose spokes and run-out when new, and again after a couple of hundred miles, truing is only mentioned in respect of 'old' wheels. No mention in Moss Europe I have found, both reputedly supply Dunlop wheels. The bottom line is that I've never had my wheels trued - when new or since, and when I was having spokes replaced by Phillips I know they checked for concentricity and run-out afterwards and never found any problems. And Dayton don't seem to be available in the UK anyway. There are a number of specialist UK manufacturers/suppliers/repairers which seem aimed at vintage/veteran/exotica (P J Hallewell, SAS, Borrani, Richards) but only one specifically mentioning MGB wheels - MWS. They don't say where their wheels are made, but their logo looks very like one on the inside of my Dunlops from memory, and several sites indicate MWS and Dunlop are one and the same.
Do I have tubes?
There is also the question of whether you need special 'tube' tyres when running with tubes, as some insist. Claimed to be 'essential' for safety reasons, as well as imperfections on the inside of tubeless types puncturing the tube. However in 30 years and several tyre changes the only puncture I've had so far is from a thorn, so I don't give either theory any credence with modern radials.
You can't just bang on any tyre size with tubes though, most sources show them as being suitable for just two adjacent widths e.g. 155 and 165, or 175 and 185. Having said that I've had 165s and 175s on the same tubes and not had any problems. I've seen one eBay source saying theirs is suitable for 165/175/185/195 and 60/65/70 profile, but I'm doubtful about using that on 80 profile.
Unlike with tubeless you need to do a bit of detective work with a puncture in a tube, or it could happen again and again. With the thorn mentioned above I marked the position of the valve on the tyre before removal, located the puncture in the tube in the normal way, then checked the inside of the tyre carefully in that location. It was a very small thorn that would have been difficult to spot otherwise, and I was able to remove it. I also chose to replace the tube rather than repair, using the spare that I had been carrying round in the boot for some years. I did wonder if having been folded up in the box for some years might cause problems but it has been fine for well over 10 years so far. I bought a new spare that has similarly been in the boot every since.
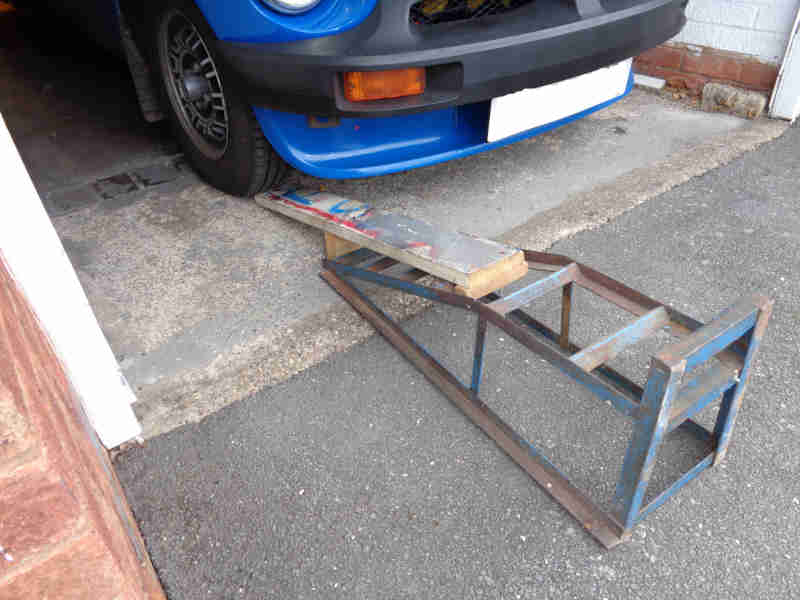 Very popular for raising one end of the car safely to work under it, but they have a couple of draw-backs. One is that they tend to skid on concrete, which some deal with by putting a board underneath the ramp with a block of wood behind the 'high' end, so the weight of the car on the board stops the ramp sliding. Another is a length of webbing tied to the ramps laid on the ground that goes under the rear wheels, but that seems a right faff. The second problem is that 25 years ago I discovered that the ST air-dam on the V8, and the rear fog lights, catch on the ramps before the car has gone high enough to clear them. Both these became immediately obvious ... but not until I had caught first one end then the other, so Something Had To Be Done double-quick as I needed to use them. I happened to have (of course) a length of planking that used to run up the stairs as part of a really naff 70s banister arrangement, supported by four iron bars (also kept until I needed them) kept back from when I replaced them with a much more tasteful polished hardwood handrail and spindles. Cut two lengths of that to about the same length as the ramps, screwed a block of wood to one end that lodges behind the tread one short of the top, with another block immediately in front of the ramps which rests on the ground to support the middle as the car goes up - pre-ramps. Simples. Many years later son need he same thing for similar reasons of clearance, and I discovered by then that commercial versions were available, such as these. But since I got the full-length ramps I very rarely use them, and when the subject came up on the MGOC forum I had to search them (the pre-ramps) out.
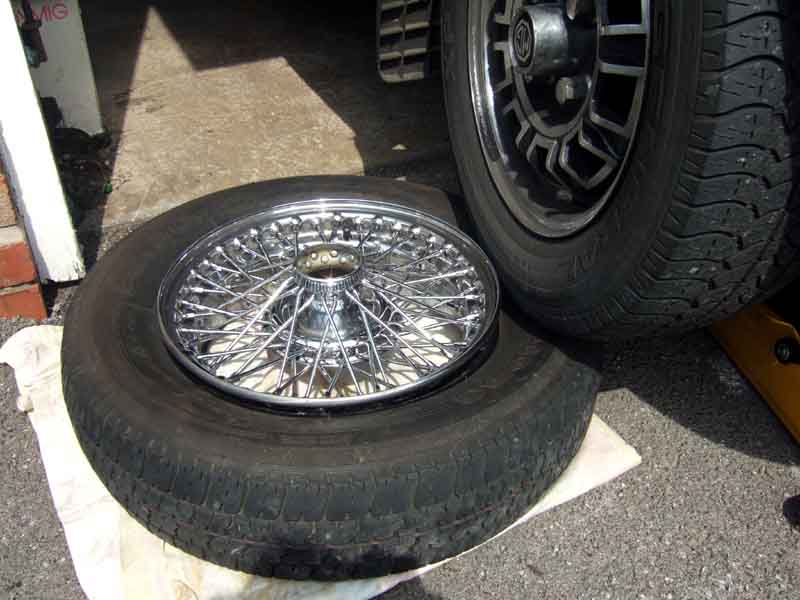 As mentioned I found that by jacking up the V8, laying the wire-wheel down under it (on some thick padding to protect the rim edge on the back of the wheel), and jacking the V8 tyre down on the sidewall of the wire-wheel tyre, the bead came free easily.
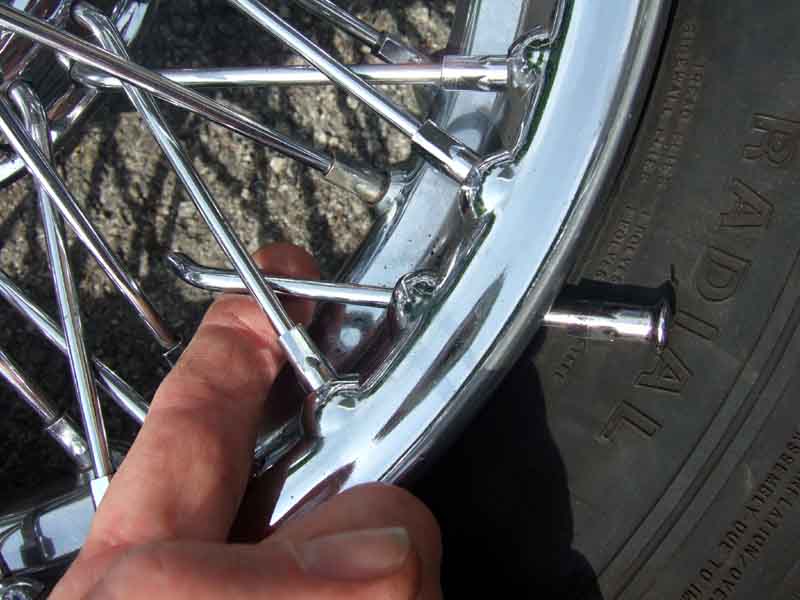 With the bead off the rim very little pressure on the sidewall presses it down far enough to get at the nipples of the short spokes (these are the only ones that break in my experience), cut the protective tape and remove the nipple complete with broken spoke through the rim. Cutting the protective tape over the short spokes doesn't matter as the tyre bead covers them and stops the tube coming into contact with any sharp edges.
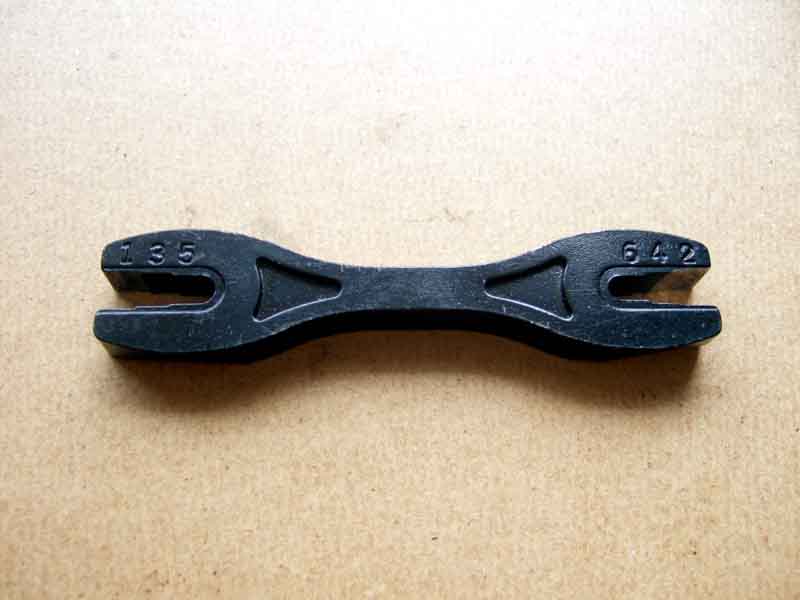 I took a good spoke as well as a broken one to Central Wheel Components at Coleshill in Warwickshire to have 10 made up at �1.50 each, and they also had a suitable spanner. This has two jaws capable of fitting six different sizes of nipple, the largest one had to be ground out very slightly to fit the MGB nipples, and the edges ground down slightly to get enough 'swing' on it as the nipples only have four flats.
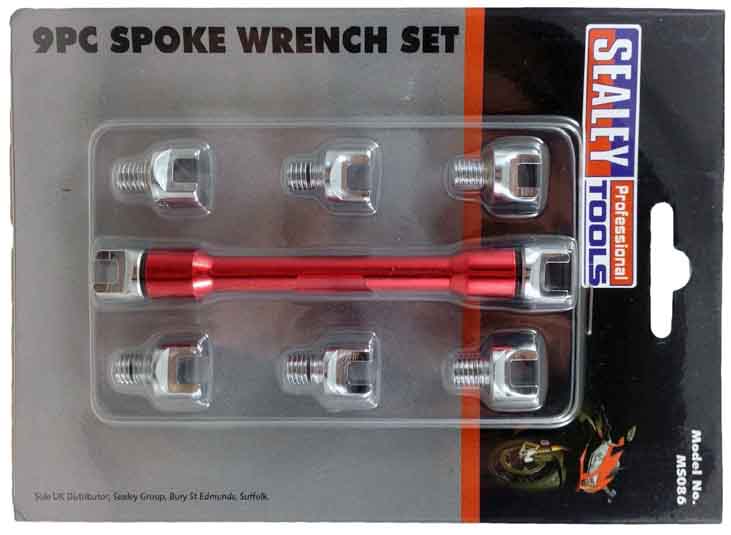 Subsequently I bought a 9pc Sealey kit - the fit is better and needs no modification.
 Picked up the new spokes a few days later. Not quite as shiny as the sample I had from them originally, but a few minutes with some Solvol Autosol soon cured that for the one spoke I needed to fit right now.
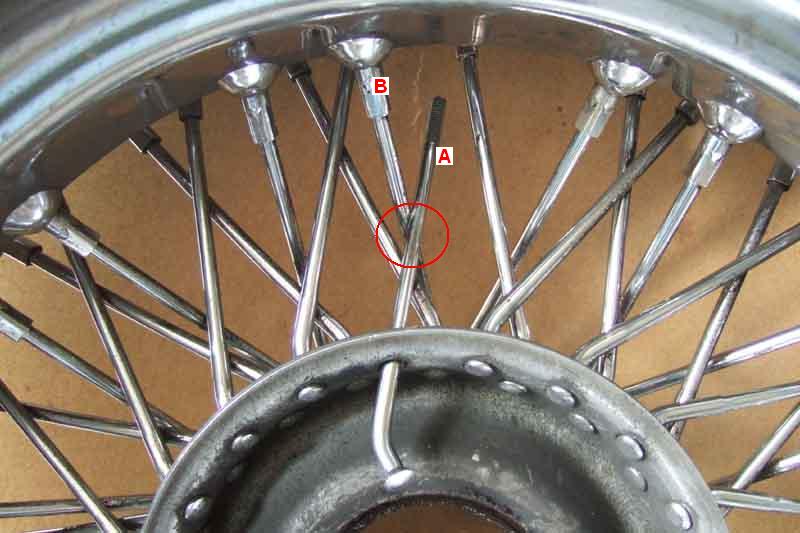 Inserting the new spoke you soon discover that one of the long spokes has to be undone and swung out of the way, as when the thicker butt of the new spoke reaches the hole in the hub it fouls and can't be pushed in any further. Be careful not to damage the protective tape over the nipples in the well of the rim or it is likely to cause subsequent punctures.
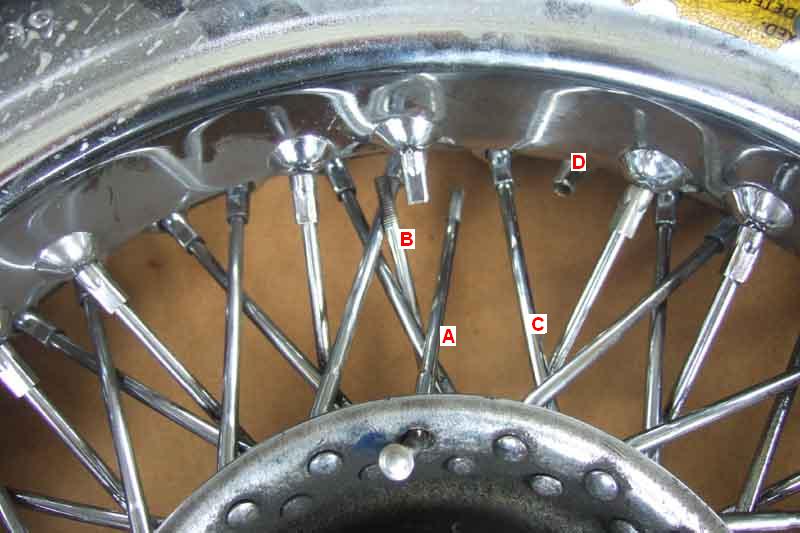 With the adjacent long spoke out of the way you then find that the new spoke can't be pushed directly to its nipple waiting in the rim as it fouls the short spoke on the other side! However inserting the new spoke nearly all the way on the wrong side of the adjacent short spoke, then swinging it past it, is the way to go.
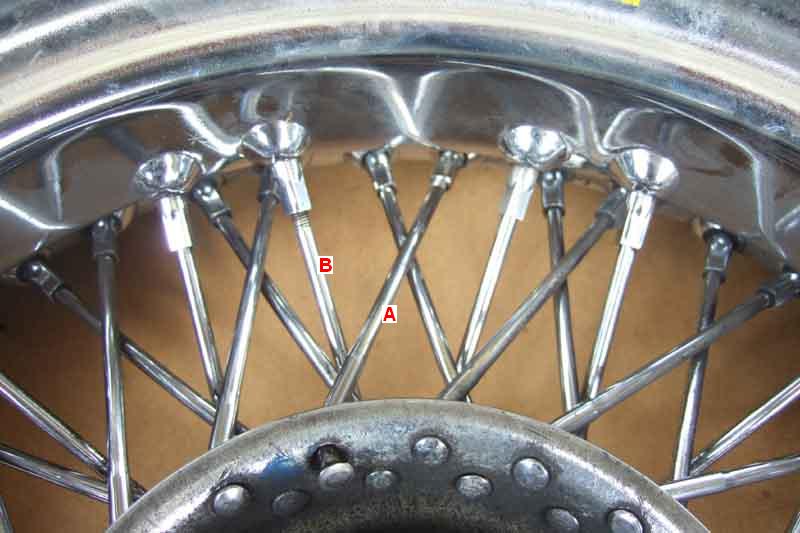 Then it's just a matter of screwing the nipples onto the two spokes and tensioning them. I just tightened until they 'pinged' at about the same pitch as the spokes around them.
 One problem I found with the stainless nipples is that they are quite a bit softer than the chrome and distorted as I tightened them. This made the jaws of the spanner loose on the one pair of flats, but the other pair of flats had bulged out so I couldn't get the spanner on them to tighten it any further. As the thread seems to be identical and the chrome nipples are in good condition I reused that instead of the new stainless. That was with the original flat black spanner, the Sealey is a much better fit and does not distort the nipples. I've never seen what my wheel repairer uses as he keeps his trade secrets by making me wait outside while he does them.
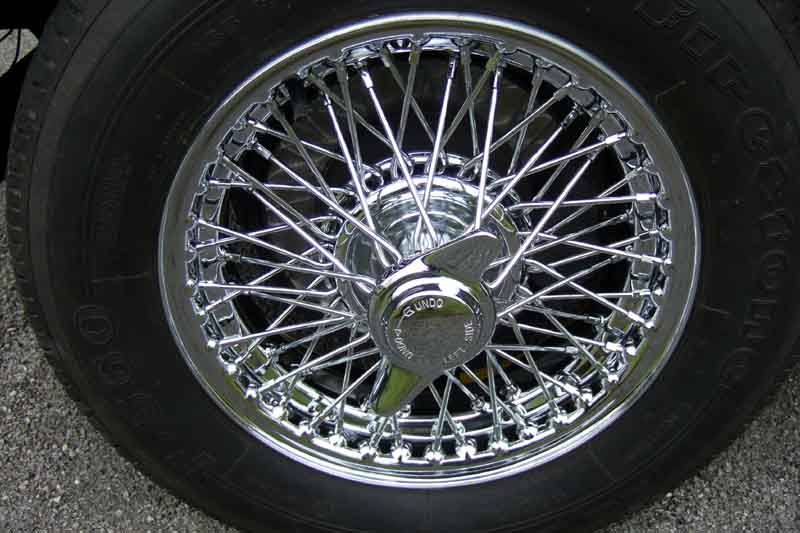 The best results with the least damage take the longest - 4 hours for four wheels. They get the following full treatment a couple of times a year, the rest of the time they have to make do with a hose brush and cold water on the car, although wheel cleaner spray and a hose off gets behind the spokes as well.. The full treatment is time-consuming and painstaking, but the results are absolutely superb against the Black Tulip paintwork in the sun. This picture was taken in May 2008, the wheels are now 19 years old and have done around 45k miles. When I was doing them prior to the Broadlands Heritage Run two neighbours stopped to admire them, the one saying they looked like diamonds sparkling in the sun as she walked past the end of the drive.
 One of the questions with wire wheels is whether they have tubes in them or not. For many years tubes were always required as the spoke holes were not sealed, but lately some wheels are apparently available with sealed spokes and so do not need tubes. It's very easy to tell with the tyre deflated, as a tube valve will push very easily through the hole in the rim, whereas a tubeless valve won't as it is sealed to the rim. It can usually be identified even with the tyre inflated, as the tubeless valve has a mushroom head both sides of the rim to form the seal, whereas a tube valve will have straight sides.